How to Add Captions on CapCut: 2 Proven Quick & Easy Methods
Captions, also known as subtitles, are essential for enhancing the accessibility and engagement of video content.
So, whether you’re creating videos for YouTube, TikTok, or Instagram, adding captions can help convey your message to a wider audience, including those with hearing impairments or those watching videos in sound-off mode.
In this guide, we’ll explore how to add captions to your videos using CapCut, the benefits of adding captions, and some tips to ensure your captions are clear and effective.
Table of Contents
What Does it Mean to Add Captions in Video Editing
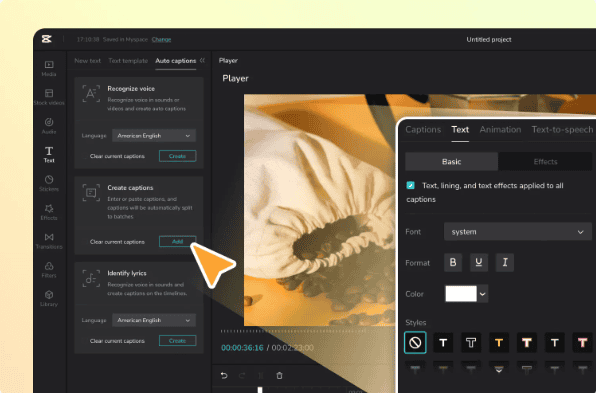
Adding captions in video editing refers to placing synchronized text on a video to display spoken dialogue, sound effects, or other relevant audio cues.
Captions are essential for accessibility, helping viewers who are deaf or hard of hearing understand the content.
They also improve engagement by allowing people to watch videos without sound, making them ideal for social media and mobile viewing.
Many video editing tools, such as CapCut, offer automatic captioning features that use speech recognition, while others allow for manual captioning to ensure accuracy and customization.
Can You Add Captions on CapCut?
Yes, you can easily add captions on CapCut. CapCut has a feature that allows you to automatically generate captions for your videos while editing.
CapCut is designed to offer flexible editing options, making it easy for users to add subtitles, adjust their appearance, and sync them with the audio.
How to Automatically Generate and Add Captions on CapCut
For users who prefer to save time or don’t want to manually input captions, CapCut offers an automatic caption generation feature. Here’s how to use it:
- Import Your Video: Import the video you want to edit into CapCut.
- Select Auto Captions: Tap on the Caption option in the menu down below on your screen, and you’ll see a choice for Auto Captions in the next screen, as shown in the image below:

- Generate Captions: CapCut will automatically analyze the audio in your video and generate captions based on the spoken words. This process usually takes a few moments, depending on the length of your video.
- Review and Edit Captions: Once the captions are generated, it’s important to review them for accuracy. You can edit the text, adjust the timing, and make any necessary changes to ensure perfect captions.
You can view a video demonstration of this step on our YouTube channel: https://youtube.com/shorts/rZisu5v0iy0
How to Add Captions Manually on CapCut
If you prefer more control over your captions, you can manually add and customize subtitles using CapCut. Here’s how to do it:
- Open CapCut and Import Your Video: Launch CapCut and import the video you want to edit.
- Tap on Text Option: Once your video is loaded, tap on the Text button located at the bottom of the screen.
- Select Add Text: Choose the Add Text option to begin typing your captions manually.
- Input Your Captions: Enter the text for your captions. You can add multiple text boxes and adjust the timing so that the captions sync perfectly with the audio.
- Customize the Appearance: CapCut allows you to customize the font, color, size, and position of your captions to match the style of your video.
- Adjust Timing: Use the timeline at the bottom of the editor to adjust when each caption appears on screen, ensuring it matches the spoken words.
Is CapCut Auto Caption Free?
Yes, CapCut offers a free auto-caption feature that uses speech recognition to generate subtitles automatically.
This makes it easy to add captions to your videos with minimal effort. While the basic auto-caption tool is free, some advanced customization options may require a CapCut Pro subscription.
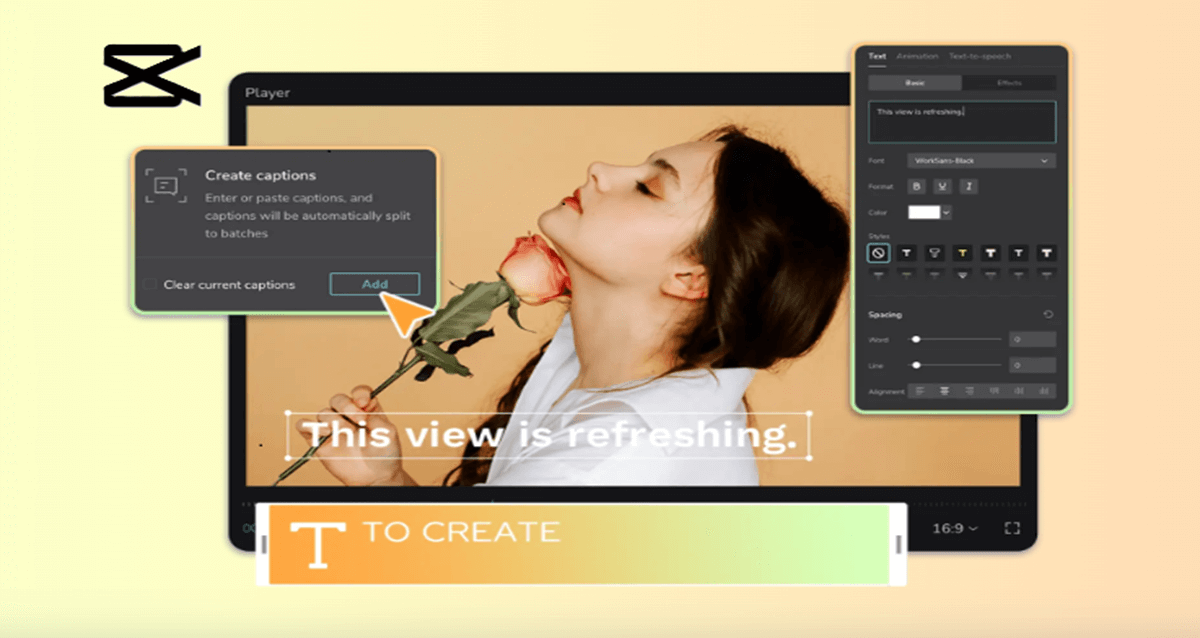
The Key Features of CapCut Caption Generator
- Automatically Synchronize Subtitles with Playback: Adding subtitles to videos has never been easier.
CapCut’s intuitive subtitle generator streamlines the process, allowing you to type your own text or paste subtitles directly with just one click.
You can clear existing captions and replace them with new ones effortlessly, ensuring accurate information delivery.
Once added, the captions are perfectly synchronized with the video playback, eliminating the need for manual adjustments and saving you valuable time. - Customize Subtitles to Make Your Videos Unique: CapCut offers creators the ability to personalize subtitles, giving their videos a distinctive look.
Using the “Captions” tab, you can view and edit all subtitles with timestamps, offering a clear preview of the final video. From font style and size to text format, color, and spacing, CapCut provides extensive customization options.
You can even add effects and animations to captions, helping your content stand out and making it visually engaging for your audience. - Upload Subtitle Files for Broader Accessibility: CapCut is set to expand its features with the ability to upload subtitle files in widely used formats like SRT.
This enhancement will enable creators to add professional captions to their videos, catering to audiences who are hard of hearing or who speak different languages.
Subtitles ensure viewers can follow your content regardless of the audio environment, aligning with modern viewing preferences and reaching a wider, more diverse audience.
Benefits of Adding Captions to Your Videos
Adding captions offers numerous benefits, both for your audience and your content’s performance. Here are some key advantages of using captions:
- Improved Accessibility: Captions make your videos accessible to a broader audience, including those who are deaf or hard of hearing.
- Increased Engagement: Many users watch videos with the sound off, especially on social media platforms like Facebook, Instagram, and TikTok. Captions help retain viewer engagement even when the sound is muted.
- Clear Communication: Adding captions ensures that your message is conveyed clearly, even in noisy environments or for viewers who may not understand the spoken language.
Captions are a powerful tool that enhance the impact and accessibility of your videos. They make your content more inclusive, allowing viewers with hearing impairments or language barriers to engage with your message.
Captions also ensure your videos are effective in sound-off environments, like public spaces or workplaces, where viewers may rely on visual cues.
Whether you’re aiming to captivate your audience or expand your reach, captions are a small addition that yields big results.
Best Practices for Using Captions in Your Videos
To ensure your captions are effective and enhance the viewer experience, consider the following best practices:
- Keep Captions Simple and Clear: Avoid using complex language or long sentences. Captions should be easy to read and understand quickly.
- Sync Captions Accurately: Ensure that the captions appear in sync with the spoken words in the video. Misaligned captions can confuse viewers.
- Choose Readable Fonts: Select a font that is easy to read, even on small screens like mobile devices.
- Use Contrasting Colors: Make sure your caption text is visible by using contrasting colors between the text and the background. For example, white text on a dark background is a popular choice.
Mistakes to Avoid when Adding Captions on CapCut Videos
While adding captions is relatively simple, there are some common mistakes to watch out for:
- Incorrect Timing: Make sure the captions match the audio perfectly. A delay in captions can frustrate viewers.
- Overcrowded Captions: Don’t try to fit too much text on the screen at once. Break up long sentences into smaller, more digestible segments.
- Poor Visibility: Ensure the captions are easy to read by using a large enough font and a contrasting background if necessary.
Conclusion
CapCut makes it easy to add captions to your videos, whether you prefer to do it manually or use the automatic caption generation feature.
Adding captions not only improves the accessibility and engagement of your content but also helps with discoverability on platforms like YouTube.
By following best practices and avoiding common mistakes, you can ensure that your captions enhance your video’s overall quality and impact.
If you’re serious about creating professional, accessible videos, take advantage of CapCut’s captioning tools and upgrade to CapCut Pro for even more customization options.
FAQs
How Do I Automatically Synchronize Subtitles with Playback?
CapCut’s subtitle generator ensures that captions sync perfectly with the video playback. Simply type or paste the text into the subtitles tool, and it automatically aligns with the timeline. This eliminates the need for manual adjustments, saving you time and effort.
Can I Customize Subtitles in CapCut?
Yes! CapCut offers extensive customization options. Under the “Captions” tab, you can edit subtitles, adjust their timing, and personalize their appearance. Choose font styles, text formats, colors, spacing, and even apply effects or animations to make your captions visually engaging.
Is It Possible to Add Subtitle Files to CapCut?
Currently, CapCut doesn’t support uploading external subtitle files, but this feature is expected to be added soon. Once available, users will be able to upload subtitle files in formats like SRT, allowing for professional-grade captions and broader accessibility.
What are the Benefits of Adding Subtitles to Videos in CapCut?
Adding subtitles improves accessibility for viewers who are hard of hearing or might not understand the audio language. Subtitles also make your videos more engaging and easier to follow, especially in sound-off environments.
Can I Delete Subtitles After Adding Them in CapCut?
Absolutely! If you need to replace or remove subtitles, you can delete them directly in the “Captions” tab. This ensures flexibility and gives you control over the final look of your video.
How Can I Add Captions to My Video in CapCut?
To add captions:
- Open your video project in CapCut.
- Tap on the “Text” or “Captions” tab.
- Select the option to type your captions manually or generate them automatically using CapCut’s subtitle tools.
- Adjust the timing of each caption to match the playback by dragging the text layers in the timeline.
Can I Customize Captions in CapCut?
Yes! CapCut lets you fully customize captions. You can change the font style, size, color, and format. Additionally, you can add effects or animations to make the captions visually appealing and tailor them to your video’s theme.
Does CapCut Offer Automatic Captioning?
CapCut provides an automatic captioning feature that detects and transcribes speech from the audio in your video. This tool syncs captions with playback in real-time, saving you the effort of manual adjustments.
How Can I Edit or Delete Existing Captions in CapCut?
To edit captions:
- Go to the “Captions” tab and select the text layer you want to modify.
- Make changes directly in the edit box, such as updating the text or adjusting the timing. To delete captions:
- Select the text layer and tap the delete option to remove it from your project.
What Are the Benefits of Adding Captions in CapCut?
Captions improve accessibility, making videos understandable for viewers with hearing impairments or language barriers. They also enhance engagement in sound-off environments, such as social media feeds, and boost SEO discoverability on platforms that index caption text.


