
CapCut Features and Capabilities: Everything You Need to Know

Video isn’t optional anymore, it’s how people communicate, sell, and grow online. The real challenge? Turning your ideas into clean, professional edits.
That’s where CapCut features and capabilities come in. From trimming and transitions to AI-powered tools, CapCut makes it easy to create polished videos without the steep learning curve of professional software.
In this guide, you’ll get a practical breakdown of CapCut’s tools, learn which features matter most, and see how to use them to make your videos sharper, cleaner, and more engaging.
What Are CapCut Features and Capabilities?
CapCut features and capabilities refer to the tools and functions that allow users to edit, enhance, and customize videos within the app.
These include basic editing tools like trimming and splitting, advanced features like keyframe animation and green screen, audio controls for improving sound quality, and export options for different platforms.
In simple terms, CapCut combines everything you need to turn raw clips into polished videos. From cutting and arranging footage to adding motion, effects, text, and clean audio, all in one editing workflow.
CapCut Features and Capabilities Overview
CapCut offers a comprehensive range of features designed to help you edit, enhance, and export videos efficiently, from basic cutting to professional-grade color grading and multi-camera workflows.
Below is a complete breakdown of its core capabilities.
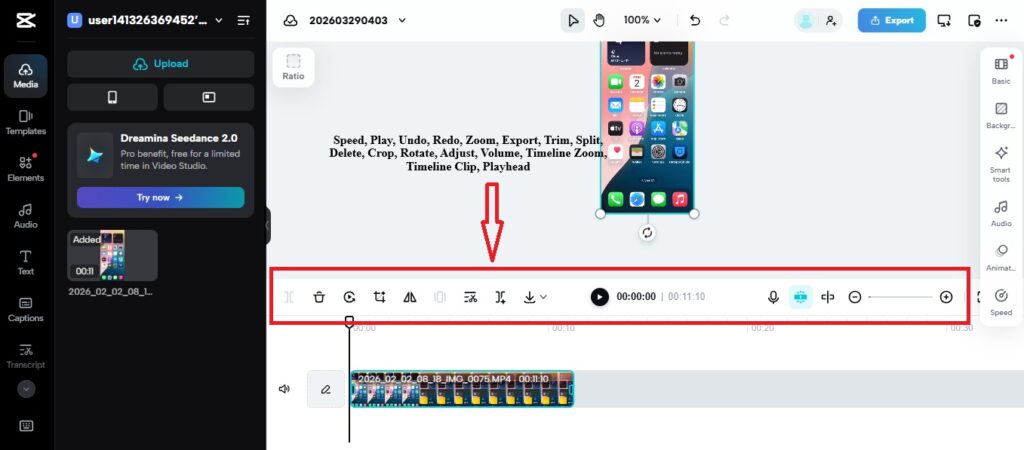
Core Editing Features
- Trim, split, and merge clips to control pacing and structure
- Drag-and-drop timeline editing for arranging scenes
- Built-in transitions for smoother scene changes
- Speed controls for slowing down or speeding up clips
- Reverse playback for creative rewind effects
- Freeze frame to highlight specific moments
Advanced Editing Capabilities
- Keyframe animation for custom motion and transitions
- Chroma key (green screen) for background replacement
- Multi-layer editing with unlimited video and audio tracks
- Advanced masking tools—linear, circular, text, and pen tool masks for selective effects
- Compound clips for nesting complex sequences into single timeline elements
- Multi-timeline workflow—create up to 50 separate timelines within one project
- Multi-camera editing—sync and switch between 4 or 9 camera angles automatically
Professional Color Grading
- Color wheels for independent shadow, midtone, and highlight control
- HSL curves for targeting specific colors by hue, saturation, and lightness
- RGB curves for channel-specific contrast and color balance
- Hue/Saturation curves for precise color range adjustments
- Custom LUT import and preset saving for consistent branding
- Float color grading for advanced precision control
3D Effects and Motion Graphics
- 3D Zoom effect creating parallax depth from static images
- 3D motion effects with rotation and perspective shifts
- 3D text animation with dimensional rotation and movement
- Layered dimensional effects combining 3D with overlays
Audio Features
- Noise reduction to remove background distractions
- Volume control and audio balancing
- Stereo balance and panning for spatial audio positioning
- Pitch shifting for vocal tone adjustments without speed changes
- Audio extraction from video clips
- Audio separation—isolate vocals, drums, bass, or instruments
- Volume envelopes for custom fade curves and dynamic changes
- Fade in/out for smoother sound transitions
Export and Platform Support
- Export videos in up to 1080p or 4K resolution (depending on device/version)
- Multiple aspect ratios (9:16, 16:9, 1:1, 4:5) for different platforms
- Hardware acceleration support (NVIDIA RTX 50-series GPU optimization)
- Optimized output for TikTok, YouTube, Instagram, and more
Want your video to look sharp and professional after export? Read the best CapCut export settings for TikTok, YouTube, and Instagram.
Smart Tools
- Auto captions for quick subtitle generation
- Background removal tools
- Beat sync for automatic cuts matched to music rhythm
- Smart reframing for automatic subject tracking when changing aspect ratios
- AI-assisted effects and enhancements
For a deeper breakdown of CapCut’s AI-powered tools and how to use them effectively, see our detailed guide on CapCut AI features.
Why CapCut Is So Popular
CapCut has quickly become one of the most widely used video editing tools, especially among content creators.
The reason is simple: it combines ease of use with powerful editing capabilities, without the steep learning curve of traditional professional software.
Here are the key reasons why CapCut stands out and has gained so much popularity among creators:
- Beginner-friendly interface: Designed so that even first-time users can start editing without confusion. Most tools are clearly labeled and easy to access.
- Powerful features without complexity: Advanced capabilities like keyframes, multi-timeline editing, professional color grading, advanced masking, and multi-camera support feel intuitive rather than overwhelming.
- Professional-grade tools at no cost: Features that usually require expensive software—like color wheels, HSL curves, multi-cam editing, and compound clips—are available in CapCut’s free version.
- Works across devices: Start editing on mobile and switch to desktop for more precise control with advanced features like the pen tool and full color grading.
- Optimized for social content: Built for TikTok, Instagram, and YouTube with smart reframing, multiple aspect ratios, and export settings tailored for modern platforms.
- Organized workflow support: Multi-timeline editing, compound clips, and project nesting allow creators to handle complex productions efficiently.
- Clean output quality: Videos exported from CapCut maintain professional visual quality with hardware acceleration support, suitable for casual or commercial content.
In short: CapCut lowers the barrier to entry while offering professional tools for polished, engaging videos—whether creating quick social clips or complex multi-camera productions.
Step-by-Step Guide to CapCut’s Full Features and Capabilities
CapCut is packed with tools that make your videos look polished and professional. Here’s how to use the key features effectively, even if you’re new to video editing.
1. Keyframe Animation
Keyframes let you animate elements like text, stickers, and video clips for smooth motion and dynamic transitions.
- Select your clip or text/sticker layer on the timeline
- Tap or click the Keyframe (diamond) icon
- Move the playhead to where you want the motion to start and add a keyframe
- Move forward in the timeline, adjust Position, Scale, Rotation, or Opacity, then add another keyframe
- Preview your animation and adjust as needed for smooth motion
Pro Tip: For advanced motion curves and bezier control, use CapCut Desktop. The mobile version supports basic keyframing but not the full graph editor. Learn more from our full Keyframe in CapCut guide.
2. Audio Cleanup & Background Noise Removal
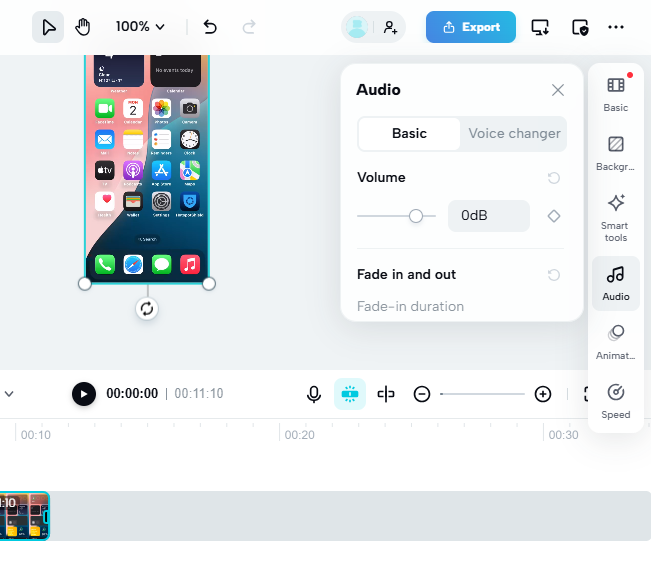
Clean audio makes your videos more professional and easier to watch, especially for vlogs or voiceovers.
- Select the clip with audio you want to clean
- Go to the Audio tab
- Turn on Noise Reduction or Enhance depending on your version
- Adjust the intensity until voices are clear and natural
- Use the Audio Mixer for stereo balance and spatial positioning
- Apply pitch shifting if you need to match vocal tones without changing speed
Remember: Always preview your edits on headphones to catch subtle background sounds.
3. Professional Color Grading
CapCut’s color grading tools go far beyond basic brightness and contrast, allowing cinema-grade correction for specific moods and consistent visual styles.
- Select your clip and open the Adjust panel
- Switch from “Basic” to “Pro” or “Curves” tab
- Use Color Wheels to set overall mood (warm vs. cool tones)
- Apply HSL Curves to make specific colors pop or mute distractions
- Use RGB Curves for channel-specific contrast control
- Create and save custom presets for consistent branding across videos
Pro Tip: Use adjustment layers to apply the same color grade to multiple clips simultaneously.
4. Advanced Masking and Selective Effects
Masking allows you to apply effects, color grades, or blur to specific areas while protecting other regions.
- Linear Mask — Gradual transitions and wipes
- Circular Mask — Spotlight effects and vignettes
- Text Mask — Creative typography effects
- Pen Tool — Custom freehand masks around irregular shapes
How to use masks:
- Select your clip and go to Mask in the effects panel
- Choose your mask shape and position it over your target area
- Feather the edges for smooth blending
- Apply effects that only affect the masked area
- Animate the mask position using keyframes for moving subjects
Practical applications: Blur faces for privacy, create “before/after” reveals, isolate subjects for color pop, or smooth skin tones selectively.
5. Chroma Key (Green Screen)
Chroma key lets you replace solid-color backgrounds with custom images or video clips for creative overlays.
- Add your background clip to the timeline first
- Tap Overlay → add your green screen clip
- Select the overlay → tap Chroma Key
- Use the color picker to select the green background
- Adjust Intensity and Shadow until edges look clean
Pro Tip: Good lighting on the green screen makes keying much easier and cleaner. Combine with masking for precise edge refinement.
6. Multi-Timeline Workflow for Complex Projects
CapCut Desktop allows you to create up to 50 separate timelines within a single project file.
- Keep raw footage organized separately from your main edit
- Create A/B versions for client review without duplicating files
- Maintain vertical (9:16), horizontal (16:9), and square (1:1) versions simultaneously
- Break long-form content into chapters for easier management
How to create timelines:
- Right-click in the timeline panel and select “New Timeline”
- Name descriptively (e.g., “Raw Selects,” “YouTube Version,” “TikTok Teaser”)
- Drag clips between timelines or copy/paste edits across versions
- Use Compound Clips to nest complex sequences within your main timeline
- Export only the active timeline
Pro Tip: Create one timeline to mark your best takes, then pull from that timeline into your main edit to keep your working timeline clean.
7. Multi-Camera Editing
For interviews, concerts, or events shot with multiple cameras, CapCut can automatically sync and switch between angles.
- Import all camera angles into your project
- Select all clips from the same scene/take
- Right-click and choose “Create Multi-Camera Clip” or use auto-sync
- CapCut aligns clips based on audio waveforms automatically
- Switch between 4 or 9 camera angles in the viewer
- Cut between angles in real-time during playback or manually select shots
Benefits: Eliminates manual alignment, allows live “director’s cut” style editing, and maintains sync even if cameras started/stopped at different times.
8. 3D Effects and Motion Graphics
CapCut includes tools to create dimensional depth and motion graphics without external software.
3D Zoom Effect:
- Automatically adds depth to static images by separating foreground and background
- Creates parallax movement that makes photos feel like video
- Adjust intensity and focus point for different moods
3D Motion Effects:
- Apply 3D rotation and perspective shifts to video layers
- Create dynamic text that rotates in 3D space
- Combine with keyframes for custom motion graphics
How to create 3D effects:
- Select your image or video clip
- Go to Style → 3D Zoom or 3D Motion
- Adjust depth intensity and motion direction
- Add keyframes to animate the 3D movement over time
- Combine with overlays for layered dimensional effects
Pro Tip: Use high-resolution images with clear subject/background separation for best results.
9. Text & Captions
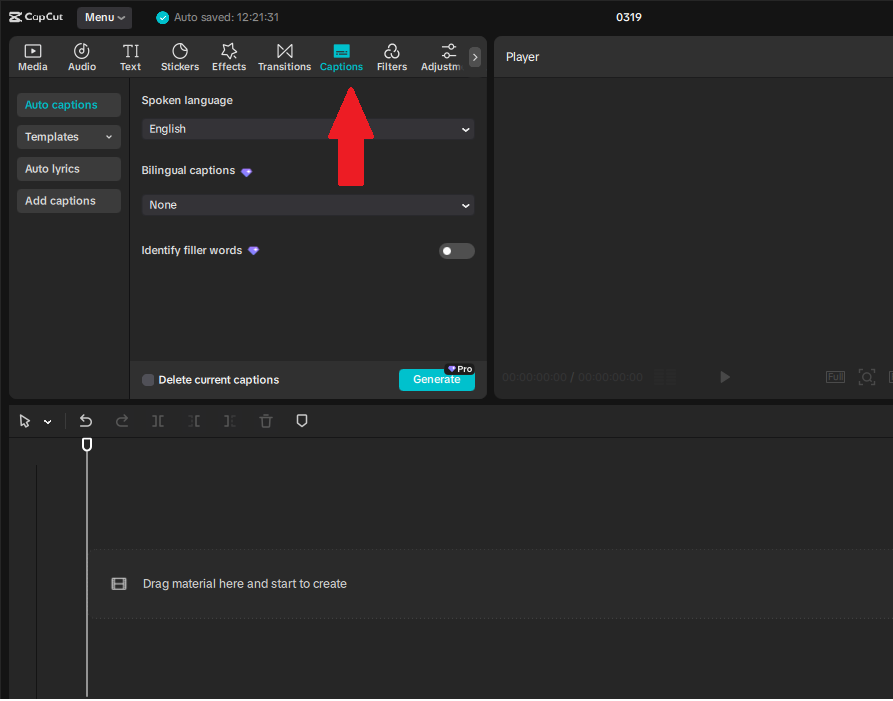
Adding text keeps viewers engaged and improves accessibility. Auto captions help save time.
- Tap Text → Add text
- Choose font, size, color, and position
- Add animations for entry/exit effects if desired
- For subtitles, use Auto Captions and proofread carefully
- Use Text Masks for creative typography effects
Pro Tip: Keep text readable for mobile screens and avoid covering faces.
10. Speed & Reverse Editing
Adjust the pace of your clips for dramatic effect or creative storytelling.
- Tap the clip you want to adjust
- Use Speed to slow down or speed up sections
- Use Reverse for rewind effects or creative transitions
- Apply Speed Ramping for smooth acceleration/deceleration
Pro Tip: Combine speed changes with keyframes for smooth ramped transitions rather than abrupt changes.
How to Use CapCut for Editing Videos (Step-by-Step Workflow)
If you’re new to CapCut, following a simple workflow will help you avoid common mistakes and keep your edits clean.
Instead of jumping between tools randomly, use this step-by-step process to stay organized and efficient.
Step 1: Start a New Project
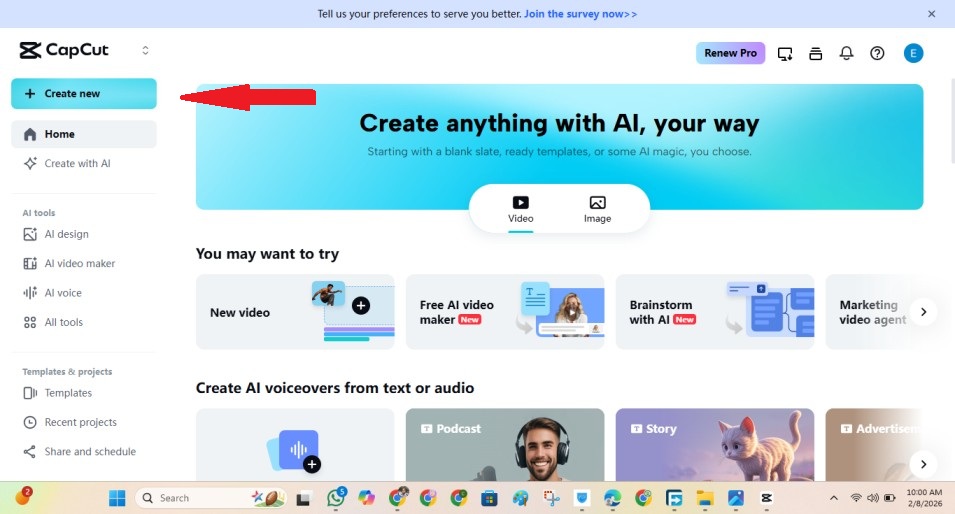
Open CapCut and create a new project. Import the video clips and images you want to use, then add them to the timeline.
- Click “New Project”
- Select your media files
- Add them to the timeline
Step 2: Trim and Arrange Your Clips
Before adding effects, clean up your footage. Remove unnecessary parts and arrange clips in the correct order.
- Drag clip edges to trim
- Use split to cut unwanted sections
- Reorder clips to match your story
Step 3: Clean Up Your Audio
Good audio makes a big difference. Fix it early so everything else builds on a clear foundation.
- Adjust clip volume levels
- Enable noise reduction if needed
- Lower background music under voice
Step 4: Add Text or Captions
Text helps guide the viewer and improves retention, especially on mobile devices.
- Add a hook in the first few seconds
- Insert captions or subtitles
- Keep text readable and centered
Step 5: Apply Effects and Basic Adjustments
Enhance your visuals, but keep it simple to avoid a cluttered look.
- Adjust brightness, contrast, and color
- Add a consistent filter if needed
- Use effects sparingly
Step 6: Add Transitions Where Needed
Transitions help smooth scene changes, but overusing them can make your video feel messy.
- Use simple transitions like fade or slide
- Apply transitions only between major cuts
- Keep duration short
Step 7: Adjust Speed (Optional)
Speed changes can improve pacing and highlight important moments.
- Speed up slow or boring sections
- Slow down key moments for emphasis
- Use speed changes intentionally
Step 8: Review and Export
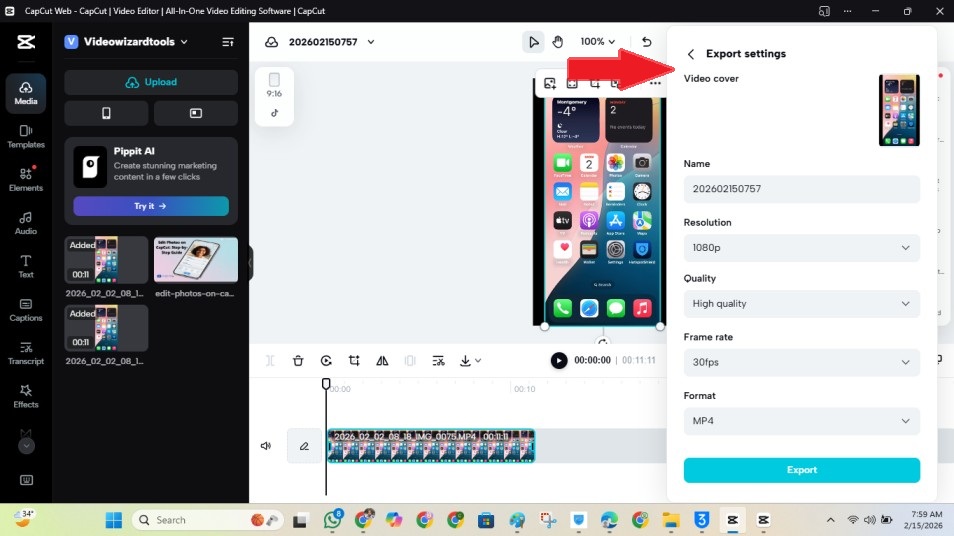
Before exporting, check your video to make sure everything looks and sounds right.
- Watch from start to finish
- Check audio clarity and balance
- Make sure text is readable
- Export in the correct format (e.g., 1080p, 9:16 for short-form)
Following this workflow keeps your editing process structured and helps you get consistent results without missing important steps.
Common Mistakes to Avoid When Using CapCut
Even with CapCut’s powerful tools, small mistakes can make your videos look unpolished. Avoid these pitfalls to keep your edits clean and professional.
1. Overusing Effects and Transitions
It’s tempting to try every effect and transition, but too many create a messy video.
- Do this instead: Pick one consistent style. Use one filter and 2–3 simple transitions max.
- Keep your video clean and easy to watch.
2. Using the Wrong Aspect Ratio
Wrong dimensions can cut off text or make your content awkward on the platform.
- Do this instead: Set your format at the start:
- 9:16 for TikTok, Reels, Shorts
- 16:9 for YouTube long videos
- 1:1 for square posts if needed
Struggling to get your videos to fit perfectly on every platform? Learn how to use CapCut for social media the right way.
3. Text That’s Too Small or Misplaced
Text should be readable on mobile and shouldn’t cover faces or key visuals.
- Do this instead: Keep text large, high-contrast, and within the “safe area” of your video.
4. Ignoring Audio Levels
Poor audio can ruin even the best-looking video.
- Do this instead: Balance voice, background music, and sound effects so dialogue is clear.
5. Not Saving Backup Versions
CapCut can crash, or accidental edits may happen.
- Do this instead: Duplicate your project before making major changes, and export a draft copy.
6. Skipping Keyframes for Important Motion
Linear movement looks robotic. Without keyframes, smooth zooms, text animations, and motion graphics will feel stiff.
- Do this instead: Use keyframes for motion, scale, rotation, or opacity to make animations feel natural.
- Tip: For advanced easing, combine with your CapCut AI features workflow to enhance timing and motion.
Avoiding these mistakes will save editing time, prevent frustration, and make your videos look more professional—even if you’re a beginner.
CapCut Teams & Collaboration: Work Smarter Together
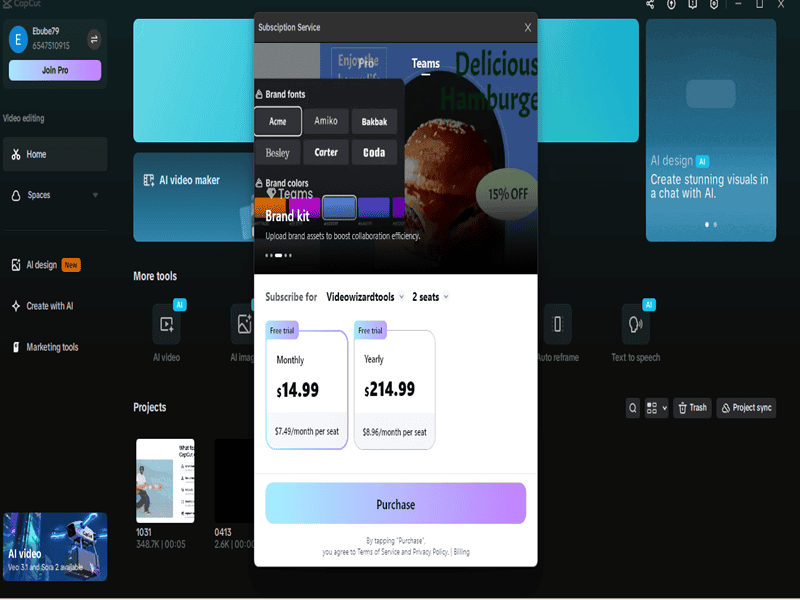
Collaborating on video projects can get messy without the right tools. CapCut Teams streamlines teamwork by letting multiple editors work on the same project, share assets, and maintain consistency—all without bouncing files back and forth.
What CapCut Teams Offers
- Team Collaboration Tools: Multiple editors can contribute to a project simultaneously.
- Shared Workspace (Teamspace): Keep projects, templates, and brand assets organized in one central hub.
- Multiple Logins & Permissions: Assign roles for editors, reviewers, and approvers to maintain workflow control.
- Cloud Storage: Store logos, fonts, and reusable clips for consistent branding across edits.
- Cross-Device Access: Work on desktop or mobile without exporting and re-importing projects.
Who Should Use CapCut Teams?
- Small businesses managing a content calendar with multiple editors.
- Creators working with clients who require an approval workflow.
- Freelancers collaborating on short-form content projects.
- Teams producing videos regularly across multiple platforms.
Pro Tips for Smooth Team Editing
- Standardize Templates: Create intro/outro sequences, lower thirds, and caption styles in Teamspace for brand consistency.
- Version Control: Duplicate projects before major edits to avoid overwriting important work.
- Leverage Shared Assets: Upload commonly used clips, overlays, and music so every team member has access.
Want details on CapCut Teams pricing and plans? Check out our full CapCut Pro for Teams guide for the latest subscription options.
Frequently Asked Questions About CapCut Features and Capabilities
What are the essential CapCut features for beginners?
Start with trimming, splitting, adding text & captions, and noise reduction. Once comfortable, explore keyframes, chroma key, and speed adjustments for more polished edits.
Which CapCut features make videos look professional quickly?
Captions plus clean audio are the quickest upgrades. Clear text keeps viewers engaged (even on mute), while noise reduction makes your video feel higher quality instantly.
Is CapCut free or do I need a paid plan for these features?
CapCut’s free version includes most essential editing tools including trimming, splitting, keyframes, chroma key, and 1080p export with no watermark. Paid plans mainly unlock 4K export, unlimited AI features (auto-edit, captions, background removal), 100GB cloud storage, and premium templates. Pro costs $7.99/month.
Does CapCut have auto captions?
Yes, CapCut includes AI-powered auto captions on both free and paid plans. The free version offers 10 minutes of auto captions per video, while Pro provides unlimited captions. Always proofread results as auto captions can misinterpret names, slang, or accents.
How do I use keyframes in CapCut?
Add a keyframe at the start of your clip, move forward in the timeline, adjust position/scale/rotation, then add another keyframe. CapCut animates movement between them. For advanced motion timing with bezier curves and graph editing, use CapCut Desktop—mobile supports basic keyframing but not the full graph editor.
Why does my CapCut video look blurry after exporting?
Common causes include exporting at low resolution (720p), heavy compression, or repeatedly re-uploading files. Free users can export up to 1080p, while Pro supports 4K/60fps/HDR for sharper output. Export at the highest resolution available and upload the exported file directly without re-compression.
Can I use CapCut keyframe graphs on mobile?
No. Mobile supports basic keyframing (position, scale, opacity), but full bezier curves and graph editing require the desktop version. For advanced curve control and professional motion design, switch to CapCut Desktop on Windows or Mac.
How do I fix keyframe curves that don’t appear or respond?
Check that you’re viewing the correct property in the graph panel dropdown. Ensure at least two keyframes exist—one keyframe alone won’t show motion. Move the playhead or press Enter/Return to refresh the preview cache. If the panel is blank, close it, select another clip, then reselect your original clip and reopen.
Why is the graph panel lagging or freezing?
Too many keyframes or a complex timeline can cause lag. Reduce unnecessary keyframes and keep only essential points. Lower preview quality in settings and close background apps to improve performance. On older systems, dense animations may make the graph feel unresponsive.
What AI features does CapCut offer?
CapCut includes AI auto-captions, background removal, smart reframing, beat sync, text-to-speech, voice cloning, and AI video/image generation. Free users get limited monthly uses (5 auto-edits, 3 AI effects, 5 background removals), while Pro subscribers get unlimited access to all AI tools.
Does CapCut work offline?
Yes, CapCut can work offline for basic editing tasks like trimming, splitting, and applying local effects. However, certain features—such as accessing the sound library, downloading templates, cloud sync, and AI-powered tools—require an internet connection.
Conclusion & Next Steps
CapCut is one of the most versatile video editors for creators, combining beginner-friendly tools with professional-grade features.
By mastering keyframes, captions, audio cleanup, and core effects, your videos can look polished and engaging without hours of editing.
Remember: linear motion is fine for simple edits, but for smooth, natural animation, keyframes and the graph editor make all the difference.
Keep your workflow organized, finalize rough cuts first, and avoid overloading your timeline with unnecessary effects.
Want to explore more ways to make your edits smarter? Check out our CapCut AI Features guide to see how smart automation can speed up your workflow and elevate your motion design.
Curious about advanced plans or team collaboration? See our CapCut Pricing & Plans guide for a detailed breakdown.
Next, practice one key feature at a time. Add keyframes to a short clip, clean the audio, or try a chroma key effect.
Gradually stacking these skills will turn your content from basic to professional-ready.