
CapCut Keyframes Not Working? 8 Easy Fixes (Mobile & PC)

You tap the screen. Tap again. The diamond icon refuses to appear—or worse, your keyframes sit there doing nothing while your video stays frozen.
CapCut keyframes not working issues kill your editing momentum. Whether you’re editing TikToks on your phone or producing content on a desktop, these failures follow predictable patterns.
This guide walks you through exactly why keyframes break and how to fix them in minutes.
Who this is for: Mobile editors (iPhone/Android), PC/Mac users, beginners struggling with the basics, and intermediate editors hitting unexpected walls. If you’ve ever screamed, “Why won’t this animate?” you’re in the right place.
What you’ll fix: Missing keyframe buttons, static animations that refuse to move, lost keyframes after trimming, choppy exports, and sync issues that ruin your final video.
New to keyframing? Start with our complete CapCut keyframe guide to master the fundamentals, then return here when something breaks.
Why Are Your CapCut Keyframes Not Working?

Most troubleshooting guides skip this part. They throw fixes at you without explaining why things are broken.
Here’s the thing: keyframes fail for three core reasons, and understanding them saves you hours of frustration.
Keyframes are markers that tell CapCut, “Remember this setting at this exact moment.” Set one keyframe at 0 seconds (video at 100% size), another at 2 seconds (video at 150% size), and CapCut animates the growth between them.
Simple in theory. But three things break this system:
1. Wrong Layer Selected
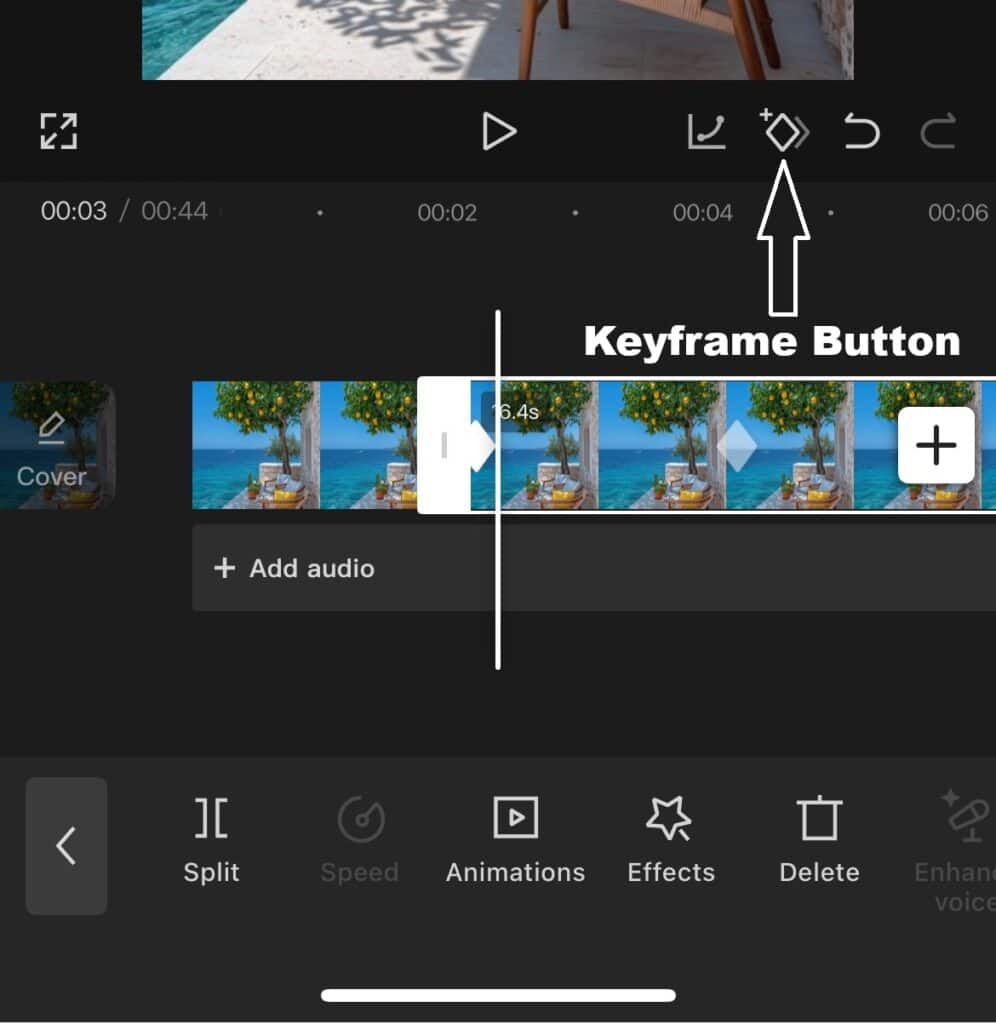
CapCut’s keyframe button is context-sensitive. It only appears when you’ve selected a clip that supports animation.
Select a transition, audio file, or certain stickers, and the diamond icon vanishes. This isn’t a bug, it’s CapCut telling you that the element can’t be keyframed.
2. No Value Change Between Keyframes
Two keyframes with identical values produce zero motion. CapCut sees “100% scale” at point A and “100% scale” at point B and correctly determines that nothing needs to be animated. Beginners often set the second keyframe before changing the value, creating invisible animation.
3. Timeline Mismatch
CapCut uses absolute timestamps for keyframes. Trim your clip’s start, and every keyframe shifts backward with it. Split a clip, and keyframes might land in the deleted section. Variable frame rate (VFR) footage from screen recordings causes timing drift between preview and export.
Quick Fix Checklist (Try These First)
Before diving into detailed fixes, run through this 30-second diagnostic:
| Check | Action |
|---|---|
| Correct clip selected? | Tap the video on the timeline (not preview) until you see a white border/highlight |
| Playhead positioned correctly? | Scrub to the middle of your clip—the keyframe button only appears when inside clip boundaries |
| Values actually different? | Set keyframe 1, move forward, change the value significantly (e.g., 100% → 150%), then set keyframe 2. Identical values = zero motion |
| Keyframes visible? | Look for red diamonds on the clip (mobile) or right-click clip → “Show keyframe animation” (desktop) |
| App restarted? | Force-close completely and relaunch—updates sometimes require a fresh start to activate keyframe features |
Still broken? The detailed fixes below cover platform-specific quirks and edge cases.
8 Fixes for CapCut Keyframes Not Working
Fix 1: Keyframe Button Missing or Grayed Out
Symptoms: You select a clip, but the diamond icon doesn’t appear in the toolbar (mobile) or the keyframe checkbox stays inactive (desktop).
Root Cause: 90% of the time, you haven’t selected the correct layer type, or you’re looking in the wrong panel.
Mobile Fix (iPhone/Android):
- Tap the video clip on the timeline, not the preview screen
- Look for the white border around the clip thumbnail
- The bottom toolbar now shows the diamond icon between “Split” and “Speed”
- If still missing, verify the playhead sits within the clip boundaries (not in empty timeline space)
- Check that you’re not trying to keyframe audio, transitions, or certain stickers—these don’t support keyframes
Desktop Fix (Windows/Mac):
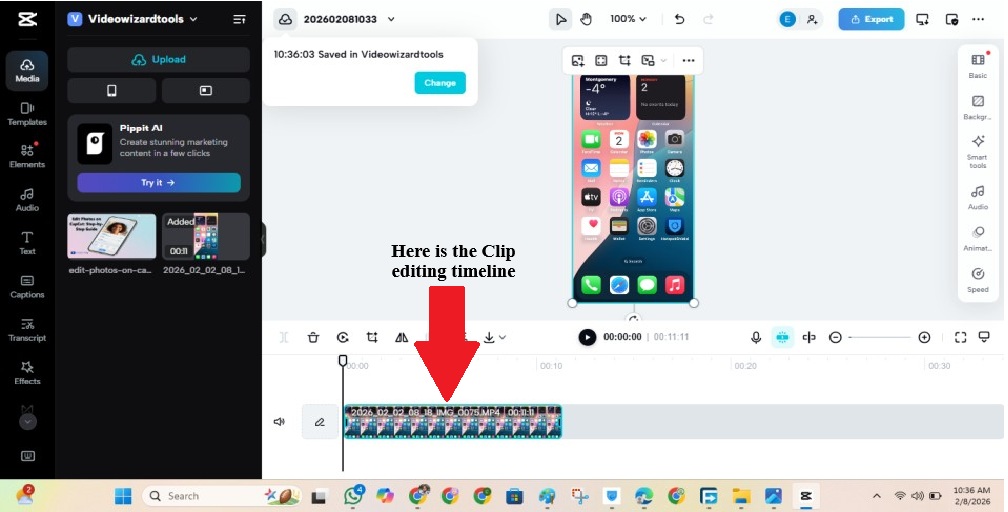
- Click the clip on the timeline to select it
- Look at the right-side Video panel
- Find any property (Position, Scale, Rotation, Opacity)
- The diamond icon appears to the right of the value field
- If grayed out, ensure you’re in “Professional” mode—switch from “Basic” in Settings → Interface
Important: Always verify selection by checking for the white border (mobile) or highlighted clip (desktop) before hunting for keyframe controls. If the diamond doesn’t appear, you selected the wrong thing.
Fix 2: Keyframes Set But No Animation Plays
Symptoms: Red diamonds appear on your timeline, but the property stays static during playback.
Why Identical Values Kill Motion:
You set two keyframes, but both read “Scale: 100%.” CapCut calculates the difference between values, finds zero, and renders nothing. This is the #1 beginner mistake—setting the second keyframe before adjusting the value.
How to Verify Properly:
- Scrub to each keyframe (tap the red diamond to jump to it)
- Check the property value at each point
- If values match: Delete the second keyframe, move playhead forward, change the property significantly (e.g., scale 100% → 150%), then tap the keyframe button again
Graph Editor Check (Desktop):
Right-click clip → “Show keyframe animation.” If the line is flat between keyframes, your values are identical. Look for a horizontal line with dots at the same height—this confirms the problem.
Pro Tip: When testing, exaggerate movement first. Scale 100% to 200% is obvious. Scale 100% to 105% might look like a glitch. Once you see motion working, dial back to subtle levels.
Fix 3: Keyframes Disappear After Trimming or Splitting
Symptoms: You cut a clip or adjust its speed. Keyframe markers vanish from the timeline.
Why CapCut Uses Absolute Timing:
Keyframes attach to specific timestamps (e.g., 2.5 seconds into the project), not relative positions within clips. Trim 1 second from the start of your clip, and every keyframe shifts 1 second earlier. If that pushes a keyframe before the clip’s new start time, CapCut deletes it .
The Mistake Most Beginners Make:
They rough-cut their timeline, then add keyframes, then continue trimming. Each trim risks pushing keyframes into the void.
Recovery vs Prevention:
Before trimming (prevention):
- Always finalize your rough cut before adding keyframes
- Or, split clips at keyframe points first, then trim the segments independently
After trimming (recovery):
- Undo immediately (Ctrl/Cmd + Z or mobile shake-to-undo)
- If too late: Split the clip at the keyframe location before trimming
- For speed changes: Delete and rebuild keyframes—CapCut doesn’t auto-adjust keyframe timing to new durations
Smart Workflow Order:
- Import footage
- Rough cut (trim/split to final timing)
- Add keyframes
- Color/audio polish
- Export
This sequence prevents 80% of keyframe loss issues.
Fix 4: Choppy or Laggy Keyframe Animation
Symptoms: Motion looks smooth in preview, but exports with jerky, stepped movement. Or the preview itself lags.
Keyframe Spacing Explained:
CapCut calculates motion between keyframes. Place them too close together (under 0.5 seconds), and the math gets unstable. The animation has no room to breathe.
Minimum spacing guidelines:
- 15 frames at 30fps (0.5 seconds)
- 30 frames at 60fps
- Sweet spot: 1-2 seconds for most effects
FPS Mismatch Breakdown:
Check your project settings (gear icon → Resolution & Frame Rate). If your source footage is 60fps but your project is 30fps, CapCut drops frames unevenly. If your footage is 30fps but your project is 60fps, CapCut invents frames that don’t exist, creating stutter.
Performance vs Export Difference:
Mobile preview lag often fixes itself in export. Desktop exports that look choppy usually indicate timeline FPS mismatches, not preview performance issues.
Easing (The Engagement Booster):
Linear keyframes (default) move at constant speed, which looks robotic. Add easing for natural motion:
- Desktop: Right-click keyframe → Ease In-Out
- Mobile: Tap graph icon next to the property, select curve preset
Easing simulates real-world physics—objects accelerate and decelerate. This single change makes amateur animation look professional.
Fix 5: Keyframe Graph Not Showing (PC/Mac)
Symptoms: You right-click a clip with keyframes, select “Show keyframe animation,” but the graph panel appears empty or flat.
Property Selection Issue:
The graph panel shows one property at a time. Look for dropdown menus labeled “Position,” “Scale,” “Rotation.”
Click the property you actually animated. If you keyframed Scale but the panel shows Position, you’ll see a flat line.
UI Bugs and Fixes:
CapCut PC shows all properties simultaneously in the list, but only the selected property displays its curve. Click between the Position, Scale, and Rotation tabs to verify each animated property.
Hidden Panels Walkthrough:
- Right-click the clip on the timeline
- Select “Show keyframe animation.”
- Look for the property list on the left side of the panel
- Click the animated property name (not the checkbox)
- The graph should populate with your keyframe curve
Mac-Specific Fix:
If the panel won’t open, try Option + K to force keyframe view. If still broken, restart CapCut—macOS Ventura and earlier have a known UI bug where panels freeze until restart.
Fix 6: Audio Keyframes Not Working (Volume Not Changing)
Symptoms: You set volume keyframes on music (high → low → high), but the audio plays at constant volume.
Wrong Track Selection (Very Common):
You keyframed the video track’s audio instead of the music track. CapCut treats these as separate layers.
How Audio Keyframes Differ Visually:
- Video keyframes: Red diamonds
- Audio keyframes: White diamonds on the audio waveform
If you see red diamonds on your music track, you selected the wrong layer.
Step-by-Step Fix:
- Select the music track (bottom timeline layer), not the video
- Verify keyframe location: White diamonds should appear on the audio waveform
- Check dip depth: 20-30% volume reduction is subtle—test with 0% to confirm keyframes work
- Replace the music file with a known good MP3 or WAV if issues persist—some M4A files ignore keyframes
Proper Ducking Pattern:
For background music that dips under dialogue, use this 4-keyframe structure:
- Keyframe 1: Full volume (before speech starts)
- Keyframe 2: Reduced volume (as speech starts)
- Keyframe 3: Reduced volume (hold through speech)
- Keyframe 4: Full volume (after speech ends)
This creates a clean “duck” without jarring volume jumps.
Fix 7: Mask Keyframes Missing (CapCut Pro Users)
Symptoms: You have CapCut Pro, but can’t find mask keyframe controls.
Free vs Pro Confusion:
Free users see the mask tool but can’t keyframe it. Pro users get keyframe options, but only if they follow the correct sequence.
Correct Workflow Sequence:
- Verify Pro status: Look for the crown icon—if missing, re-login to restore subscription
- Apply mask first: Add mask (Overlay → Mask shape)
- Select the mask layer: The mask is a separate timeline element, not a property of the video
- Keyframe the mask layer: With the mask selected, keyframe Position and Scale to move the masked window
Limitations (Building Trust):
CapCut Pro only keyframes mask position and scale, not mask shape. You cannot animate a circle mask morphing into a square using keyframes. For animated shape changes, use multiple mask clips with crossfades between them.
This limitation exists across all platforms. Knowing it saves you from hunting for nonexistent controls.
Fix 8: Keyframes Out of Sync After Export
Symptoms: Animation timing looks perfect in preview, but the exported video shows keyframes happening too early or late.
VFR vs CFR Explained:
- CFR (Constant Frame Rate): Every second contains exactly 30 or 60 frames. Professional cameras shoot CFR. CapCut handles this perfectly.
- VFR (Variable Frame Rate): Frame rate fluctuates based on content complexity. Screen recordings, mobile game captures, and some webcams use VFR to save file size.
CapCut’s timeline assumes CFR. VFR footage causes timing drift—keyframes trigger at the wrong moments because the frame count doesn’t match real time.
Why Preview Lies:
CapCut’s preview engine handles VFR differently from its export engine. What looks synced in preview desynchronizes in the final render.
Tools to Fix It:
Convert VFR to CFR before importing:
- HandBrake: Free, open-source, set “Constant Framerate” in video settings
- Shutter Encoder: Professional tool with batch conversion
- FFmpeg: Command-line option for advanced users
Workarounds Inside CapCut:
If stuck with VFR footage:
- Add “hold keyframes” (two identical keyframes close together) to force timing stability
- Avoid keyframing on VFR clips entirely—use static adjustments instead
- Export individual clips, re-import as new footage (bakes in the timing)
Prevention: Always check footage specs before starting keyframe-heavy edits. Screen recordings are the worst offenders for VFR issues.
Tips to Prevent Keyframe Problems
Always finish rough cut first: Keyframing on a locked timeline prevents loss from trimming. This one habit eliminates Fix #3.
Use fewer, more meaningful keyframes: Beginners add 10 keyframes for a simple zoom. You need 2. Excess keyframes create choppy motion and make editing harder. Space them 1-2 seconds apart, minimum.
Match FPS before editing: Check your source footage properties, then set project settings to match before adding a single keyframe. This prevents choppy exports and sync drift.
Test animations early: Before building a complex 20-keyframe sequence, test a simple 2-keyframe zoom. Confirm it exports correctly. If basic motion works, complex motion will too.
When to Fix vs When to Rebuild Keyframes
Sometimes troubleshooting takes longer than starting fresh. Here’s the decision matrix:
| Scenario | Action | Time |
|---|---|---|
| 2-3 keyframes on short clip | Delete and rebuild | 2 minutes |
| Complex 10+ keyframe animation | Copy clip, delete video, keep animation layer | 5 minutes |
| Entire project broken | Export individual clips, re-import as static footage | 20 minutes |
Time vs Complexity Decision:
If you’ve spent 10 minutes debugging 3 keyframes, rebuild them. If you’ve spent 10 minutes on a complex multi-property animation, keep debugging—you’ve invested too much to start over.
Fast Recovery Workflows:
- Copy animation: On desktop, right-click clip → “Copy” → select new clip → “Paste attributes” to transfer keyframes without rebuilding
- Save presets: CapCut Pro users can save keyframe animations as presets for reuse
- Backup before trimming: Duplicate your timeline before major cuts if keyframes exist
Test Your Keyframes (Simple 2-Step Method)
Before committing to a complex edit, verify your keyframes work:
Step 1: Basic Zoom Test
- Import any clip
- Set keyframe at start: Scale 100%
- Move 2 seconds forward
- Set keyframe: Scale 150%
- Play back
You should see a smooth zoom. If this works, your CapCut installation is healthy.
Step 2: Confirm Export
Export the 2-second test clip. If the Zoom plays correctly in the exported file, your project settings are correct. If the preview shows motion but the export doesn’t, you have VFR footage (see Fix #8).
FAQs on CapCut Keyframe Problems
You likely selected the wrong layer type (audio, transitions, or stickers don’t support keyframes) or your playhead sits outside the clip boundaries. Select the video clip on the timeline, ensure white border/highlight appears, and position playhead inside the clip.
Mobile: Tap the clip on the timeline (not preview) until you see a white border. Desktop: Switch from “Basic” to “Professional” mode in Settings → Interface. The button only appears for animatable properties.
Your keyframes have identical values. Delete the second keyframe, move playhead forward, change the property value significantly, then add the keyframe again. Two keyframes with the same number produce zero motion.
Yes. Tap clip → look for diamond icon in toolbar. Mobile supports Position, Scale, Rotation, and Opacity keyframes. Some advanced features (graph editor, easing curves) are desktop-only.
Variable frame rate (VFR) footage causes timing drift. Convert your source files to constant frame rate using HandBrake before importing into CapCut.
Conclusion
CapCut keyframe problems follow patterns. Once you recognize whether it’s a selection issue, timing issue, or technical limitation, the fix usually takes under 30 seconds.
Start with the quick checklist. If that fails, identify your specific symptom in the 8 fixes above. Most issues are resolved by selecting the correct layer, spacing keyframes properly, or matching your project FPS to source footage.
Fix your current problem using the steps above, then run the 2-step zoom test. When basic motion works reliably, expand to complex multi-property animations with confidence.
Ready to level up your editing? Explore our complete CapCut keyframe guide to move from fixing problems to creating professional motion design.