
How To Export CapCut Without Pro (Step-by-Step Guide)
Struggling with CapCut forcing you to upgrade to Pro before exporting? You’re not alone. Many users hit a wall when trying to save their videos, only to see a “Join Pro” popup blocking their export.
The good news: you can export CapCut without Pro, but only if you avoid certain pitfalls. This comprehensive guide shows you exactly how to fix export issues, troubleshoot error messages, and get your videos saved for free.
CapCut has emerged as one of the most popular video editing applications available currently, offering powerful editing capabilities that rival professional desktop software.
However, as CapCut has evolved, so has its monetization strategy. While the free version remains robust, many users encounter frustrating moments when attempting to export their carefully crafted projects.
Can You Export CapCut Videos Without Pro?
Yes, you can export videos from CapCut without a Pro subscription. The free version allows basic exports at up to 1080p resolution, which is sufficient for most social media platforms including TikTok, Instagram, YouTube Shorts, and Facebook Reels.
However, there are specific limitations that every free user should understand before beginning their editing journey:
- Watermark considerations: Free exports include a CapCut watermark or ending clip (unless properly removed through the method described later in this guide)
- Resolution restrictions: 4K export is exclusively locked behind the Pro subscription tier
- Pro feature blocking: If your project uses premium effects, templates, or assets, CapCut will not let you export without upgrading to the paid version
Critical point to understand: If CapCut is blocking your export entirely, preventing you from saving your video to your device, this is not a technical glitch or bug in the application.
You have almost certainly incorporated Pro-only features into your project timeline, and the application is enforcing its paywall at the export stage.
This is a deliberate business strategy to encourage subscriptions while still allowing genuine free use for basic editing needs.
The free version of CapCut is genuinely free, you do not need to provide payment information or sign up for a trial to access core functionality.
This distinguishes CapCut from many competitors that offer only time-limited trials or watermark-heavy exports.
But the boundary between free and paid features has become increasingly blurred as CapCut expands its premium offerings, making it essential for users to understand exactly what triggers the Pro requirement.
Does CapCut Add a Watermark in the Free Version?
Yes, CapCut does add watermarks to free exports, but the situation is more nuanced than many users initially realize.
Understanding the different types of watermarks and how they appear is crucial for creating clean, professional-looking content without surprises.
CapCut adds watermarks in two distinct ways, and confusing these two types leads to the common frustration of “I removed the watermark but it’s still there”:
Type 1: The “Made in CapCut” Ending Clip
This is the most visible and commonly recognized watermark. It appears as a branded outro automatically appended to the end of your video timeline.
The ending clip typically features the CapCut logo and animation, lasting approximately 1-2 seconds. This element is physically present in your project timeline and can be manipulated like any other clip.
Type 2: Asset-Based Watermarks
These are more insidious and harder to remove. When you use premium templates, stock footage, certain advanced effects, or Pro-only music tracks, CapCut embeds a semi-transparent watermark directly into the video frame during the export process.
This watermark appears throughout the entire video or during specific segments where the premium asset is used.
Critical correction of common misinformation: Many online guides and tutorials claim that you can “easily remove” all watermarks in the free export settings or through simple toggles. This information is outdated, misleading, or simply incorrect.
While you can delete the ending clip from your timeline with a simple tap, asset-based watermarks from Pro features cannot be removed without subscribing to CapCut Pro. There is no setting, hack, or workaround that removes these embedded watermarks while maintaining the premium feature in your video.
If you see a watermark embedded in your video preview (appearing as a semi-transparent logo overlaid on your actual footage, not just as a separate clip at the end), this definitively indicates that you are using Pro assets that require payment to export cleanly.
The only solutions are to remove the premium asset or upgrade to Pro.
How To Export CapCut Without Pro (Step-by-Step)
Follow these comprehensive steps to successfully export your video without encountering the Pro paywall:
Step 1: Audit Your Project for Pro Features Before Exporting
Before you even reach the export screen, perform a thorough audit of your entire project:
- Scroll through your entire timeline slowly, examining each element
- Look for the diamond icon or “Pro” badge on any effects, transitions, filters, or templates
- Check your text overlays, some font styles, and text animations are Pro-only
- Review your audio tracks, premium music from CapCut’s library often requires a subscription
- If you find any Pro indicators, replace them immediately with free alternatives or delete them entirely
Step 2: Remove the CapCut Ending Clip
The ending clip is the easiest watermark to eliminate:
- Navigate to the end of your timeline by scrolling right or using the timeline scrubber
- Identify the CapCut logo clip. It’s usually clearly branded and separated from your content
- Tap the ending clip to select it (it should highlight with a border)
- Tap the Delete button (trash can icon) to remove it completely
- Verify the clip is gone by checking that your timeline ends with your actual content
Step 3: Verify No Premium Assets Remain
Double-check these commonly overlooked areas:
- Audio verification: Premium music tracks will block export or add watermarks. Use your own imported music or royalty-free tracks from external sources
- Sticker inspection: Browse your used stickers—Pro versions display a lock icon or diamond symbol
- Effect confirmation: AI effects, advanced beauty filters, and cinematic color grades are often premium
- Transition check: Some transition packs are Pro-only, though basic cuts and fades are free
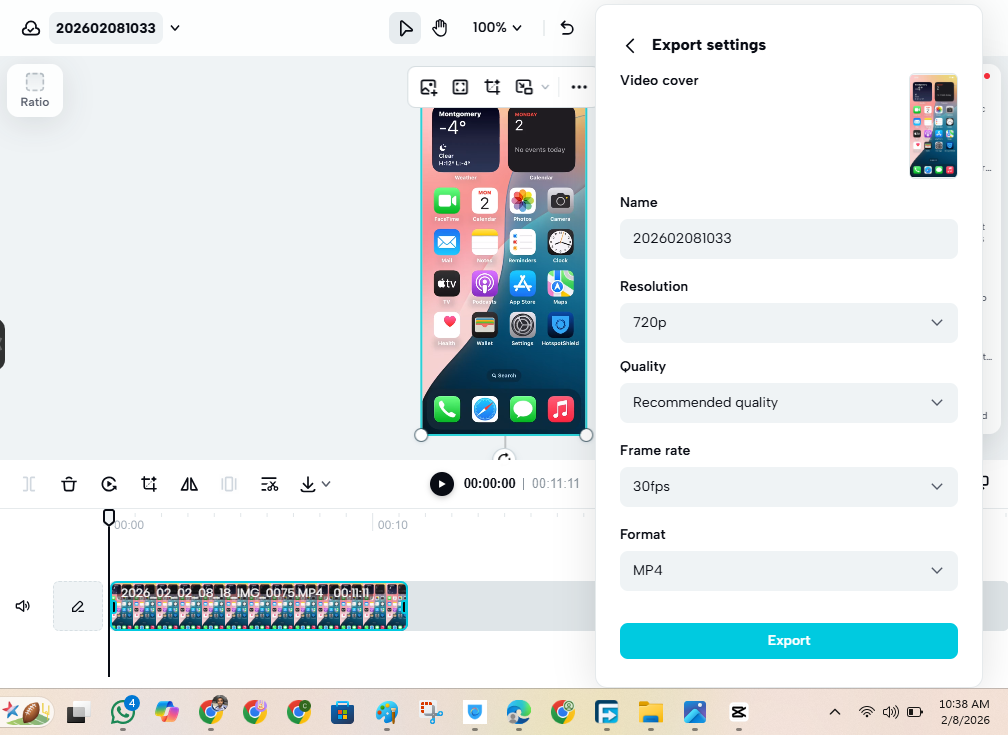
Step 4: Configure Export Settings for Free Version
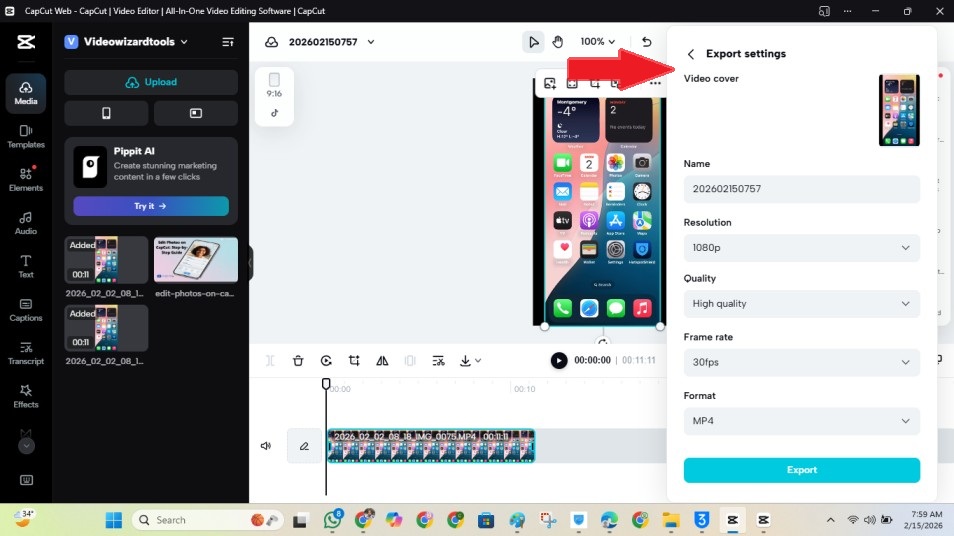
- Tap the Export button located in the top-right corner of the editing interface
- Select resolution: Choose 720p or 1080p (1080p provides the best quality available to free users)
- Avoid 4K/2160p options, these will trigger the Pro upgrade screen
- Choose frame rate: 30fps is the standard for most social media and works perfectly for free users
- 60fps may be available depending on your source footage and device
- Review the estimated file size to ensure you have sufficient storage
Step 5: Execute the Export
- Tap the Export button to begin rendering
- Wait for the processing to complete—do not switch apps or lock your device during this phase
- Once rendering finishes, the video automatically saves to your device’s gallery or Camera Roll
Critical warning: If you see a “Join Pro” popup at this stage, do not proceed with payment. Instead, tap cancel and return to Step 1, you have missed a Pro feature somewhere in your project

How To Export CapCut Without Watermark (Free Method)
Creating a completely clean video without paying requires strategic planning from the moment you start your project. Here is what actually works versus what wastes your time:
Strategies That Work (100% Free)
1. Delete the Ending Clip
This is the most straightforward method. As detailed in the previous section, simply removing the branded outro eliminates the most visible watermark. This takes approximately 5 seconds and requires no technical skill.
2. Use Only Free Assets
Develop a habit of checking for the diamond icon before applying any effect, filter, or template. CapCut’s free library is extensive—thousands of effects, transitions, and stickers are available without cost. Stick to these verified free options.
3. Import Your Own Media
The most reliable way to avoid watermarks is self-sufficiency. Use your own:
- Music and audio files (ensure you have rights to use them)
- Video footage and B-roll
- Images and graphics
- Sound effects from free external libraries
4. Create Custom Text and Graphics
Avoid premium text templates that include animations or styled designs. Instead, use CapCut’s basic text tool to create your own titles, lower thirds, and captions. While less flashy, these are completely free and customizable.
5. Shoot Quality Source Material
Superior footage requires less correction and fewer filters. Good lighting, stable camera work, and clear audio reduce your dependence on corrective effects that might be premium.
Methods That Do Not Work (Avoid These)
1. Cropping the Watermark
While technically possible, cropping the bottom or corner of your video to remove a watermark significantly reduces video quality, destroys your composition, and looks unprofessional. Social media platforms may also flag cropped content as low quality.
2. Third-Party Watermark Remover Apps
Numerous apps claim to remove watermarks from videos. These violate CapCut’s terms of service, often contain malware or excessive advertising, reduce video quality through aggressive processing, and may result in account bans or legal issues.
3. Using Modified or “Cracked” APKs
Downloading altered versions of CapCut from unofficial sources poses severe security risks including data theft, device compromise, and privacy violations. These versions are unstable, lack updates, and can result in permanent loss of your projects.
4. Screen Recording “Tricks”
Recording your screen while playing the preview results in terrible quality, includes interface elements, captures at lower resolution, and often includes the watermark anyway if it’s embedded in the preview.
Honest limitation statement: If your project requires premium effects, advanced AI tools, or specific templates, and you need completely watermark-free exports, there is no reliable free method. The only official, legal, and safe way to achieve this is through a CapCut Pro subscription.
Why CapCut Asks You to Upgrade to Pro When Exporting
Understanding the specific triggers for the Pro upgrade screen helps you avoid it entirely. If CapCut won’t let you export without Pro, you have activated one of these paywall mechanisms:
Trigger 1: Using Pro Effects or Templates
CapCut’s most powerful features—AI-powered effects, advanced color grading, cinematic transitions, and professional templates—are reserved for subscribers.
These features are clearly marked with diamond icons or “Pro” labels in the interface. Once applied to your timeline, they create a dependency that blocks export.
Solution: Before starting your project, browse the effects library and identify free alternatives. Replace Pro effects with free options before attempting export.
Trigger 2: Selecting 4K Resolution
High-resolution export is a major selling point for CapCut Pro. Free users are capped at 1080p Full HD. If you attempt to select 2160p (4K) in the export settings, the app will immediately present the upgrade screen.
Solution: For social media content, 1080p is perfectly adequate. Most viewers watch on mobile devices where the difference between 1080p and 4K is barely perceptible. Select 1080p or 720p to avoid the paywall.
Trigger 3: Premium Audio or Stock Assets
CapCut’s built-in music library includes both free and premium tracks. Premium audio is often newer, higher quality, or from popular artists. Using these tracks triggers the Pro requirement.
Solution: Import your own audio files or use royalty-free music from sources like YouTube Audio Library, Free Music Archive, or Incompetech. Add these to your device’s storage and import them into CapCut.
Trigger 4: Advanced Export Settings
Professional users require specific technical controls: higher bitrates for better quality, specific codec selections for compatibility, frame rate adjustments beyond standard options, and cloud storage integration. These are Pro-only features.
Solution: For standard social media posting, default export settings are perfectly acceptable. Avoid adjusting advanced parameters unless absolutely necessary.
Trigger 5: Cloud Storage and Cross-Device Sync
CapCut Pro offers expanded cloud storage for projects, allowing you to start editing on your phone and finish on your tablet or computer. Attempting to use these cloud features without Pro triggers upgrade prompts.
Solution: Save projects locally to your device. While this limits cross-device workflow, it keeps your editing completely free.
Proactive tip: Before beginning any project, scan the interface for diamond icons. If you see them on features you plan to use extensively, reconsider your approach or accept that Pro may be necessary for your specific project.
CapCut Free vs Pro: What’s the Real Difference?
When deciding whether to upgrade, focus on outcomes rather than feature lists. Here is the practical comparison:
| Feature | Free Version | CapCut Pro |
|---|---|---|
| Export Resolution | Up to 1080p Full HD | Up to 4K Ultra HD |
| Watermark Status | Ending clip (removable) + asset watermarks on premium features | Completely watermark-free |
| Effects Library | Basic effects, standard transitions, essential filters | Premium AI effects, cinematic transitions, advanced color grading |
| Stock Assets | Limited selection of music, stickers, and templates | Full library with thousands of premium assets |
| Export Speed | Standard rendering queue | Priority processing with faster export times |
| Cloud Storage | Minimal space for basic project backup | Expanded cloud storage with cross-device sync |
| AI Tools | Basic auto-captions | Advanced AI features including background removal, auto-reframe, smart cutout |
| Commercial Use | Allowed with limitations | Full commercial rights to all assets |
Who Actually Needs CapCut Pro?
Professional content creators making commercial content for clients need the watermark-free guarantee and 4K quality.
YouTubers and TikTokers building personal brands benefit from premium effects that increase engagement.
Businesses and marketers require professional polish without watermarks that dilute brand identity. Power users who edit daily value the time savings from faster exports and cloud sync.
When the Free Version Is Sufficient
Casual social media users posting Instagram Stories, TikToks, or personal updates will find free features adequate. Beginners learning video editing should master free tools before paying for advanced features they may not need.
Content creators using their own branding can cover the ending clip with their own outro graphics. Budget-conscious creators can produce excellent content with careful asset selection and good shooting techniques.
Limitations of Exporting Without CapCut Pro
Working within the free version requires understanding these concrete constraints:
Resolution Cap at 1080p
Free exports max out at 1920×1080 pixels. While this is “Full HD” and sufficient for most purposes, you lose the crisp detail that 4K provides on large screens.
For mobile viewing (where 90% of social media content is consumed), this limitation is barely noticeable.
However, if you’re creating content for YouTube that might be viewed on televisions, or need to crop/zoom footage in post-production, starting with 4K provides important flexibility.
Slower Export Processing Times
Free users are placed in standard rendering queues. For short videos (under 60 seconds), this difference is minimal—perhaps 30 seconds versus 10 seconds.
For longer, complex projects with multiple effects layers, the wait can extend to several minutes. During peak usage times (evenings and weekends), free exports may take significantly longer as server resources prioritize Pro subscribers.
Locked Premium Asset Libraries
Thousands of templates, effects, music tracks, and stock videos are inaccessible. This limits creative options but does not prevent basic editing.
The free library still contains hundreds of usable assets—they simply require more searching and creativity to implement effectively.
No Advanced Export Control
Professional video editors require granular control over their output. Free users cannot adjust bitrate (affecting file size versus quality balance), select specific codecs (affecting compatibility with different platforms), or access frame rate options beyond standard presets.
The free version uses automatic settings optimized for general social media use, which works for most but not all scenarios.
Watermark Management Burden
Free users must constantly monitor their projects for accidental Pro feature usage. This cognitive load, checking every effect, every transition, every audio track, slows workflow and can be frustrating. One accidental tap on a premium template can invalidate an entire project’s export capability.
Effective workarounds: Optimize your project before export by flattening complex timelines (exporting intermediate versions and re-importing them), reducing the number of simultaneous effects, and pre-editing photos in your device’s native editor before importing to CapCut.
Is CapCut Pro Worth It?
The value proposition depends entirely on your usage patterns, professional requirements, and budget constraints.
For Beginners: Probably Not Worth It Yet
If you’re just starting your video editing journey, the free version offers an impressive array of capabilities:
- Full cutting, trimming, and splitting tools
- Basic transitions (fade, slide, wipe) that are perfectly professional
- Standard filters and color correction
- Speed control for slow-motion and time-lapse effects
- Keyframe animation for custom motion graphics
- Green screen (chroma key) functionality for background replacement
- Picture-in-picture and layering capabilities
Recommendation: Spend at least 3-4 weeks mastering these free tools. Create 10-15 complete projects. Only upgrade when you consistently find yourself blocked by specific limitations that affect your content quality.
For Serious Creators: Yes, Worth the Investment
CapCut Pro makes financial and practical sense if you:
- Publish content professionally or monetize your videos
- Need 4K resolution for client work or quality standards
- Want AI-powered editing tools that save hours of manual work (auto-captions, background removal, smart cutout)
- Require cloud synchronization across multiple devices for flexible workflows
- Cannot afford watermarks on branded content for business purposes
- Edit daily and value the time saved by faster exports
Cost-Benefit Analysis
Before upgrading, understanding the actual investment required is essential. For detailed breakdowns of monthly vs annual costs, regional pricing variations, and current promotional offers, see our complete guide on CapCut pricing plans.
In general terms, CapCut Pro sits in the mid-range of video editing solutions. Desktop alternatives like Adobe Premiere Pro ($20-30/month) or Final Cut Pro ($300 one-time) demand significantly higher investment, though they offer more advanced professional features.
The trade-off with CapCut’s subscription model is ongoing access, when you stop paying, you lose premium features and watermark-free exports, unlike one-time purchase software.
Value calculation: If CapCut Pro saves you 2 hours per month through faster exports and AI tools, and you value your time at $15/hour, the subscription pays for itself. If you’re a hobbyist creating 2-3 videos monthly for personal enjoyment, the free version likely suffices.
Tips to Export Better Videos on CapCut (Even Without Pro)
Maximize your output quality within free limitations using these professional techniques:
1. Match Resolution and Frame Rate to Source Footage
Always check your original footage specifications before editing. If you shot in 1080p at 30fps, export in 1080p at 30fps. Upscaling 720p footage to 1080p reduces sharpness and introduces artifacts.
Similarly, converting 24fps cinematic footage to 30fps creates unnatural motion. CapCut can display your source file properties—use these as your export template.
2. Minimize Heavy Effects and Filters
Complex filters, multiple simultaneous effects, and heavy color grading slow down exports and can reduce final quality due to compression. Instead:
- Use minimal color correction—slight brightness and contrast adjustments
- Apply effects sparingly—one strong effect beats three weak ones
- Pre-edit photos in your phone’s native editor for exposure and color before importing
3. Optimize Project Structure Before Export
Clean timelines export faster and more reliably:
- Delete unused clips: Remove any footage from your timeline that isn’t in the final cut—hidden tracks still process during export
- Flatten complex sections: For multi-layer segments with many effects, export just that section, re-import it as a single clip, and replace the complex timeline
- Clear cache regularly: Navigate to Settings > Cache > Clear to remove temporary files that slow performance
4. Prioritize Lighting and Stability Over Post-Processing
The best editing is invisible editing. Superior source material reduces your dependence on corrective effects:
- Shoot with adequate lighting—natural window light is free and effective
- Use a tripod, gimbal, or even a stack of books for stable shots rather than relying on digital stabilization
- Record clean audio or use an external microphone—poor audio is more noticeable than mediocre video
5. Export During Off-Peak Hours
CapCut‘s servers experience higher load during evening hours (6 PM – 11 PM) when most users are active. Exporting early morning (6 AM – 9 AM) or late night (11 PM – 2 AM) often results in faster processing times for free users.
6. Maintain Sufficient Device Storage
Exports fail or corrupt when devices run low on space. Maintain at least 5GB of free storage for reliable 1080p exports. Regularly transfer completed videos to cloud storage or computer archives.
7. Use External Resources Strategically
Supplement CapCut’s free library with external resources:
- Download royalty-free music from Free Music Archive or Incompetech
- Use Canva’s free tier for custom graphics and thumbnails
- Find free stock footage on Pexels or Pixabay
- Create custom sound effects using your phone’s voice recorder and simple processing
Frequently Asked Questions
-
Yes. The free version fully supports video exports up to 1080p resolution. Ensure your project contains no Pro-only effects, templates, or premium assets marked with diamond icons. If export is blocked, audit your timeline for these indicators.
-
CapCut blocks export when your project includes Pro-only features (marked with diamond icons). Common triggers:
- 4K resolution selected in export settings
- Premium effects, transitions, or filters applied
- Pro templates or stock assets used
- Copyrighted music from CapCut’s premium library
- AI-powered tools like background removal
Click the Pro button at the top of your project to identify specific Pro elements, then replace them with free alternatives.
-
Partially. You can remove the ending “Made in CapCut” clip for free by deleting it from your timeline. However, watermarks embedded from using Pro assets (appearing as semi-transparent overlays on your footage) cannot be removed without subscribing to CapCut Pro. There is no free workaround for asset-based watermarks.
-
No. 4K export (2160p resolution) is exclusively available to CapCut Pro subscribers. Free users are limited to 1080p maximum. For social media content viewed primarily on mobile devices, 1080p provides excellent quality and faster upload times.
-
Partially. You can achieve a clean video by: (1) deleting the ending clip, and (2) using only free assets without diamond icons. However, if you require premium templates, specific effects, or advanced AI tools, there is no method to export these without watermarks without paying for Pro. Third-party watermark removers violate terms of service and reduce quality.
-
Yes, the CapCut desktop application for Windows and Mac offers the same free tier as mobile. You can export up to 1080p without watermarks (except the removable ending clip) provided you avoid Pro features. The same limitations apply: 4K requires Pro, premium assets trigger paywalls, and certain advanced tools are subscription-only.
-
This is usually caused by one of these issues:
- Login synchronization error: Your account may be incorrectly flagged. Log out and log back in to refresh your status.
- Hidden Pro elements: Some templates apply Pro effects automatically. Check all layers and effects panels.
- Outdated app version: Update to the latest CapCut version from your app store.
- Cache corruption: Clear app cache in Settings > Cache > Clear.
- Temporary server issue: Try exporting again in 30 minutes.
- Account subscription confusion: Check if “Pro” appears next to your profile name, indicating an expired trial or billing issue.
-
No, there is no official time limit for video length in the free version. However, longer videos (over 15 minutes) may experience slower exports, occasional stability issues on older devices, and larger file sizes that strain free cloud storage. For reliable performance, consider breaking very long content into segments.
-
Yes, once downloaded and installed, CapCut functions offline for editing and exporting. However, you need internet to download new effects, access cloud storage, or update the app. Initial installation and some asset downloads require connectivity.
-
CapCut’s terms of service allow commercial use of videos created with the free version, provided you have rights to all imported content (music, footage, etc.). However, the CapCut watermark (ending clip) may appear unprofessional for client work. For commercial projects, removing the ending clip or upgrading to Pro for clean exports is recommended.
Conclusion
You can absolutely export CapCut without Pro, but success requires understanding the boundaries between free and paid features. If CapCut won’t let you export, systematically audit your project for Pro-only assets—that single step resolves 95% of export blocking issues.
The decision between free and Pro ultimately depends on your specific needs:
Choose Free if: You create casual social media content, don’t mind managing the ending clip, shoot quality source material that needs minimal effects, and primarily distribute on mobile-first platforms where 1080p is sufficient.
Choose Pro if: You create commercial content, need 4K resolution for professional delivery, rely on AI tools for efficiency, cannot afford watermarks on branded materials, or edit frequently enough that time savings justify the subscription cost.
CapCut remains one of the most capable video editing applications available, regardless of payment tier. Its free version outperforms many paid competitors, while the Pro tier offers genuine value for power users.
By understanding the limitations outlined in this guide and applying the optimization strategies provided, you can create professional, engaging content without spending a dollar—or make an informed decision about when Pro becomes the smarter investment.
The key is planning: check for diamond icons before you build your project, remove the ending clip before you export, and always verify your resolution settings.