
How To Get CapCut on iPad in 2026: An Easy Guide
Ever searched “CapCut iPad download” and then hit a wall — the app won’t install, it won’t show in the App Store, or it downloads and crashes?
You’re not alone. A lot of people want to get CapCut on iPad because the bigger screen makes trimming, captions, and effects way easier than editing on a phone.
In this guide, you’ll learn how to download CapCut on iPad, what to do if it won’t install, how CapCut iPad pricing/subscription works, and the best settings to keep editing smooth (plus a quick CapCut iPad tutorial to get your first project done fast).
Quick note: if you searched “CapCut Pad,” you’re in the right place — people usually mean CapCut on iPad.
Can CapCut Be Used on iPad?
Yes, CapCut can be used on an iPad. The iPad version runs like the mobile app, but the bigger screen makes it easier to edit timelines, place text, and fine-tune effects without feeling cramped.
In most regions, CapCut is available as a free download from the Apple App Store. You can edit and export videos without paying, but some effects, templates, and advanced tools are locked behind a subscription.
If CapCut isn’t showing in the App Store or it won’t download on your iPad, don’t worry — that’s usually caused by a simple issue like iPadOS compatibility, storage space, region settings, or restrictions. I’ll show you the fixes in the next section.
CapCut iPad Free Download: How to Get CapCut on iPad
If you’re looking for the CapCut iPad free download, the safest and easiest method is the Apple App Store.
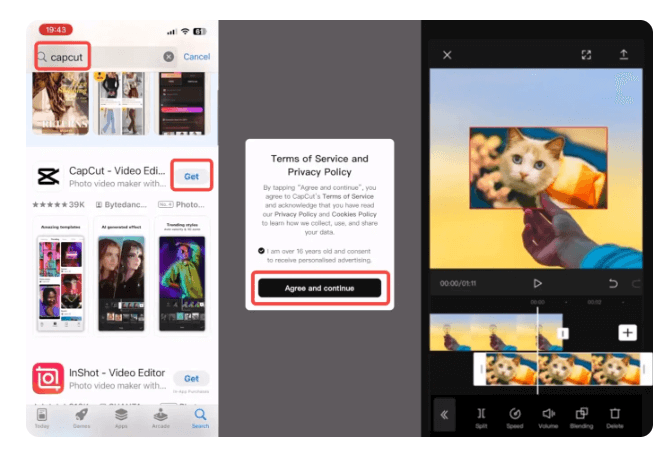
- Open the App Store on your iPad.
- Search “CapCut” (look for the official app by ByteDance / Bytedance Pte. Ltd.).
- Tap Get (or the download icon).
- Confirm with Face ID / Touch ID / Apple ID password.
- When it finishes installing, tap Open.
Quick tip: After opening CapCut, sign in (optional) if you want to use cloud/space syncing later. If you only want to edit locally on your iPad, you can start without signing in.
Why Won’t CapCut Download on My iPad? (Fixes That Usually Work)
If CapCut won’t download on your iPad, it’s usually one of these common issues. Try them in order — most people fix it in a few minutes.
1) Check your internet connection
- Switch Wi-Fi off and back on, or try another Wi-Fi network.
- If you’re using cellular on iPad, confirm that the App Store is allowed to use data.
2) Make sure you have enough storage
Low storage is one of the biggest reasons apps fail to install.
- Go to Settings → General → iPad Storage.
- If storage is tight, delete large unused apps/videos, then try again.
3) Restart your iPad (simple, but effective)
- Restart your iPad and try installing CapCut again.
4) Update iPadOS
If your iPadOS version is too old, CapCut may not install or may not show in the App Store.
- Go to Settings → General → Software Update.
- Install any available update, then try the download again.
Learn how to download CapCut on any device (including troubleshooting tips)
5) CapCut isn’t showing in the App Store (region issue)
CapCut may not appear in some countries/regions, or it can temporarily disappear depending on App Store availability.
- Check your App Store region: Settings → Apple ID → Media & Purchases → View Account → Country/Region.
- If CapCut isn’t available in your region, you may need to switch to a supported region to download it.
6) Check Screen Time restrictions
If app installs are restricted, the download button can fail or be blocked.
- Go to Settings → Screen Time → Content & Privacy Restrictions.
- Make sure that installing apps is allowed.
7) Sign out of the App Store and sign back in
- Go to Settings → Apple ID → Media & Purchases and sign out, then sign back in.
If you’ve tried all of the above and CapCut still won’t download, the next section explains CapCut iPad pricing and whether you even need the subscription to do what you want.
CapCut iPad Price: Is CapCut Free on iPad?
Yes, CapCut is free to download on iPad, and you can edit/export videos without paying. For many people, the free tools are enough for basic cuts, captions, transitions, and standard exports.
But CapCut also has paid tiers. On iPad, what you see depends on your region and how CapCut labels plans in the App Store — that’s why pricing can look different from desktop or from another country.
Current CapCut pricing (USD)
- Free: $0
- Standard (often mobile-only): $5.99/month or $89.99/year
- Pro (cross-platform: mobile + desktop + web): $19.99/month or $179.99/year
- Teams (collaboration): $24.99/month or $214.99/year
See the full CapCut Free vs Pro vs Teams comparison
What you get for free on an iPad
- Core editing (trim, split, speed, crop, filters)
- Basic text/captions, stickers, and transitions
- Many free templates and sounds
- Standard exports for most projects
What the CapCut iPad subscription unlocks
- More premium effects, filters, transitions, and fonts
- More premium templates/assets
- More advanced tools that may be locked on for free
- Extra perks (like cloud/AI features) depending on your plan/version
Important: CapCut pricing can vary by country, platform (App Store vs desktop/web), taxes, and promos. Always check the price shown on your iPad’s subscription screen before confirming.
Is CapCut Worth It on iPad?
CapCut is worth it on iPad if you edit often and care about speed, cleaner results, and having more effects/templates ready without hunting for alternatives.
But if you only edit once in a while, the free version is usually enough — especially for TikTok, Reels, Shorts, school projects, and casual videos.
CapCut on iPad is worth it if you:
- edit content weekly (or daily) and want faster workflows
- keep tapping locked effects, templates, fonts, or tools
- make videos for a brand/client and want fewer asset/licensing worries
- need cloud/space sync so you can start on iPad and finish elsewhere
- use AI-style tools (like captions or enhancements) and don’t want limits
CapCut on iPad is not worth paying for if you:
- edit occasionally, and the free tools already look good
- don’t care about premium templates/effects
- only need simple trimming + captions + export
- prefer using your own music, fonts, and assets
Simple rule: use CapCut free for a week on iPad. If you repeatedly hit “Pro” locks and it slows you down, upgrading starts to make sense. If not, stay free.
CapCut iPad Tutorial: Your First Edit (Fast Step-by-Step)
If you’re new to CapCut on iPad, this quick tutorial will get you from “downloaded” to “exported” in a few minutes.
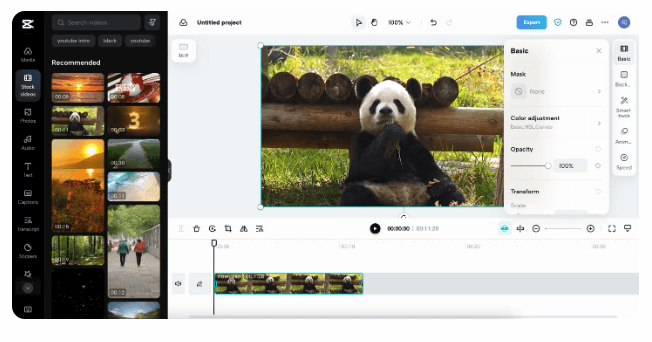
Step 1: Start a new project
- Open CapCut → tap New project.
- Select your video clips → tap Add.
Step 2: Trim and split clips (the basics)
- Tap a clip on the timeline to select it.
- Drag the ends to trim.
- Move the playhead and tap Split to cut a clip into sections.
Step 3: Add text or captions
- Tap Text → choose Add text (or Auto captions if available).
- Adjust the timing by dragging the text layer ends on the timeline.
Step 4: Clean up your audio (optional but powerful)
- Tap your clip → open Audio.
- Use Volume to balance levels.
- If you see Noise reduction / Denoise, start low and increase slowly.
Step 5: Add transitions (use sparingly)
- Tap the small box between clips (transition icon).
- Pick a transition → keep it short so it doesn’t feel “over-edited”.
Step 6: Make it look sharper (optional)
- Tap the clip → use basic adjustments (brightness/contrast/saturation).
- Small changes beat heavy filters.
Step 7: Export with the right settings
- Tap Export (top right).
- Choose 1080p for most social videos (or higher if needed).
- Save to Photos or share directly.
CapCut iPad Horizontal: How to Edit and Export the Right Way
If your video looks “sideways,” is cropped weirdly, or refuses to stay landscape, you’re dealing with an orientation mismatch (the project ratio doesn’t match the footage or your target platform).
1) Set the right aspect ratio first
- Open your project → look for Format (or Ratio).
- Choose the ratio that matches where you’re posting:
- 9:16 = TikTok / Reels / Shorts (vertical)
- 16:9 = YouTube / horizontal videos (landscape)
- 1:1 = square posts
2) Fix clips that don’t fit the frame
- Tap the clip → use Crop or Edit.
- Pinch to zoom and reposition so the subject is centred.
- If you see an option like Fit / Fill, use:
- Fit to show the whole clip (may add borders)
- Fill to remove borders (may crop edges)
3) Stop iPad auto-rotate confusion
- If your preview keeps flipping, try locking orientation in iPad Control Centre (Rotation Lock).
- Then reopen CapCut and preview again.
4) Export in landscape (horizontal) cleanly
- Before exporting, confirm the project is set to 16:9.
- Tap Export → choose 1080p (or higher if needed).
- After export, check the video in Photos to confirm orientation is correct.
CapCut iPad vs Desktop: Which Is Better?
CapCut on iPad is best for speed and convenience. CapCut desktop is better when you want a bigger workspace, more control, and smoother handling of longer or heavier projects.
Choose CapCut on iPad if you want:
- fast edits for TikTok, Reels, and Shorts
- touch editing (quick trims, captions, effects)
- portable editing on the go
- a bigger screen than a phone without carrying a laptop
Choose CapCut on desktop if you need:
- more comfortable timeline control for longer videos
- easier keyboard/mouse precision (cuts, keyframes, layering)
- better file management for lots of footage
- smoother performance on very large projects (depending on your computer)
The simple answer
If your videos are mostly short-form and you like touch editing, the iPad is a great primary setup. If you edit longer content or do heavier layering, the desktop is usually the better “main workstation.”
Frequently Asked Questions
Conclusion
At this point, you know exactly what matters with CapCut on iPad: getting it installed cleanly, choosing the right format (vertical vs horizontal), and keeping performance smooth so editing doesn’t feel frustrating.
The biggest win is keeping your workflow simple. Set the correct aspect ratio early, edit the noisiest or messiest parts first, and avoid overdoing effects that slow projects down. If you’re switching between iPad and desktop, consistency matters too — same account, same project location, and one device editing at a time to avoid version conflicts.
And when CapCut feels “limited,” it’s usually not your iPad — it’s plan access, region differences, storage, or a setting that needs a quick fix. Once those are handled, the iPad becomes a really comfortable editing setup for everyday content.
If you want the fastest results, keep using the free version until you repeatedly hit locked features. That’s the clearest sign an upgrade would actually save you time.