
How to Make One-Word Captions in CapCut (Step-by-Step Guide)
You’ve seen it before.
Captions hitting one word at a time… perfectly timed… pulling you in without you even realizing it.
That’s not random. It’s deliberate.
Instead of dumping full sentences on screen, each word lands exactly when it’s spoken—creating rhythm, tension, and momentum that keeps people watching.
That’s why this style dominates TikTok, Reels, and viral content.
But here’s the problem:
CapCut doesn’t give you a “one-word caption” button.
Auto captions group everything into full sentences. Doing it manually feels slow. And if your timing is even slightly off, the whole thing feels awkward instead of powerful.
So most people either avoid it—or do it badly.
This guide shows you the exact workflow to do it properly.
You’ll learn how to make one-word captions in CapCut easily, sync them perfectly to speech, choose animations that actually improve impact, and avoid the mistakes that make your captions look messy or amateur.
Once you get this right, your captions stop being decoration and start driving engagement.
One-Word Captions in CapCut Explanation
One-word captions are exactly what they sound like. Text captions that appear one word at a time, timed perfectly to match speech in your video.
Unlike standard captions, which often dump full sentences on the screen, one-word captions turn each word into its own visual beat.
In CapCut, this technique isn’t automated. Auto captions will group phrases into sentences, which is great for simple subtitles but doesn’t give you control over rhythm or impact.
If those auto captions also come out in all caps (a very common issue), fix the All-Caps Caption case first before breaking them into one-word style.
One-word captions, on the other hand, allow you to:
- Highlight key words: Make the most important parts of your message pop.
- Control pacing and suspense: Each word appears exactly when it’s spoken, keeping viewers’ attention glued to the screen.
- Enhance emotional impact: A punchline, call-to-action, or reveal hits harder when words arrive one at a time.
Think of it like visual “drum beats” for your speech, each word is a note, and together they create a rhythm that keeps viewers engaged and encourages replays.
In short: one-word captions turn ordinary subtitles into a tool for engagement, making your video feel sharper, more dynamic, and more professional.
Understanding One-Word Caption Psychology
Before we get into how to make one-word captions, let’s understand how and why it works.
1. They Force Attention
With full sentences, people skim.
They read ahead, lose interest, and sometimes stop watching before the video even finishes.
One-word captions change that.
Each word appears at the exact moment it’s spoken—so the viewer has to follow along in real time.
No skipping. No jumping ahead.
Every word becomes a mini moment.
2. They Boost Watch Time (and Replays)
This is where it really matters.
When captions reveal one word at a time, viewers stay longer—because they want to “complete the sentence.”
Miss a word? They replay it.
That naturally increases:
- Watch time
- Completion rate
- Replays
All of which help your content perform better on platforms like TikTok and Reels.
When to Use One-Word Captions
This style works best when you want impact.
Use it for:
- Hooks (first 1–3 seconds)
- Punchlines and reveals
- Strong call-to-actions (“WATCH THIS”, “WAIT FOR IT”)
- Emotional or dramatic moments
- Fast-paced comedy
When to Avoid It
Don’t use this style everywhere.
It actually hurts performance in some cases.
Avoid it for:
- Tutorials or educational content (it slows understanding)
- Long storytelling (it becomes tiring)
- Casual or conversational videos (feels unnatural)
Method 1: The Rapid-Fire Duplicate Technique (Fastest)
For short phrases (under 10 words), rapid duplication is fastest.
This fully manual duplicate technique is perfect if you’ve already hit your monthly auto caption limit and can’t generate any more timing references.
Here is the step-by-step:
1. Create a “Template” Word
For CapCut Mobile (iOS/Android)
- Open CapCut and import your video into a New Project.
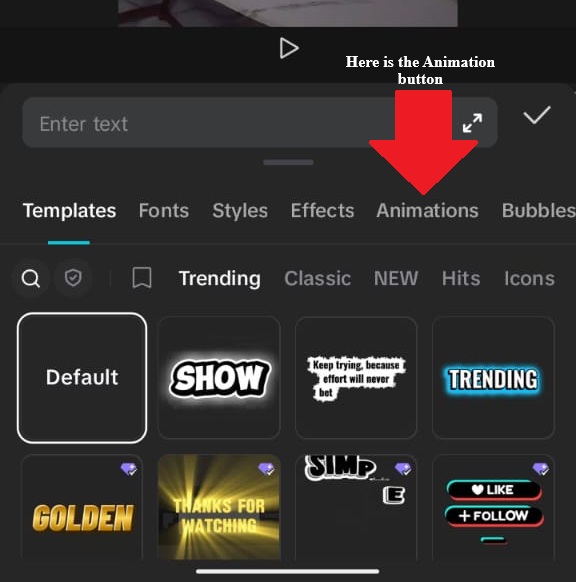
- In the bottom toolbar, tap Text → Add Text to insert a text box.
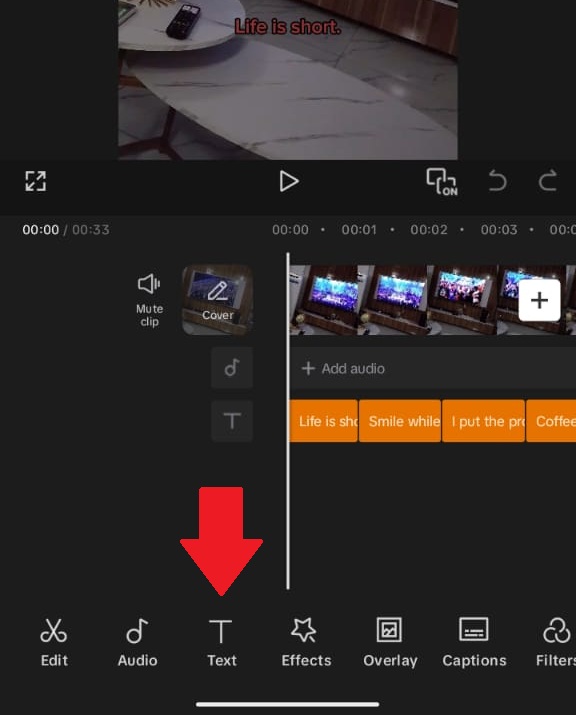
The Text tool in CapCut Mobile is where you manage overlays and captions — highlighted here.
- This is where you type the first word of your phrase.
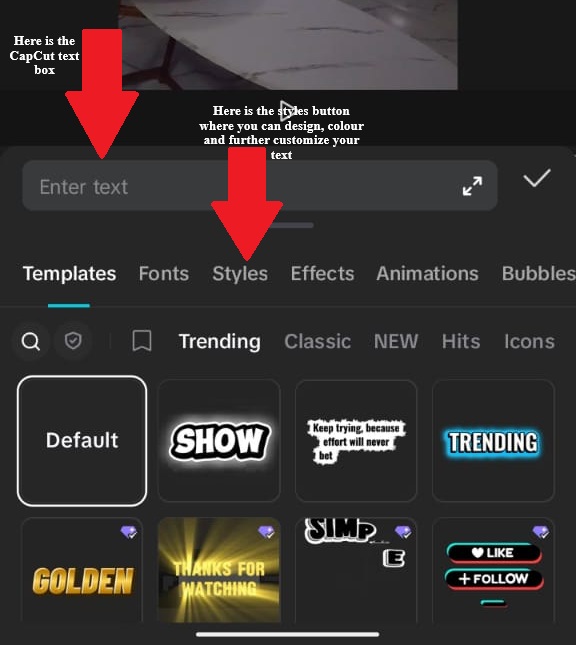
Start customizing captions by typing into the highlighted Enter text field.
- This is where you type the first word of your phrase.
- Once the text appears on screen, use the on‑screen handles and Styles options menu to change font, size, color, shadow, etc.
- You’ll see sliders and menus for font, style, color, outline, and shadow right beside or above the keyboard.
- Position the text where you want it on screen by dragging with your finger.
CapCut Desktop (PC/Mac/Web)
- Create a project and drag your clip into the timeline.
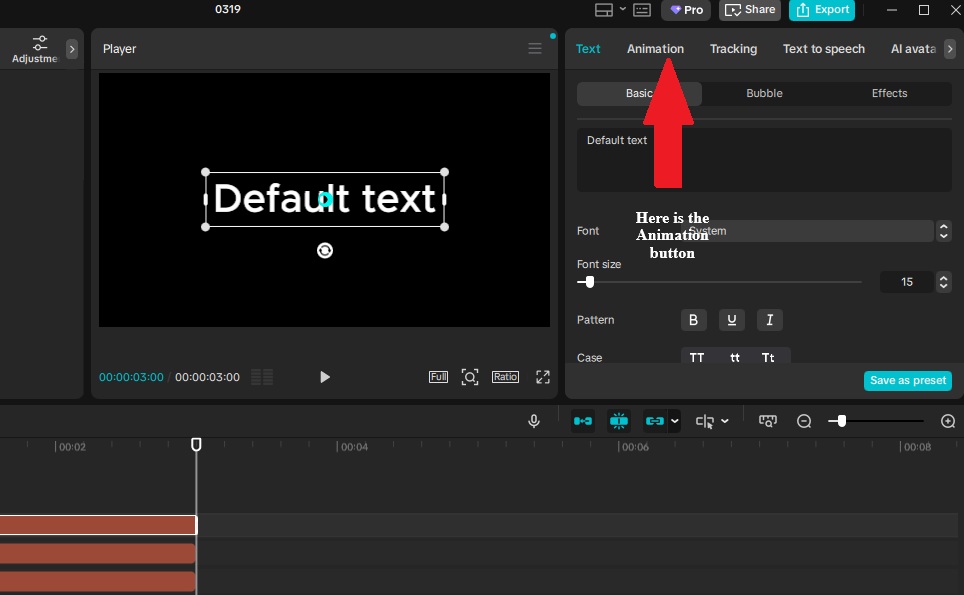
- At the top toolbar, click Text → Add Text.
- A text layer appears on your video preview and also as a “text layer” in the timeline(see image below).
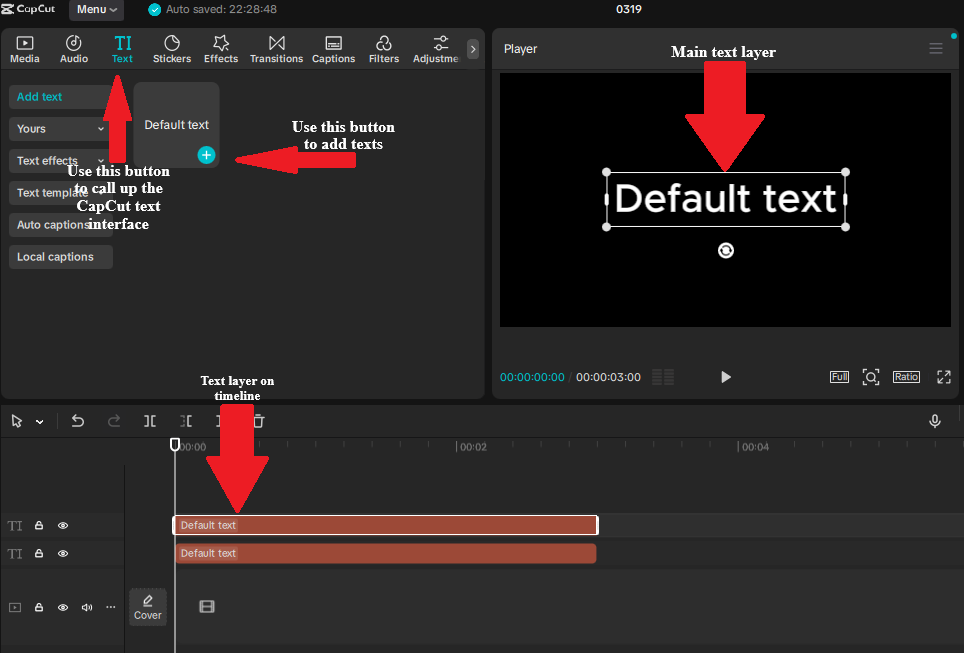
Use the Text tab in CapCut to open the text editor and start customizing captions.
- A text layer appears on your video preview and also as a “text layer” in the timeline(see image below).
- Click on the text in the preview, then use the right‑side panel or top menus to choose Font, Size, Color, Outline/Shadow, and position it where you want.
👉 In both versions, a “text layer” simply means the block you see on screen and in your timeline that holds the text, this is what you’ll duplicate for each word.
2. Add an Entrance Animation
Once you’ve styled your first word, give it a quick entrance animation so it pops:
For Mobile:
- Tap the text box in the timeline to select it.
- From the bottom toolbar, choose Animation (it should appear once text is selected).
- Under In, scroll the animation list and pick something like Pop, Bounce, or Fade In.
- Use the slider to set a short duration (e.g., 0.15–0.2s).
- These “In” animations are what make each word pop onto the screen.
For CapCut Desktop:
- After selecting your text layer, look for an Animation tab either in the right‑side panel or above the timeline.
- Click Animation → In to see the list of entry animation options, including Bounce, Pop, Fade, Slide, etc.
- Choose one you like and adjust its duration.
⚠️ CapCut’s specific animation names and availability can change with updates (some users report that certain presets move or get renamed), but the In → Animation workflow exists on both platforms as long as you’re using the default text tool.
3. Duplicate and Populate Each Word
Now that your first word looks and animates how you want, copy it and replace the text:
For Mobile:
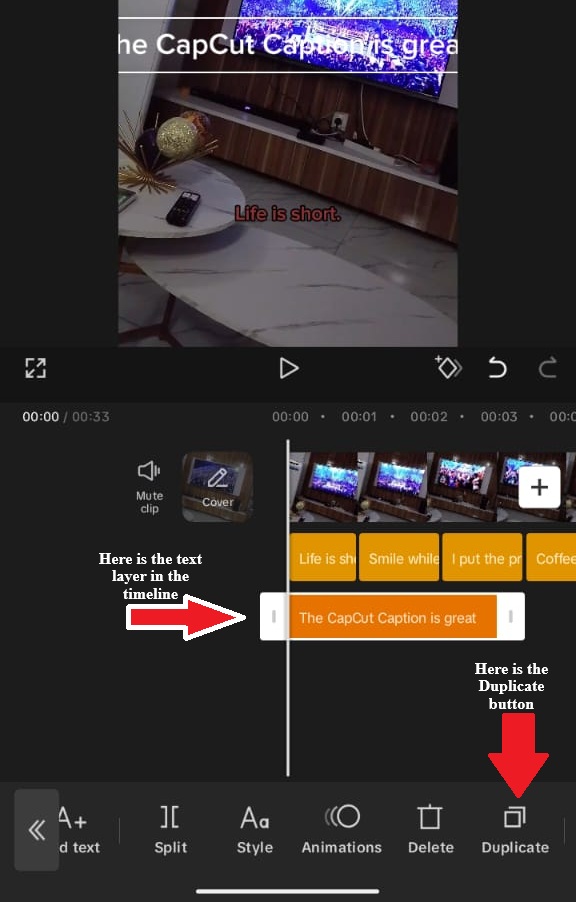
- Tap your text layer in the timeline and choose Duplicate (usually a “duplicate/copy” icon near the timeline controls).
- Move the playhead forward about ~0.3–0.5s where the next word should appear.
- Tap the new layer, double‑tap its text to edit it, and type the next word.
- Repeat for each word in your phrase.
For Desktop:
- Select your text layer, then Right‑Click → Duplicate, or use the copy/paste keyboard shortcuts (Ctrl‑C → Ctrl‑V).
- Drag the duplicated layer in the timeline forward to where the next word needs to show.
- Double‑click inside the video preview to edit the text and replace it with the next word.
- Continue duplicating and editing all words.
4. Fine-tune timing:
- Play through, pause at each word
- Drag each layer to match the exact speech timing
- Each word should appear as it’s spoken, not before
For the complete foundation on manual text layers, duplication, and precise timing before layering one-word rhythm and animations, see our full manual captions tutorial in CapCut.
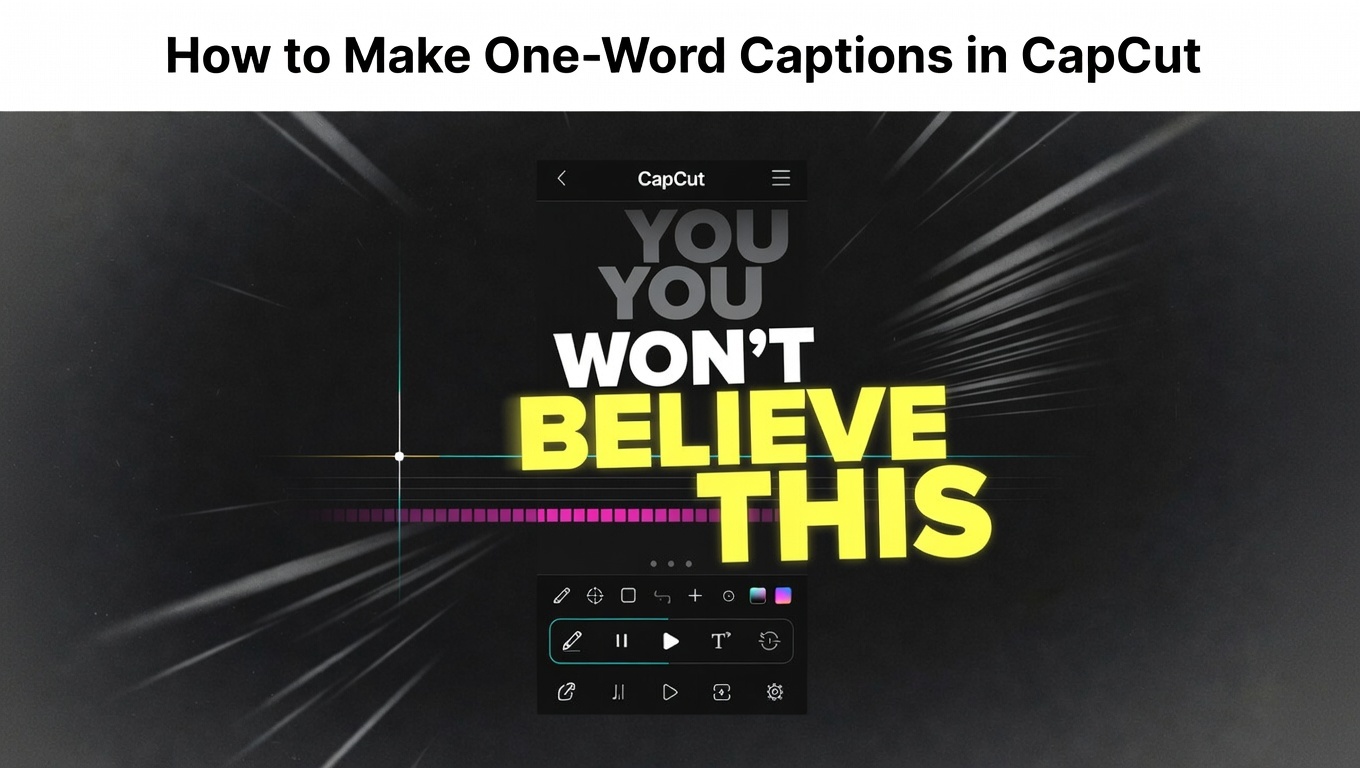
Example phrase “YOU WON’T BELIEVE THIS”:
| Layer | Text | Timing | Animation |
|---|---|---|---|
| 1 | YOU | 0:00.0 | Pop 0.15s |
| 2 | WON’T | 0:00.4 | Pop 0.15s |
| 3 | BELIEVE | 0:00.9 | Pop 0.15s |
| 4 | THIS | 0:01.4 | Pop 0.15s |
Method 2: The Waveform Sync Technique (Precise Timing)
For perfect synchronization with speech, use audio waveform visualization.
Here is the Step-by-step guide (Desktop recommended):
1. Import audio/video:
- Place on timeline
- Zoom to maximum waveform visibility
2. Identify word boundaries:
- Each word in speech creates a distinct waveform spike
- Valleys between spikes = silence between words
- Mark each word start by clicking on the waveform peak
3. Create word at first peak:
- Position the playhead at the first word’s waveform peak
- Text > Add Text
- Type word, apply styling and animation
- Layer starts at playhead position
4. Repeat for subsequent words:
- Move to the next waveform peak
- Create a new text layer
- Match styling (copy/paste previous layer, change text)
5. Adjust duration:
- Each word layer extends to next word’s start
- No gaps (immediate replacement)
- Or 0.05-0.1 second overlap for smoother flow
The precision advantage: Waveform shows exactly when sound occurs. No guessing, no repeated listening.
Method 3: The Emphasis Variation Technique (Dynamic Impact)
Not all words should be treated the same. The power of one-word captions comes from contrast. Some words stay subtle, while others demand attention.
This variation creates rhythm, guides the viewer’s focus, and makes key moments hit harder.
The Hierarchy System
Use a clear visual hierarchy to decide how each word appears:
- Articles & prepositions (e.g., “the,” “a,” “in”) → small size, simple styling, minimal or no animation
- Nouns & verbs (e.g., “quick,” “brown,” “fox”) → medium size, standard styling, light animation
- Key terms (important words) → large size, strong animation, high-contrast color
- Final punchline or climax word → maximum size, boldest styling, longest duration, strongest animation
Implementation
1. Create a base template (standard words):
Use a medium size (around 60–70% of screen width), apply a simple animation like Fade or Slide, and keep the color neutral (typically white). This becomes your default style for most words.
2. Create an emphasis template (key words):
Increase size to around 80–90% of screen width, use stronger animations like Pop or Bounce, and switch to a high-contrast color such as yellow or cyan. Add shadow or glow to improve visibility and impact.
3. Apply variation based on meaning:
Instead of styling every word the same, alternate based on importance. For example:
“the” → small, subtle fade
“QUICK” → large, bounce animation, bright color
“brown” → medium size, simple fade
“FOX” → large, strong animation, high contrast color
Visual Rhythm
This small-to-large variation creates a natural visual rhythm: subtle → strong → subtle → strong. It mirrors how we naturally emphasize speech and keeps viewers engaged without overwhelming them.
Method 4: The Build-Up Sequence (Suspense Technique)
For dramatic reveals, one-word captions can be used to build tension step by step, leading to a powerful final word.
Instead of treating every word equally, you gradually increase intensity so the last word delivers maximum impact.
The Progression
Phase 1: Foundation (first 1–2 words)
Start small and subtle to establish context without overwhelming the viewer. Use a smaller size (around 45–55% of screen width), a simple Fade-in animation, and a muted color like gray. These words should feel calm and understated.
Phase 2: Building (next 2–3 words)
Increase energy slightly. Move to a medium size (around 60–75% of screen width), use a Slide or soft motion animation, and switch to a clearer color like white. This phase signals that something important is coming.
Phase 3: Climax (final word)
This is the payoff. Use maximum size (90–100% of screen width), apply a strong animation like Bounce or Pop, and switch to a bright, high-contrast color such as yellow, red, or cyan. Add a subtle sound effect if possible, and hold this word longer than the others (about 1.0–1.5 seconds) so it fully lands.
Example Sequence
For the phrase: “AND THE WINNER IS…”
- “AND” → small, gray, fade, ~0.4s
- “THE” → small, gray, fade, ~0.4s
- “WINNER” → medium, white, slide, ~0.6s
- “IS” → medium, white, slide, ~0.8s (slightly longer hold)
- Final word (e.g., a name) → maximum size, bright color, bounce animation, ~1.2–1.5s
The Pause Trick
The word right before the climax (like “IS” in this example) should linger slightly longer than the rest. This creates a natural pause that builds anticipation. Viewers instinctively wait for the final word, which makes the reveal feel more satisfying and impactful.
Platform-Specific One-Word Caption Strategies
Not all platforms behave the same—but you don’t need to overcomplicate this.
TikTok (Where This Works Best)
TikTok rewards watch time and replays, which is exactly what one-word captions improve.
Keep your pacing fast (around 0.3–0.6 seconds per word), and make sure your first 2–3 words hit within the first 3 seconds.
Hold the final word slightly longer (about 1–1.5 seconds) so viewers stay to complete the sentence—and often replay it.
Tight audio sync matters here. The closer your captions match speech (or beats), the better your content performs.
Other Platforms (Quick Adjustment)
On Instagram Reels and YouTube Shorts, you can slow things down slightly (around 0.4–0.8 seconds per word) and use cleaner, less aggressive animations.
That’s it—the core technique stays the same.
To understand better, you can learn more from our CapCut for Social Media Guide.
Timing Synchronization: The Critical Skill
One-word captions fail if timing is wrong. Too early spoils anticipation; too late creates frustration.
Here is the synchronization methods i recommend:
Method A: Audio peak matching (most accurate)
- Word appears exactly as audio waveform peaks
- Requires waveform visibility (desktop advantage)
- 95%+ accuracy on first try
Method B: Syllable stress matching (for emphasis)
- Match caption appearance to stressed syllable
- “PHOtograph” = caption appears on “PHO” sound
- “photoGRAPH” = caption appears on “GRAPH” sound
- Changes emphasis and meaning
Method C: Beat matching (for music)
- Word appears on drum beat or musical accent
- Even if slightly misaligned with speech, feels “right” because of rhythm
- Requires musical ear or waveform beat identification
The lead time rule: Never show word before it’s spoken. Viewer reads ahead, spoils surprise. Maximum 0.05s lead time (essentially simultaneous).
The hold time formula:
- Standard words: 0.3-0.5 seconds
- Emphasis words: 0.6-1.0 seconds
- Final words: 1.0-1.5 seconds (allow comprehension)
Common One-Word Caption Mistakes to Avoid
Mistake 1: Inconsistent timing
- Some words 0.2s, others 1.2s, with no pattern
- Feels chaotic, unprofessional
- Fix: Establish rhythm (0.4s standard, 0.8s emphasis, 1.2s final) and apply consistently
Mistake 2: Over-animation
- Every word bounces, spins, or explodes
- Visual exhaustion by word 3
- Fix: Reserve animation for emphasis words (20% of words maximum)
Mistake 3: Size inconsistency
- Random size changes without purpose
- Fix: Size = importance. Small for grammar words, large for content words, maximum for climax.
Mistake 4: Ignoring exit strategy
- Words cut off instantly, creating flicker
- Fix: Use 0.1s Fade Out or overlap with next word’s entrance
Mistake 5: Too many words
- 15-word sentence as one-word captions = exhausting
- Fix: Maximum 8 words for one-word technique. Break longer content into phrases.
How to Create One-Word Captions in CapCut in Under 10 Minutes
If you’re creating a short 4–6 word hook (common for TikTok), you can build a clean, professional one-word caption sequence in under 10 minutes once you understand the workflow.
The 10-Minute Workflow
1. Template creation (2 minutes):
Create your first word, apply your font, size, color, and entrance animation. This becomes your base style for all other words.
2. Duplication (2 minutes):
Duplicate the text layer for each word in your phrase (usually 4–6 words). Replace the text in each layer while keeping the styling consistent.
3. Rough timing (2 minutes):
Place each word roughly 0.3–0.5 seconds apart on the timeline to match natural speech pacing.
4. Fine-tuning (2 minutes):
Play through the clip and adjust each word to match the exact moment it is spoken. This is where most of the quality comes from.
5. Sound effects (2 minutes):
Add subtle “pop” or click sounds to key words, or align words with background music beats for better rhythm and engagement.
Total time: ~10 minutes for a polished one-word caption sequence.
Batch Efficiency Tip
To save time long-term, create 2–3 variations (different fonts, colors, or animation styles) in a single project. Then reuse them across future videos by copying and pasting into new projects. Over time, this builds your own caption template library, making future edits significantly faster.
Final Thoughts
One-word captions are a powerful tool—but they work best when used with intention. When done right, they turn passive viewers into active participants, guiding attention word by word and increasing engagement.
However, overusing them can have the opposite effect. Too many rapid captions can feel overwhelming and reduce clarity.
That’s why it’s best to reserve this technique for high-impact moments, hooks that stop the scroll, punchlines that hit harder, and calls-to-action that demand attention.
Use them strategically, and they won’t just decorate your videos, they’ll drive results.