
If you’re searching for a complete CapCut keyframe guide for beginners, you’ve found it.
This tutorial covers everything from what keyframes are in CapCut to how to use keyframes in CapCut PC (Windows & Mac) and how to add keyframes in CapCut Mobile.
Most CapCut users stick to cuts, text, and music. Their edits look fine. They don’t look alive.
Keyframes change that. They turn static clips into motion: a slow zoom on a face, a color shift that creeps in, audio that dips exactly when you start talking.
The viewer doesn’t notice the technique. They just feel the video working better.
So, whether you’re editing on a desktop or a mobile, by the end of this guide, you will practically learn the following:
- Add your first keyframe in CapCut mobile and desktop with the exact button sequence
- Build a smooth zoom effect that draws attention without looking robotic
- Animate color shifts (color to black-and-white, warm to cool) using saturation and temperature keyframes
- Duck audio automatically so background music fades when you speak, then returns
- Troubleshoot common failures: missing keyframe buttons, choppy animations, and sync issues
No advanced skills needed. Just the right sequence of taps.
What Are Keyframes in CapCut? (Definition & the Basics)
A keyframe in CapCut is a marker that saves the exact state of a video element at a specific point in time.
By setting at least two keyframes with different values, CapCut automatically calculates and animates the transition between them.
The technical definition: Keyframes define the starting and ending points of any smooth animation. In CapCut, you can keyframe position, scale, rotation, opacity, color adjustments, audio volume, and more.
A Real-world analogy: Think of keyframes like setting GPS waypoints. You don’t steer every turn between point A and point B, the GPS builds the route. Your job is picking the right start and end points, then letting CapCut handle the motion between them.
The reasons why people use CapCut keyframes:
- To create professional Zooms without camera movement
- To animate text and graphics smoothly
- Duck audio automatically when you speak
- Shift colors for mood transitions
- All without leaving the CapCut ecosystem
Want to explore more powerful CapCut tools beyond keyframes? Read our full guide: 10 Best CapCut Features and Capabilities
Where Is the Keyframe Icon in CapCut? (Desktop & Mobile)
If you can’t find the keyframe button in CapCut, you’re not alone. It’s one of the most searched issues because the icon only appears when the correct element is selected.
On CapCut Desktop (Windows & Mac)
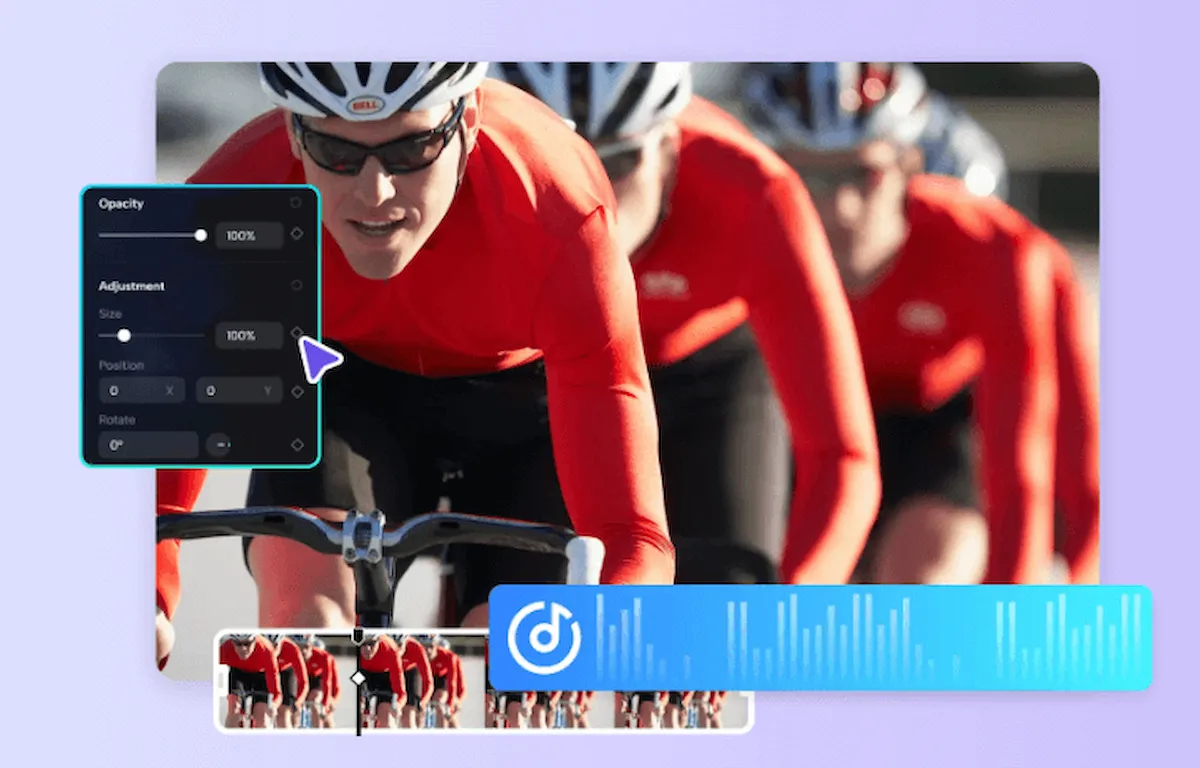
The keyframe icon in CapCut desktop is a small diamond-shaped button located in the right-side editing panel.
Here’s exactly how to find it:
Step 1: Click on your clip in the timeline (this is critical)
Step 2: Look at the right panel under “Video” settings
Step 3: Find properties like Position & Size, Scale, Rotation, or Opacity
Step 4: Next to each property, you’ll see a small diamond icon that is the keyframe button
If you don’t see the diamond icon:
- Make sure your clip is selected
- Make sure your playhead is inside the clip
- Expand the property section (some settings are collapsed by default)
👉 Important: The keyframe icon is not global. It only appears next to properties that support animation.
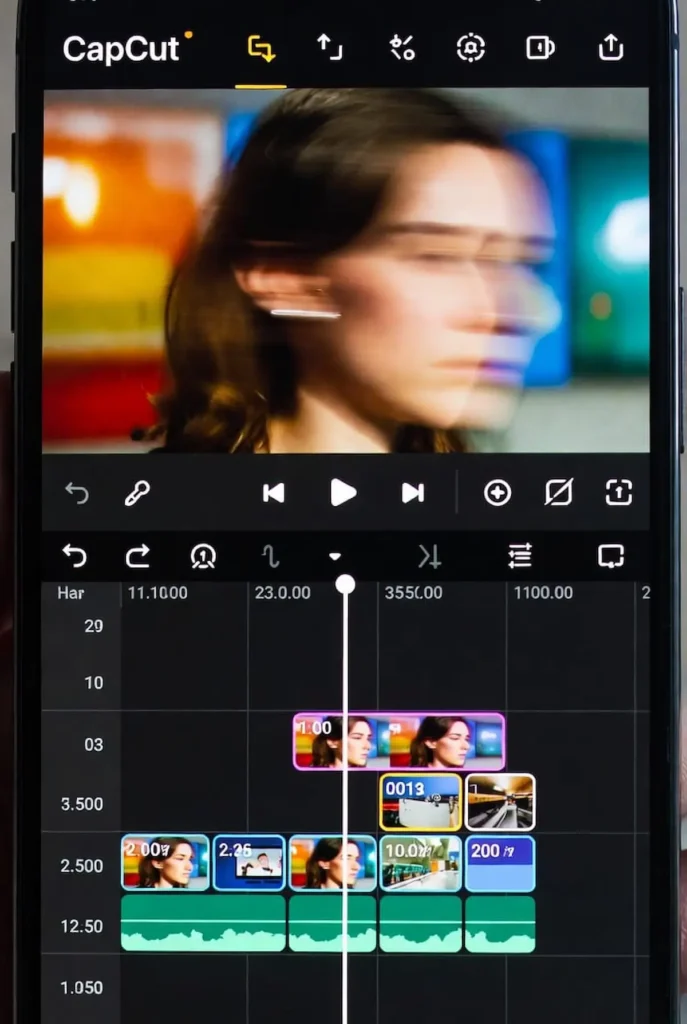
On CapCut Mobile (iPhone & Android)
On mobile, the keyframe icon is easier to spot.
Step 1: Tap your clip on the timeline
Step 2: Look at the bottom toolbar
Step 3: Find the diamond icon (as shown on the image above)
Once tapped:
- The diamond turns red = keyframe added
- A red marker appears on your timeline
Why You Might Not See the Keyframe Button
If the keyframe icon is missing in CapCut, it’s usually one of these:
- No layer selected (most common mistake)
- Playhead is outside the clip
- You’re looking in the wrong panel (desktop users)
- The setting you opened doesn’t support keyframes
If the diamond icon is still missing or animations refuse to work, check these CapCut keyframes not working fixes.
How to Use Keyframes in CapCut PC [Windows & Mac]
The desktop version of CapCut offers more precise keyframe control than mobile. Whether you’re on Windows 10/11 or macOS, the workflow remains identical.
CapCut Desktop Keyframe Tutorial for Windows
Step 1: Import your clip and select it on the timeline

Step 2: In the right panel, find the property you want to animate (Position & Size, Color, Volume, etc.)
Step 3: Click the diamond icon next to the property to set your first keyframe
Step 4: Move the playhead forward, adjust the property value, and CapCut automatically sets the second keyframe
Step 5: Right-click the clip → “Show keyframe animation” → Click “Graphs” to adjust easing curves
CapCut Desktop Keyframe Tutorial for Mac
The Mac interface mirrors Windows, with one exception: keyboard shortcuts. On Mac:
- Option + K: Add keyframe at playhead
- Cmd + click: Select multiple keyframes for bulk editing
Mac-specific troubleshooting: If you can’t find the keyframe button, ensure you’re in “Professional” mode (Settings → Interface).
PC-Exclusive Keyframe Features
| Feature | Mobile | Desktop (Win/Mac) |
|---|---|---|
| HSL Curve Keyframes | ❌ | ✅ |
| Multi-select keyframes | ❌ | ✅ |
| Custom easing curves | Basic | Advanced |
| Mask keyframing | Pro only | Pro only |
| Frame-accurate scrubbing | Limited | Precise |
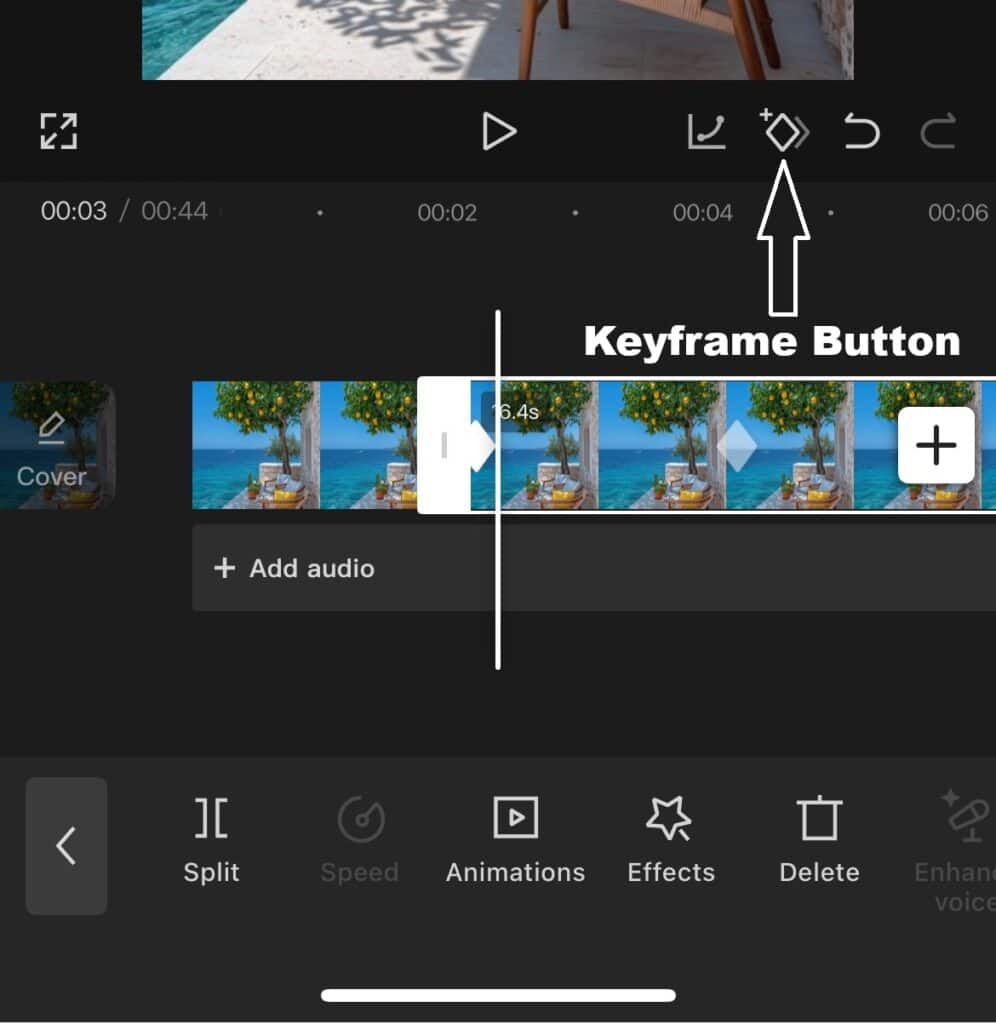
How to Add Keyframes in CapCut Mobile [iPhone & Android]
iPhone/iOS Keyframe Setup
Step 1: Select your clip on the timeline
Step 2: Position the playhead where animation starts
Step 3: Tap the diamond icon in the bottom toolbar
Step 4: Adjust the property (pinch to scale, drag to move)
Step 5: Move playhead forward, adjust again—second keyframe auto-creates
iOS tip: Use two fingers to pinch-zoom the timeline for precise keyframe placement.
Android Keyframe Setup
The Android workflow matches iOS, but with hardware variations:
- Pinch sensitivity: Android devices vary—if pinch-to-zoom timeline isn’t working, use the zoom buttons (+/-) instead
- Performance: Mid-range Android phones may show choppy keyframe previews; export to check smoothness
Mobile Keyframe Pro Tips
- Timeline zoom: Pinch with two fingers to expand the timeline for frame-accurate placement
- Delete keyframes: Move playhead over the red diamond, tap the keyframe button again to remove
- Graph adjustments: Tap the “graph” icon next to the diamond for speed curves.
How to Make Smooth Keyframe Animations (Speed Curves)
By default, CapCut creates linear animations at constant speed from start to finish. Real camera movement accelerates and decelerates. Here’s how to fix robotic motion:
On CapCut PC:
- Add your keyframes as normal
- Right-click clip → “Show keyframe animation.”
- Click the Graphs icon
- Choose from presets: Ease In, Ease Out, Ease In-Out, or custom bezier
On Mobile:
- Add keyframes
- Move the playhead over a keyframe
- Tap the graph icon beside the diamond
- Select curve type: Linear, Ease In, Ease Out, or Ease In-Out
My recommended Best practices:
- Ease In: Use for zooms starting from still (slow start, fast end)
- Ease Out: Use for movements ending on a subject (fast start, slow end)
- Ease In-Out: Use for most general motion (natural acceleration/deceleration)
If the curve panel refuses to appear, here’s how to fix the issue when the CapCut keyframe graph is not showing.
5 CapCut Keyframe Examples (Step-by-Step Tutorials)
These three effects cover 80% of what you’ll use keyframes for. Master them, then combine them.
Example 1: Smooth Zoom (Focus Pull)
When to use: Drawing attention to a face, product detail, or reaction. Also hides cuts when paired with movement.
The mistake most make: Placing start and end keyframes too close together, creating a jarring snap-zoom instead of a slow focus pull.
Timing rule: For a 1-second zoom, place keyframes 30 frames apart (at 30fps) or 60 frames apart (at 60fps). For slower drama, use 2-3 seconds.
Step-by-step instructions:
Step 1: Import your clip and select it on the timeline.
Step 2: Position the playhead at the exact frame where you want the zoom to begin — typically when your subject starts speaking or when you want to break a static shot.
Step 3: Tap the Keyframe button (diamond icon). It turns red, confirming the keyframe is set. Notice the red diamond that appears on your clip in the timeline — this is your anchor.
Step 4: Without moving the playhead, pinch the preview screen to set your starting zoom level. For a zoom-in, start at 100% (normal). For a zoom-out, start slightly cropped in.
Step 5: Move the playhead forward 1-2 seconds. This is where your zoom completes.
Step 6: Tap Keyframe again to set your second anchor.
Step 7: Pinch the preview to your ending zoom level. For a standard focus pull, end at 130-150% zoom. For dramatic emphasis, push to 200%.
Step 8: Play back. CapCut animates the scale change between your two keyframes automatically.
Pro variations:
| Effect | Keyframe Setup | Use Case |
|---|---|---|
| Slow creep | 3-second gap, 100% → 120% | Documentary, vlog — adds life without distraction |
| Snap zoom | 10-frame gap, 100% → 180% | Comedy, reaction videos — mimics handheld energy |
| Zoom + pan | Add position keyframes alongside scale | Following a moving subject |
| Zoom out reveal | Start cropped, end wide | “Here’s what I was looking at” moments |
Common failure: The zoom feels mechanical. Fix this by adding a third keyframe in the middle with a slight position adjustment, creating organic handheld feel.
Example 2: Animated Color Shift
When to use: Flashbacks, mood transitions, time passage, or stylistic emphasis. More subtle than cuts — viewers feel the change without seeing an edit.
The core principle: CapCut animates between any two adjustment states. Saturation, temperature, tint, and even individual RGB curves if you’re on a desktop.
Example: Color to Black and White
Step 1: Select your clip. Position the playhead where the shift should begin — often a line of dialogue that signals reflection or a time jump.
Step 2: Tap Keyframe to set your color anchor.
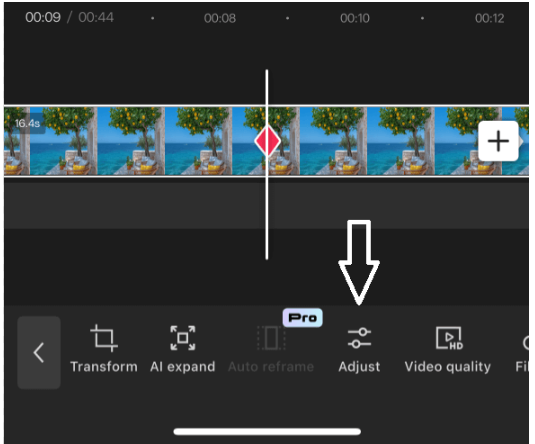
Step 3: Open Adjust → Saturation. Set to 0 (normal color). This saves your starting state.
Step 4: Move playhead 2 seconds forward — longer for emotional beats, shorter for shock.
Step 5: Tap Keyframe again.
Step 6: Drag Saturation to -50 (full black and white). CapCut animates the desaturation between your two points.
Pro variations:
| Transition | Keyframe Path | Timing |
|---|---|---|
| Warm to cool | Temperature +20 → -20 | 1.5 seconds — signals mood shift |
| Day to night | Brightness 0 → -30, Saturation 0 → -20 | 3 seconds — time passage |
| Selective color pop | Use mask keyframes (Pro feature) to isolate one color | Complex, but striking |
Desktop advantage: On CapCut PC, you can keyframe individual HSL adjustments — turn just the reds more orange while blues shift cyan, creating stylized looks impossible on mobile.
Mobile workaround: Split your clip into segments and apply different filters to each, then crossfade. Not true keyframing, but achieves similar color shifts.
For more advanced selective animation, see this CapCut mask keyframes guide.
Example 3: Audio Ducking (Automatic Fade)
When to use: Talking over background music. The music dips when you speak, rises when you stop — professional podcast and vlog standard.
Why keyframes beat manual fades: Keyframes follow your voice automatically. Manual fades drift out of sync if you re-edit your cuts.
Step-by-step:
Step 1: Add your background music track. Position it under your video.
Step 2: Select the music track (not the video).
Step 3: Scrub to where you start speaking. Tap Keyframe.
Step 4: Drag the volume slider to your normal music level — typically 80-100%.
Step 5: Scrub forward 0.5 seconds (15 frames at 30fps). This is your dip speed — faster than this sounds abrupt, slower sounds muddy.
Step 6: Tap Keyframe. Drag volume to 20-30% — audible but not competing.
Step 7: Scrub to where you stop speaking.
Step 8: Tap Keyframe. Keep volume at 20-30%.
Step 9: Scrub forward 0.5 seconds.
Step 10: Tap Keyframe. Return volume to 80-100%.
The shape you built: High → Low → Low → High. The two middle keyframes hold the dipped state while you speak.
Pro tip: For multiple speech sections, copy this 4-keyframe pattern and paste it along your timeline. Consistent ducking without re-tuning each time. learn how to fully edit, extract, or replace audio tracks in CapCut.
Advanced: On desktop, keyframe the music’s High Pass filter alongside volume — cut bass frequencies when you speak (less rumble), restore full spectrum when music plays alone.
Example 4: Text Animation (Position + Opacity Combined)
When to use: Introducing titles, lower thirds, or call-to-action text that needs to slide in and fade up simultaneously. This creates professional broadcast-style motion that static text cannot achieve.
The technique: Layer position keyframes with opacity keyframes on the same element. CapCut animates both properties independently but simultaneously.
Step-by-step instructions:
Step 1: Add your text element (tap Text → Add text). Type your headline. Position it below the frame where you want it to start.
Step 2: With the text selected, move the playhead to where the animation begins. Tap the Keyframe button.
Step 3: Set starting state. Drag the text down 20% below its final position. Open Opacity (under Basic) and set to 0%.
Step 4: Move the playhead forward 0.8 seconds (24 frames at 30fps). Tap Keyframe again.
Step 5: Set ending state. Drag the text up to its final position. Set Opacity to 100%.
Step 6: Play back. The text rises while fading in—two properties animated from two keyframe pairs.
Pro variations:
- Staggered reveal: Animate position first (keyframes at 0s and 0.6s), opacity second (keyframes at 0.3s and 0.9s). The text moves, then fades.
- Exit animation: Add a third keyframe set 2 seconds later—text slides up and out while fading to 0%.
- Scale emphasis: Add scale keyframes (100% → 110% → 100%) alongside position for a “pop” effect.
Timing rule: Text animations need to be faster than camera motion. 0.6-1.0 seconds total duration keeps the reading flow intact. Slower feels sluggish, faster becomes unreadable.
Common failure: Text starts animating mid-word. Fix by adding a “hold” keyframe—set position and opacity keyframes with identical values 0.3 seconds before the movement starts.
For a full walkthrough, see how to animate text with keyframes in CapCut.
Example 5: Ken Burns Effect (Slow Pan + Zoom on Photos)
When to use: Documentary-style photo reveals, storytelling sequences, or breaking up static B-roll. Named after filmmaker Ken Burns, who popularized the technique. Adds life to still images without leaving CapCut.
The technique: Combine position keyframes (panning) with scale keyframes (zooming) in opposite directions—zoom in while panning out, or zoom out while panning across.
Step-by-step instructions:
Step 1: Import a high-resolution photo (higher than your output resolution to allow zooming without pixelation). Place it on the timeline.
Step 2: Select the photo. Move the playhead to the start. Tap Keyframe.
Step 3: Set starting composition. Scale to 120% (slightly zoomed in). Position the photo so the left side fills the frame—this is your starting “look.”
Step 4: Move the playhead forward 4-6 seconds. This slow duration is essential for the Ken Burns mood.
Step 5: Tap Keyframe again.
Step 6: Set ending composition. Scale to 100% (full width). Reposition the photo so the right side fills the frame. CapCut animates both the zoom-out and the pan-right simultaneously.
Step 7: On desktop, open the keyframe graph and apply “Ease In-Out” to both properties. This eliminates mechanical linear motion.
Pro variations:
- Zoom in, pan up: Start wide on a landscape, end tight on a mountain peak—creates discovery.
- Reverse direction: Start tight on a face, pull back to reveal the crowd—creates context.
- Vertical pan: Use for tall portraits or phone-screenshot content. Start at chin, end at eyes.
- Multi-stop journey: Add three keyframe sets—start left, pause center, end right. The “pause” uses identical values at keyframes 2 and 3.
Technical requirements:
- Source resolution: Photo must be 1.5x your export resolution minimum. For 1080p export, use a minimum 1620px width.
- Duration: 4-8 seconds per photo. Shorter feels rushed, longer tests patience.
- Motion speed: The visible frame should travel roughly 20-30% of the photo width over the duration.
Mobile limitation: Precise 4-second keyframe placement is difficult on small screens. Use the “split clip” workaround—cut the photo into 3 segments, apply different static positions/scales to each, then add 0.5-second crossfades between them. Mimics keyframing with cuts.
Desktop advantage: CapCut PC allows viewing the motion path. You can drag the bezier handles to make the pan accelerate at the start and decelerate at the end—exactly how a real camera operator would move.
Common failure: The photo becomes pixelated during zoom. Always check the resolution before animating. If you see softness at 150% zoom in the preview, reduce your maximum scale or use a higher-res source image.
The Complete CapCut Keyframe Guide for Beginners: Universal Workflow
Every keyframe animation follows the same pattern. Master this 5-step CapCut keyframe workflow once, apply it to zooms, color shifts, audio ducking, and text animation.
The 5-Step Pattern for CapCut Keyframes
Step 1: Select the layer
Video, text, sticker, or audio. Keyframes attach to whatever is selected.
Step 2: Position the playhead
Scrub to where the change begins. This is your starting keyframe position.
Step 3: Set the starting state
Tap the Keyframe button (diamond icon). Adjust any property — position, scale, rotation, opacity, color, volume. The keyframe saves this state.
Step 4: Move and modify
Advance the playhead. Change the same property to a new value. CapCut auto-generates the ending keyframe when you modify.
Step 5: Preview and adjust
Play the segment. If the motion feels fast, spread the keyframes apart. If it feels slow, bring them closer. Add intermediate keyframes for curves or holds.
CapCut Keyframe Timing Guidelines
| Effect Type | Keyframe Gap | Feel |
|---|---|---|
| Subtle zoom | 2-3 seconds | Cinematic, unnoticed |
| Snap zoom | 0.3-0.5 seconds | Energetic, comedic |
| Color shift | 1.5-2.5 seconds | Emotional, deliberate |
| Audio duck | 0.5 seconds | Smooth, professional |
| Text slide | 0.8-1.2 seconds | Readable, dynamic |
CapCut Mobile vs Desktop: Keyframe Feature Comparison
| Feature | Mobile | Desktop |
|---|---|---|
| Keyframe button location | Bottom toolbar, diamond icon | Right panel, “Keyframe” checkbox |
| Precision | Finger scrubbing, approximate | Mouse + zoomed timeline, frame-accurate |
| Properties available | Position, scale, rotation, opacity, basic adjustments | Same + HSL curves, masking, advanced effects |
| Multi-select keyframes | No | Yes — lasso select, bulk move |
| Easing curves | Automatic only | Manual curve editor (Pro) |
Workflow tip: Start on mobile for speed. Refine on desktop for precision. Projects sync via CapCut Cloud.
Pro Techniques
Hold keyframes: Place two keyframes with identical values. The property stays static between them, then changes abruptly. Useful for pausing Zoom mid-animation.
Ease in/out: On desktop Pro, adjust curve handles so motion starts slow, accelerates, then decelerates. Mimics real camera movement.
Copy motion: Mobile limitation — no direct copy. Workaround: duplicate the clip, keyframes included. Split and reposition as needed.
Keyframe density: More keyframes = more control. For complex motion (tracking a moving object), place keyframes every 10-15 frames. For simple zooms, two suffice.
CapCut Keyframe Troubleshooting: Fix Common Issues
| Symptom | Cause | Fix |
|---|---|---|
| Animation snaps instead of smooth | Keyframes too close | Space them 0.5s+ apart |
| Property jumps unexpectedly | Accidental keyframe on adjacent frame | Zoom timeline, delete stray keyframe |
| Can’t find keyframe button | Wrong layer selected | Tap video/text/audio first |
| Motion feels robotic | Linear interpolation only | Add middle keyframe with slight variation |
| Keyframe won’t set | Playhead not on clip | Ensure playhead is within clip boundaries |
Keyframes in CapCut Troubleshooting and Solutions
Three issues account for most keyframe failures. Work through these in order.
Problem 1: Keyframe Button Missing or Grayed Out
Check these in order:
| Check | Action | Result |
|---|---|---|
| Layer selection | Tap video, text, sticker, or audio track until highlighted | Unselected layers hide the keyframe tool |
| Clip boundaries | Ensure playhead is within the clip’s start and end points | Keyframes cannot exist outside clip duration |
| App version | Update CapCut via App Store/Google Play | Keyframe features expanded significantly in v6.0+ |
| Pro feature limit | Some advanced properties (mask keyframes) require Pro | Check for crown icon — upgrade or use workaround |
Still missing? Force-close app, clear cache, reload project. Corrupted UI states occasionally hide tools.
Problem 2: Animation Choppy or Stuttering
Causes and fixes:
| Cause | Diagnosis | Fix |
|---|---|---|
| Keyframes too close | Gap under 0.3 seconds | Space to 0.5s minimum for 30fps, 0.25s for 60fps |
| Device performance | Lag during preview, not in export | Close background apps, lower preview quality |
| Frame rate mismatch | 60fps keyframes on 30fps timeline | Match project frame rate to source footage |
| Complex叠加 | Multiple animated layers simultaneously | Pre-render: export individual layers, re-import as single clip |
Preview vs. export: Choppy preview often smooths in final export. Test export before adjusting.
Problem 3: Keyframes Out of Sync After Editing
The scenario: You trim a clip or move it on the timeline. Keyframes stay at original timestamps, now misaligned with audio or cuts.
Prevention: Always finalize your rough cut before adding keyframes. Keyframe timing is absolute, not relative to clip edges.
Fix after the fact:
| Situation | Solution |
|---|---|
| Clip trimmed from start | Keyframes now too early — delete and rebuild, or split clip at keyframe point |
| Clip moved on timeline | Keyframes move with clip — problem is elsewhere (audio not grouped?) |
| Speed changed after keyframing | Keyframes don’t auto-adjust to new duration — delete and rebuild at proportional points |
Nuclear option: Split clip at each keyframe point, apply static adjustments instead of animation, crossfade segments. Loses smoothness but preserves timing.
Frequently Asked Questions
Step 2: In the right panel, find the property you want to animate (Position, Scale, Rotation, etc.).
Step 3: Click the diamond icon next to the property to set your first keyframe.
Step 4: Move the playhead forward and adjust the property value—CapCut auto-creates the second keyframe.
Pro tip: Right-click the clip → “Show keyframe animation” → “Graphs” to adjust easing curves for smoother motion.
Mac shortcuts:
Option + K adds a keyframe at the playhead. Cmd + click selects multiple keyframes for bulk editing. If you don’t see the keyframe button, ensure you’re in “Professional” mode via Settings → Interface.1. Select your clip on the timeline
2. Position the playhead where animation starts
3. Tap the diamond icon in the bottom toolbar
4. Adjust the property (pinch to scale, drag to move)
5. Move playhead forward and adjust again—the second keyframe auto-creates
Tip: Use two fingers to pinch-zoom the timeline for frame-accurate keyframe placement.
On PC: Right-click clip → “Show keyframe animation” → Click “Graphs” → Select “Ease In-Out” for natural acceleration/deceleration.
On Mobile: Tap the graph icon next to the keyframe diamond → Choose “Ease In,” “Ease Out,” or “Ease In-Out.”
Timing rule: Space keyframes at least 0.5 seconds apart for 30fps footage to avoid choppy motion.
CapCut Pro adds advanced features: mask keyframing (selective animation), custom curve easing editors, and HSL color curve keyframes. The free version handles 95% of typical keyframe needs.
1. Nothing selected: Tap a clip, text, or audio track first—the keyframe button only appears when a layer is active
2. Playhead outside clip: Move the playhead so it’s within the clip’s boundaries on the timeline
3. Outdated app: Update to CapCut v6.0+ (keyframe features expanded significantly)
If you see a crown icon, that property requires CapCut Pro.
Desktop (Windows/Mac): Click the keyframe diamond on the timeline, then press Delete or right-click → Remove. You can also
Cmd/Ctrl + click multiple keyframes to delete them in bulk.Desktop advantage: CapCut PC allows multi-select (
Cmd/Ctrl + click) and bulk move of keyframes. You can also save clips with keyframes as “Components” to reuse across projects.Desktop advantages: HSL curve keyframing, multi-select keyframes, frame-accurate scrubbing with mouse, and custom easing curves. Projects sync via CapCut Cloud, so you can start on mobile and refine on desktop.
• Keyframes too close: Space them at least 0.5 seconds apart (15 frames at 30fps)
• Device performance: Close background apps or lower preview quality
• Frame rate mismatch: Ensure project settings match your footage (30fps vs 60fps)
• Too many layers: Pre-render complex sections
Note: Choppy preview often renders smoothly in final export—test export before adjusting.
• Mask keyframing (animate selective areas only)
• Custom curve easing editors (fine-tune animation speed)
• Advanced HSL color curve keyframes
• Keyframe graphs on mobile
Basic zoom, position, opacity, and volume keyframes are fully free and unlimited.
Conclusion
Keyframes turn static edits into motion that holds attention. The three techniques in this guide: zoom, color shift, and audio ducking, cover most of what you’ll need for professional social content.
The workflow is always the same: select, set, move, modify, preview. Timing separates amateur from polished. Space your keyframes intentionally; don’t accept default spacing.
CapCut’s keyframe tool punches above its weight for a free mobile editor. Master it here, and you’ll adapt faster when you eventually move to desktop software.
Make sure to choose the best export settings to preserve your keyframed animations.
Your next step: open a project, pick one clip, and add a two-keyframe zoom. Takes 60 seconds. The skill compounds from there.