
CapCut effects can make your video look clean and pro. Or they can make it look like you tapped every button on the screen.
I learned that the hard way. When I first started editing short videos, I thought more effects meant more wow. But the videos that held attention were the clean-looking ones. Not plain. Just intentional. The effect wasn’t the star. The message was.
On TikTok, Reels, and YouTube Shorts, effects should do one job: make the clip easier to watch. Clearer image, tighter pacing, or focus on the moment that matters. If an effect distracts, it hurts retention, and people swipe.
So this is my go-to set of CapCut effects for social media videos that work across most niches. You’ll see what to use, where it fits best (TikTok vs Reels vs Shorts), and how to apply effects without making your edit feel messy.
If you’re still new to editing, start with my complete guide to CapCut for social media so you understand the foundation before layering in effects.
Table of Contents
- CapCut Effects for Social Media Videos (Quick Answer)
- Updated and Trending Effects (Worth Knowing)
- Effects vs Transitions (So You Don’t Mix Them Up)
- Best CapCut Effects for Social Media (By Goal)
- Best CapCut Effects for TikTok (Trend-Friendly, Still Clean)
- Best CapCut Effects for Instagram Reels (Clean, Aesthetic, Readable)
- Best CapCut Effects for YouTube Shorts (Retention + Clarity)
- How to Add Effects in CapCut (Step-by-Step)
- My 7-Effect Kit You Can Reuse on Any Social Media Video
- Common Mistakes With CapCut Effects (And How to Fix Them)
- Conclusion
CapCut Effects for Social Media Videos (Quick Answer)
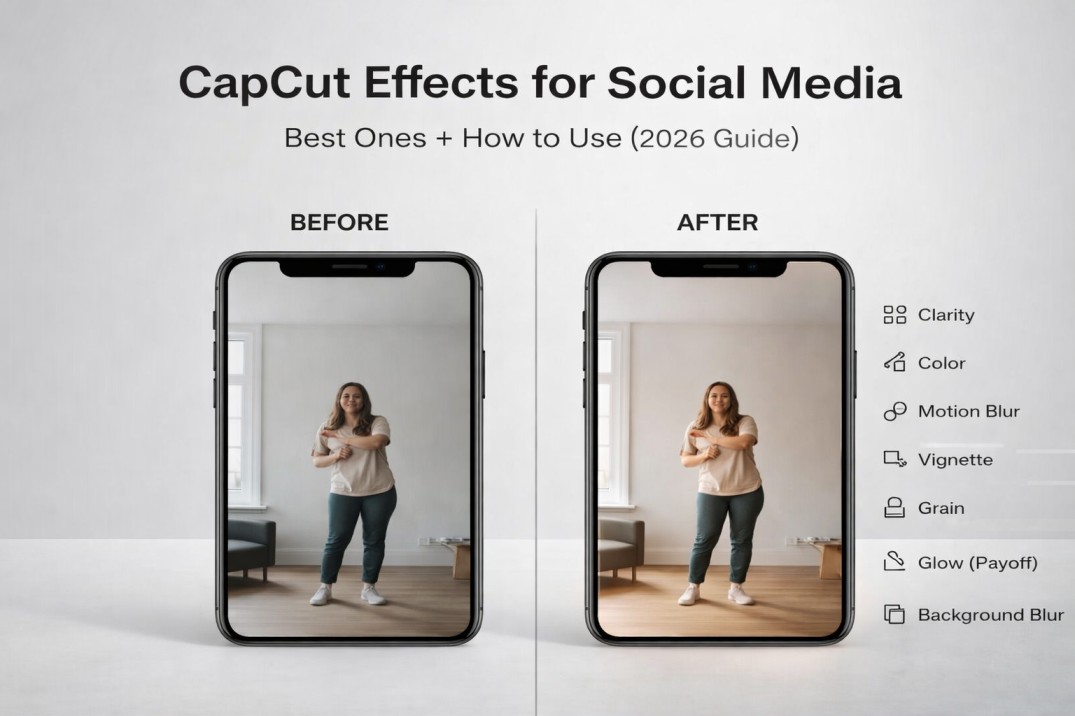
If you want a simple effects kit that works in almost any niche, start here:
- Light sharpen/clarity (tiny boost, not crunchy)
- Basic color + contrast (the clean upgrade)
- Motion blur (light, only when movement is fast)
- Vignette (barely there, for focus)
- Glow/highlight (subtle, for payoff moments)
- Film grain (tiny amount, optional mood)
- Background blur (when your framing or background is messy)
Rule i follow: use 1 to 2 effects max per video (plus your basic color adjustment). If you stack a bunch, the video stops looking edited and starts looking processed.
Updated and Trending Effects (Worth Knowing)
CapCut trends change fast. Currently, a lot of creators are leaning into AI-powered tools, cleaner cinematic looks, and template-driven edits. Grab some viral CapCut templates for edits to get started without building everything from scratch.
You don’t need to chase every trend, but it helps to know what’s hot so your videos don’t feel stuck in last year.
Here are a few 2026-style additions to keep on your radar:
- Light AI-enhanced tools like background removal, auto cutouts, or smarter subject isolation to keep the focus clean.
- Cinematic touches like subtle teal and orange style grading, soft light rays, or vintage film looks used lightly for mood.
- Template trends like speed ramps, viral text animations, motion tracking, and text-behind-subject effects (these often live inside CapCut’s trending templates section).
Quick reminder: trends work best as a garnish. Your core results usually come from the same basics: clear footage, tight cuts, readable captions, and 1 to 2 effects that support the message.
Effects vs Transitions (So You Don’t Mix Them Up)
A lot of creators confuse these. And when you mix them up, your edit starts feeling chaotic.
Transitions happen between two clips. They control how you move from one shot to the next.
Effects are applied to a clip itself. They change how it looks or feels. Clarity. Mood. Focus. Motion.
Use transitions when:
- You’re switching scenes or camera angles
- You want a smooth change between clips
- You’re building a montage or reveal
Use effects when:
- A clip needs to look cleaner
- You want stronger focus on the subject
- You’re setting a consistent mood
- You want to emphasize one key moment
Here’s the simple workflow that keeps edits clean:
- Cut first.
- Add captions and text.
- Then apply effects last.
If you add effects too early, you’ll mess with readability and pacing. Clean structure first. Styling second.
Best CapCut Effects for Social Media (By Goal)
Effects for clarity (cleaner, sharper video)
These are the invisible effects. They make your footage look better without shouting that it’s edited.
Use when your clip looks soft, dull, or slightly washed out.
Best options:
- Sharpen/Clarity (light): improves detail (don’t push it)
- Contrast (small boost): adds depth
- Highlights/Shadows (balanced): fixes harsh lighting
- Saturation (small boost): richer color without looking fake
Keep it subtle. If skin starts looking crunchy or the image gets noisy, you went too far.
Effects for pacing (make clips feel faster)
These help your edit feel tighter and punchier without turning it into chaos.
Use when a clip drags, or movement feels slow.
Best options:
- Motion blur (light): smooths fast cuts and quick movement
- Speed effects (small ramps): speed up boring parts, keep key moments normal
If your speed ramp looks jumpy, lower the intensity and shorten the ramp.
Effects for mood (clean vibe without clutter)
Mood effects should feel like something you barely notice, but your brain likes.
Use when you want a consistent look across your content.
Best options:
- Film grain (tiny amount): adds texture
- Cinematic/soft tone (light): makes footage feel less phone-ish
- Vignette (very light): pulls focus to the subject
If the effect is the first thing you notice, it’s too strong.
Effects for emphasis (draw attention to one moment)
These are moment effects, not whole-video effects.
Use when you want to highlight a key point, result, or reaction.
Best options:
- Glow/highlight (subtle): emphasize text or the payoff moment
- Background blur: make the subject pop (great for talking head)
- Zoom emphasis (keyframes): often cleaner than heavy effects
Use emphasis effects for 0.5 to 1.5 seconds, then return to normal.
Instead of stacking heavy effects, add a quick, subtle keyframe zoom on emphasis moments — it pulls focus cleanly without overwhelming the clip. Learn more from our keyframes in capCut guide.
Effects for trending looks (use only if it fits your niche)
Trendy effects can work. They can also make your content age fast.
Use when the trend matches your niche and audience.
Best options:
- Light shake (very minimal)
- Flash (one-time beat hit)
- Retro/VHS style (only for specific vibes)
Rule: if you’re teaching, selling, or explaining, stay clean. Trend effects usually work best for entertainment edits.
Best CapCut Effects for TikTok (Trend-Friendly, Still Clean)
TikTok can handle stronger effects than other platforms. But the videos that keep performing over time still look readable and intentional.
Use effects to support the hook, the pacing, or the payoff. Not to decorate the whole clip.
1) Motion Blur (Light)
Best for fast cuts, quick camera movement, and montage-style edits.
Use it lightly so your video doesn’t look smeared.
2) Glow/Highlight (Subtle, Payoff Only)
Use it to punch up the result moment.
Add it for 0.5 to 1.5 seconds on the payoff, then remove it so it stays special.
3) Background Blur (Clean Talking-Head Look)
Perfect if you film in a messy room or a busy environment.
It keeps attention on your face or product and makes text overlays easier to read.
4) Light Shake (Minimal)
Works for comedic emphasis or beat drops.
Use it once or twice max. If it shakes nonstop, it looks spammy.
5) Flash (One-Time Beat Hit)
Good for trend edits where the beat drop matters.
Keep it quick. Use it once at the strongest moment, not repeatedly.
6) Color/Contrast Boost (Clean Pop Look)
Most TikToks look better with small adjustments:
- Slight contrast boost
- Slight saturation boost
- Balanced highlights and shadows
This makes footage look sharper without screaming filter.
7) Speed Effects (Small Ramps)
Speed up boring parts and keep key moments normal.
Keep ramps smooth and short. Don’t turn the whole video into 2x speed. Only the dead time.
Best CapCut Effects for Instagram Reels (Clean, Aesthetic, Readable)
Reels usually perform better with a cleaner look. Heavy effects can feel spammy fast, especially for educational, lifestyle, or business content.
1) Subtle Color and Contrast Adjustments (Most Important)
This is the easiest way to make your footage look premium.
- Slight contrast boost
- Slight saturation boost
- Fix highlights and shadows so the clip looks balanced
Small tweaks beat heavy filters every time.
2) Background Blur (For Cleaner Focus)
Great for talking-head tips, product demos, and busy backgrounds.
It keeps attention on the subject and makes captions easier to read.
3) Vignette (Very Light)
A tiny vignette helps focus without being obvious.
Use it lightly so the edges don’t look dark and dramatic.
4) Film Grain (Tiny Amount)
Adds texture and can make footage feel less raw.
Use a very small amount. If you can clearly see the grain, it’s too much.
5) Soft/Cinematic Tone (Light)
Good for aesthetic Reels like beauty, fashion, travel, and lifestyle.
Keep it subtle so skin tones stay natural.
6) Sharpen/Clarity (Light Touch Only)
Use only when footage looks soft.
Too much sharpness makes faces look crunchy and adds noise.
7) Simple Glow/Highlight (One Moment)
Use glow for the payoff moment only:
- Final reveal
- Before and after result
- Key product shot
Keep it short, then return to normal.
Best CapCut Effects for YouTube Shorts (Retention + Clarity)
Shorts viewers swipe fast if they’re confused. So the best effects for YouTube Shorts are the ones that improve clarity and guide attention without looking extra.
1) Captions + Readability (Most Important)
This isn’t flashy, but it wins.
- Use high-contrast captions (white with outline or shadow)
- Keep captions 1 to 2 lines
- Place them slightly higher so the Shorts UI doesn’t cover them
Clean captions often outperform heavy visual effects.
2) Subtle Sharpen/Clarity (Light)
Use only if your footage looks soft.
A small boost makes faces and text look crisp. Too much makes the video noisy and crunchy.
3) Background Blur (Focus Effect)
Shorts are watched on small screens. Background blur helps you:
- Keep attention on your face or product
- Make the video feel cleaner
- Reduce distraction in busy scenes
4) Vignette (Very Light)
A tiny vignette pulls focus to the subject.
Keep it subtle so it doesn’t look dark or dramatic.
5) Keyframe Zoom (Cleaner Than Most Effects)
Instead of stacking effects, add movement:
- Small zoom-in on key moments
- Slight zoom-out for pacing
- Keep it smooth and consistent
This boosts retention without making the edit messy.
6) Motion Blur (Light, Only When Needed)
Use motion blur if you have:
- Fast camera movement
- Quick montage cuts
- Whip or pan-style motion
Keep it light so the video doesn’t look smeared.
7) Emphasis Effect (One Moment Only)
If you want a pop moment, use a subtle glow or highlight:
- On the payoff moment
- For 0.5 to 1.5 seconds
Then return to your normal look.
How to Add Effects in CapCut (Step-by-Step)
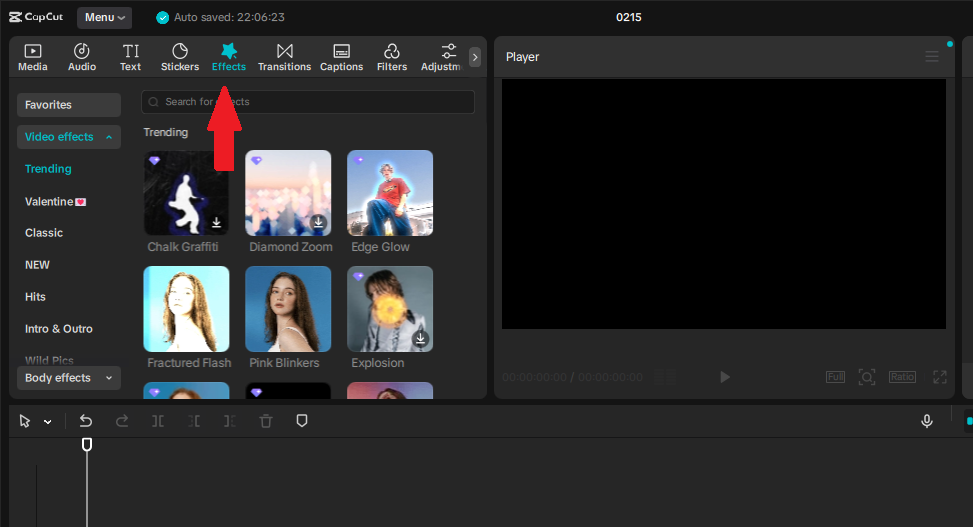
1) Apply an effect to one clip (best for control)
- Tap the clip you want to edit on the timeline
- Tap Effects (or Video effects)
- Choose an effect and tap Apply
- Adjust intensity so it stays subtle
- Trim the effect duration so it only covers the moment you want
2) Apply an effect to the whole video (use sparingly)
Only do this for simple look effects like a light tone or tiny grain.
- Go to Effects → Video effects
- Add the effect to the track
- Stretch it across the full timeline
- Keep intensity low so it doesn’t overpower captions and faces
3) Control how strong the effect looks
- If the effect has an intensity slider, keep it low
- If your video starts looking noisy or over-processed, reduce it
- If text becomes harder to read, lower the effect or remove it
4) Use a clean effects order
This keeps your edits readable.
- Cut and trim first
- Add captions and text overlays
- Apply effects last
5) Save your style (so you edit faster next time)
Once you find a clean look:
- Reuse the same 1 to 2 effects
- Keep the same intensity range
- Stick to the same caption style
That consistency is what makes your content look pro.
My 7-Effect Kit You Can Reuse on Any Social Media Video
If you want your videos to look consistent without spending forever editing, this is the kit to stick with.
I use it because it covers the only three things most short videos need: a cleaner image, stronger focus, and a little motion polish.
You do not need all seven on every video. Think of this like a toolbox. Most of the time you’ll grab two tools, not the whole set.
1) Light Color Boost (Clean Pop)
This is the fastest way to make phone footage look less flat.
Use a small contrast lift and a small saturation lift. Stop the second skin starts looking too orange or too intense.
2) Highlights/Shadows Balance (Fix Harsh Lighting)
Use this when your lighting is messy, like indoor lamps, backlight from a window, or a bright sky behind you.
The goal is simple: pull back blown-out highlights and lift dark shadows so the subject looks clear.
3) Sharpen/Clarity (Very Light)
Use this only when the clip feels soft.
Add the tiniest bump, then stop before edges look crunchy or you start seeing noise in skin and backgrounds.
4) Background Blur (Focus on Subject)
If the background is distracting, this cleans it up fast. It also makes captions easier to read and keeps attention on your face or the product. (For privacy instead of focus, you can also blur faces in CapCut using a similar masking approach.)
It also makes captions easier to read and keeps attention on your face or the product.
5) Motion Blur (Light, Only When Needed)
Use it for fast movement, montage cuts, or quick camera motion.
Keep it light. Motion blur should smooth movement, not smear the whole clip.
6) Vignette (Very Light)
A tiny vignette helps guide attention toward the center of the frame.
If viewers notice the dark edges, it’s too strong.
7) Subtle Glow/Highlight (Payoff Moment Only)
This is for the one moment you want people to feel.
Use it on the result, reveal, or key reaction for 0.5 to 1.5 seconds, then go back to normal so it stays impactful.
Common Mistakes With CapCut Effects (And How to Fix Them)
Most videos don’t look bad because of the camera. They look bad because the effects are fighting the message. If your edit feels noisy, messy, or hard to watch, it’s usually one of these.
Stacking too many effects
If you’re using 4 to 6 effects on one clip, it will start looking processed fast. Pick one main effect, maybe one support effect, and stop.
Fix: stick to 1 to 2 effects max per video (plus basic color adjustment).
Using intensity too high
A lot of CapCut effects look cheap when the strength is cranked up. The clean look almost always sits in the lower range.
Fix: lower intensity until the effect is barely noticeable, but the clip looks cleaner.
Making captions harder to read
If an effect reduces contrast, adds glare, or creates motion behind text, viewers have to work to read. When people have to work, they swipe.
Fix: lower the effect, increase caption contrast (outline or shadow), move captions higher, or remove the effect under text-heavy moments.
Applying effects to the whole video when only one moment needs it
Glow, shake, flash, and heavy blur should be moment effects. If they run the whole video, the edit feels spammy.
Fix: trim those effects to the payoff moment only, then return to your normal look.
Using trend effects that don’t match your niche
If you’re teaching, selling, or explaining, heavy trend effects usually hurt clarity. Trend looks are better for entertainment edits.
Fix: keep your style clean and use trends only when they support the message. (If you started from a template with a built-in look, check whether you can take a filter off a CapCut template instead of layering more effects to compensate.)
Making your content look inconsistent
If every video has a totally different look, your page won’t feel branded.
Fix: keep one base look (same color style and caption style) and reuse the same 1 to 2 effects most of the time.
Trying to use effects to hide weak pacing
Effects don’t fix boring clips. Tight cutting does.
Fix: trim harder first, remove dead time, then add effects at the end as polish.
Conclusion
CapCut effects are powerful, but the best social media edits don’t look effect-heavy. They look clean, clear, and intentional.
If you want your videos to perform on TikTok, Reels, and YouTube Shorts, build a small effects kit you reuse every time: light color adjustment, a tiny sharpen when needed, background blur for focus, and motion blur only when movement is fast.
Keep flashy effects like glow, shake, and flash as payoff-only moments that last 0.5 to 1.5 seconds, then go back to normal.
The real win is consistency. When your effects, caption style, and overall look stay similar from video to video, your content starts to feel branded even if you’re filming on a phone.
Stick to 1 to 2 effects per video, keep intensity low, and prioritize readability every time. That’s how your edits stay scroll-stopping without looking messy.