
You tap Auto Captions, wait for the processing circle… and nothing. Or worse, CapCut spits out completely wrong captions, freeze mid-process, or vanish entirely after you’ve spent 10 minutes editing.
Sound familiar? You’re not alone. Auto captions are one of CapCut’s most requested features—but also one of the most frustrating when they fail.
The good news: most auto-caption issues have specific causes and simple fixes. You don’t need to abandon your project or switch to manual captions (unless you want to).
In this guide, you’ll discover why your CapCut Auto Captions is Not Working, how to pinpoint your exact problem, and seven proven fixes that actually work.
The solutions are ordered from quick wins to deeper troubleshooting, so you can get captions working fast—without losing your sanity.
CapCut Auto Captions Not Working: Main Reasons
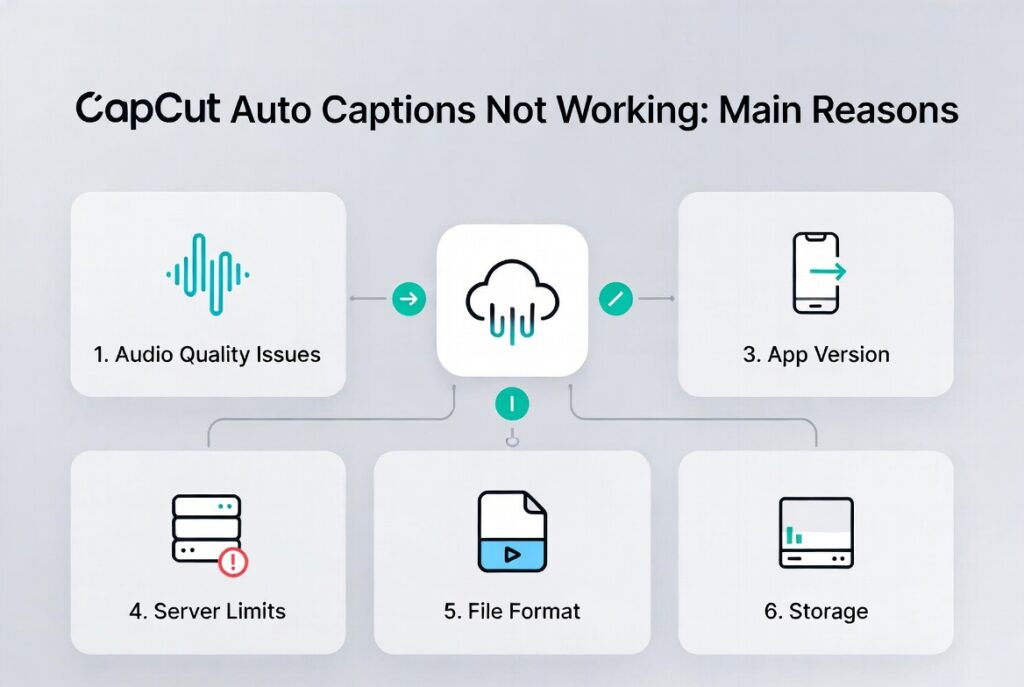
Before trying any fixes, it helps to understand what’s actually breaking. CapCut’s auto caption feature relies on cloud-based speech recognition.
Your video audio is uploaded to CapCut’s servers, analyzed, and the text is sent back to your device. This setup creates several points where things can fail:
1. Audio Quality Issues
Poor audio can cause the speech recognition engine to return incorrect text or fail. Background music, echoes, wind noise, or multiple people speaking at once can confuse the algorithm.
2. Network Connectivity Problems
Interruptions during upload or download can prevent captions from generating. If your connection drops mid-process, captions may be partial, frozen, or completely missing.
3. App Version Incompatibility
Running an outdated version of CapCut may include known caption bugs. Since CapCut updates frequently, auto caption functionality can change between versions, making some features unstable.
4. Server-Side Processing Limits
CapCut’s servers can get overloaded, or you might hit monthly free generation limits (more on this in fix #6). In these cases, captions may fail or process slowly.
5. File Format Conflicts
Certain video codecs or audio tracks can’t be read properly by CapCut’s speech engine, causing captions to fail or return errors.
6. Device Storage Constraints
Insufficient storage prevents temporary files needed for caption processing from being created or saved, leading to failed auto captions.
Identifying which category your issue falls into saves time. For example, cleaning up audio won’t fix a network problem, and restarting the app won’t resolve server-side limits.
7 Fixes for CapCut Auto Captions Not Working
Fix 1: Check Your Internet Connection (30 Seconds)
Auto captions require a stable upload and download connection. CapCut doesn’t always warn you if the network fails mid-process.
- Switch between WiFi and mobile data to test which works better.
- Run a speed test – at least 2 Mbps upload for short videos; more for longer content.
- Disable VPNs or proxy connections that might interfere with CapCut servers.
- Try generating captions on a completely different network (coffee shop WiFi, friend’s hotspot).
Symptom fixed: Captions that stall indefinitely or appear briefly then vanish. Unstable connections prevent speech recognition results from fully downloading.
Fix 2: Clean Your Audio Track (2–5 Minutes)
Poor audio is the most common reason auto captions fail or produce nonsense. CapCut needs clear, isolated voice audio for accurate results.
- Remove background music temporarily: Mute the music track or split sections with speech only. Generate captions on speech-only sections, then restore music.
- Reduce background noise: Use Noise Reduction (50–80%). Too much makes voices sound robotic.
- Boost voice clarity: Use Audio > Equalizer > Voice/Speech preset to emphasize vocal frequencies.
Symptom fixed: Captions with wrong words, skipped sentences, or “[Music]” tags instead of speech. Music with lyrics or noisy backgrounds reduces recognition accuracy.
If your generated text is readable but formatted badly, here’s how to fix auto captions in all caps in CapCut.
Fix 3: Update or Reinstall CapCut (3–5 Minutes)
Auto captions can break in specific versions of CapCut. Updating or reinstalling often resolves the issue.
- Check your version: Mobile – App Store/Play Store > Update. Desktop – Profile > Check for Updates.
- If already updated, consider reinstalling to clear corrupted cache or roll back temporarily.
- Backup projects before uninstalling.
Symptom fixed: Auto captions worked before, but now fail, the button is grayed out, or captions can’t be edited.
Fix 4: Change Your Video’s Language Setting (1 Minute)
CapCut’s speech recognition is language-specific. Wrong language selection produces gibberish.
- Start auto captions and verify the language matches your spoken language exactly.
- For multiple languages, generate captions for the dominant language first, then add secondary language segments manually.
- For accents, try the generic language option if regional variants fail.
Symptom fixed: Captions with random words, incorrect alphabet, or gibberish.
Fix 5: Split Long Videos into Shorter Segments (5–10 Minutes)
CapCut has processing limits. Long videos (>10–15 min) or dense speech may hang or fail.
- Use natural breaks (scene changes, topic shifts, pauses) to split the video into 3–5 minute segments.
- Generate captions per segment, then export or combine.
- Duplicate your project before splitting to preserve the original.
Symptom fixed: Captions freeze at 80–99%, generate partially, or the Generate button becomes unresponsive.
Note: When merging segmented captions back together, watch for looping or repeating text artifacts, use these steps to fix CapCut captions looping or repeating in your final timeline.
Fix 6: Check Your Monthly Auto Caption Limit (Immediate Check)
Free users get a limited number of caption generations each month, so check your monthly auto caption limit before assuming the feature is broken. Exceeding this either disables the feature or triggers errors.
- Go to Captions > Auto Captions and check remaining quota (if available).
- Options if limit reached: wait for the monthly reset, switch to manual captions, or upgrade to CapCut Pro for unlimited captions.
Symptom fixed: Auto captions stop working mid-month, the menu item disappears, or the feature becomes unresponsive.
Fix 7: Convert Your Video Format (5–10 Minutes)
CapCut supports many video formats, but some codecs or audio tracks can cause caption failures.
- Re-export through CapCut: Import video into a new project and export using default settings (1080p, 30fps, H.264, AAC audio).
- Use a converter tool: Convert videos to MP4/H.264 with AAC audio using HandBrake or Any Video Converter.
- Extract audio separately: Generate captions from MP3 audio, then sync with video.
Symptom fixed: Captions fail only on certain videos while working on others. Common with screen recordings or unusual codecs.
If these fixes don’t solve the issue, the problem is usually in your overall caption workflow. For a complete step-by-step system, read our full guide on how to add captions in CapCut.
When to Give Up on Auto Captions (And What to Do Instead)
Sometimes, no matter what you try, auto captions just won’t work. Common scenarios include:
- Heavy background music that can’t be separated from speech
- Multiple speakers talking at the same time
- Very fast speech or strong accents, the engine struggles to recognize
- Videos where precise caption timing is critical (comedy, music videos, tutorials)
In these cases, manual captions become necessary, and this manual captions tutorial in CapCut will walk you through the faster fallback.
Preventing Future Auto Caption Problems on CapCut
Once you get captions working, avoid the same headaches by following these steps:
Before Recording
- Use a dedicated microphone rather than camera audio whenever possible
- Record in quiet environments or use directional mics to reduce background noise
- Leave 1–2 seconds of silence at the start of clips to help the engine lock onto your voice
Before Generating Captions
- Preview your audio track solo (mute music/effects) to verify clarity
- Trim dead air from the beginning and end of clips
- Split clips at scene changes rather than generating captions for a single long take
For TikTok-bound videos, optimize settings post-fix to match fast-paced viewing—see our dedicated guide on CapCut captions for TikTok settings (timing, style, export tips).
After Generating Captions
- Save your project immediately after caption generation completes
- Export a backup version before heavy editing (in case the app crashes)
- Review captions within 24 hours while the generation is fresh in memory
Quick Reference: Which Fix to Try First
| Symptom | Try This Fix First |
|---|---|
| Processing freezes or stalls | Fix 1: Check Internet Connection |
| Captions are gibberish or wrong words | Fix 2: Clean Your Audio |
| Worked yesterday, broken today | Fix 3: Update or Reinstall CapCut |
| Wrong alphabet or characters | Fix 4: Check Language Setting |
| Fails at 99% or on long videos | Fix 5: Split Long Videos |
| Stopped working after a few uses this month | Fix 6: Check Monthly Auto Caption Limit |
| Only fails on specific video files | Fix 7: Convert Video Format |
Frequently Asked Questions
Why are my CapCut auto captions not generating?
CapCut auto captions may not generate because of unstable internet, server-side processing issues, poor audio, an outdated app version, monthly caption limits, or unsupported file formats. Start by switching networks, updating CapCut, and testing with a short clip that has clear speech.
Why are my CapCut auto captions wrong or inaccurate?
Wrong captions usually come from poor audio quality. Background music, echo, wind noise, overlapping speakers, strong accents, or unclear speech can confuse CapCut’s speech recognition. Mute music, reduce noise, boost voice clarity, and try generating captions again.
Why does CapCut auto captions freeze or get stuck?
Auto captions can freeze when the video is too long, your connection drops, CapCut servers are slow, or the file has codec issues. Split longer videos into shorter 3–5 minute sections and generate captions one segment at a time.
Is there a limit to auto captions in CapCut?
Yes. CapCut may limit auto caption generations for free users depending on account, region, device, and current plan rules. If the feature stops working after several uses, check whether you have reached your caption limit or whether CapCut is asking you to upgrade.
Why are my captions in the wrong language or showing gibberish?
This usually happens when the caption language does not match the spoken audio. Before generating captions, choose the correct language. If CapCut struggles with a regional accent, try a more general language option if available.
Why do my captions disappear after generating in CapCut?
Captions can disappear because of incomplete processing, app glitches, low storage, sync issues, or project bugs. Save the project after captions generate, clear storage space, restart CapCut, and test again with a shorter clip.
How do I fix CapCut auto captions not working quickly?
Start with the fastest fixes: check your internet connection, update CapCut, select the correct language, clean the audio, and try a shorter clip. If it still fails, check your auto caption limit or convert the video to MP4 with H.264 video and AAC audio.
What should I do if CapCut auto captions still do not work?
If auto captions still fail, use manual captions as a backup. You can also use YouTube auto captions, Whisper, Descript, or another caption tool to generate text, then bring the corrected captions back into CapCut manually.
Final Thoughts
CapCut auto captions are genuinely useful when they work, and genuinely frustrating when they don’t.
The key is systematic troubleshooting rather than random button-mashing. Start with the quick fixes (connection, updates, language) before moving to more involved solutions (audio cleaning, format conversion).
Remember that auto captions are a convenience feature, not a guaranteed one. CapCut’s free tier has real limitations, and the speech recognition technology has inherent accuracy boundaries.
When auto captions fail repeatedly, switching to manual captions isn’t a defeat – it’s often the faster path to professional results.