

You spend time fixing every caption.
The spelling looks right. The font looks good. The timing looks perfect in CapCut.
Then you export the video, upload it to TikTok, Instagram, or YouTube Shorts, and the captions suddenly feel wrong.
They may appear a second late, flash too quickly, or stay on screen after the audio has already moved on.
That is what makes CapCut caption sync problems so annoying. Everything can look fine inside the editor, but the exported or uploaded video does not match what you saw in preview.
The good news is that this usually happens for a reason. It is often caused by frame rate issues, export settings, platform compression, or playback problems on the device watching the video.
In this guide, you will learn why CapCut captions go out of sync, how to check where the problem is happening, and the fixes that usually work.
Why Are CapCut Captions Out of Sync?
CapCut captions can go out of sync when the timing changes somewhere between recording, editing, exporting, uploading, or playback.
That sounds technical, but the idea is simple.
Your captions are timed to match the audio on the CapCut timeline. If the video file, audio track, frame rate, export render, or upload platform changes that timing even slightly, the captions can start to feel early, late, or completely off.
This is why caption sync problems can show up in different ways.
- The captions look fine in CapCut but are delayed after export.
- The captions start synced but slowly drift over time.
- The captions are correct on your phone but wrong after uploading to TikTok or Instagram.
- The captions match the audio for you, but another viewer says they look off.
Before you start moving captions around randomly, you need to find where the sync problem is happening.
For a complete step-by-step guide on adding captions in CapCut before tackling sync issues, check out our comprehensive tutorial on how to add captions on CapCut.
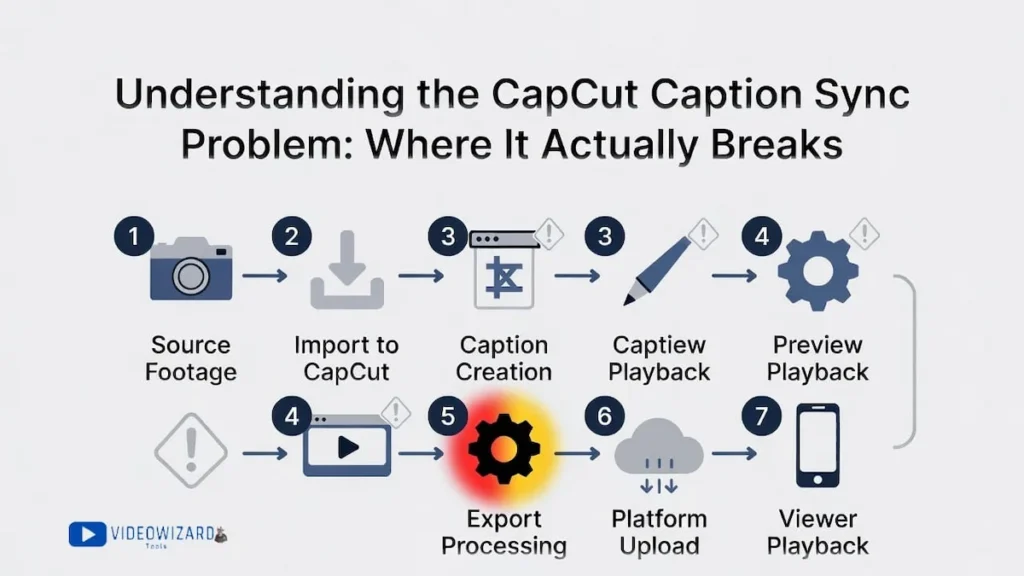
Where Caption Sync Problems Usually Happen
A caption sync issue can happen at several points in the video process.
Here is the simple version of the chain:
- Recording: Your phone, camera, or screen recorder creates the original video file.
- Importing: CapCut reads the video and places it on the timeline.
- Captioning: You create, edit, or auto-generate the captions.
- Previewing: CapCut plays the project inside the editor.
- Exporting: CapCut renders the final video file.
- Uploading: TikTok, Instagram, or YouTube processes the video again.
- Playback: The viewer’s phone, browser, app, or speaker setup plays the final video.
The mistake many people make is assuming the captions themselves are always the problem.
Sometimes they are. But other times, the real problem is the footage, the export, the app you uploaded to, or the device playing the video.
1. The Original Video File Has Timing Issues
Some videos are harder for editing apps to read cleanly.
This is common with phone recordings, screen recordings, and clips recorded with variable frame rate. The video may look normal, but the timing can shift slightly when CapCut imports it.
When this happens, your captions may start correctly but slowly drift away from the audio as the video continues.
2. CapCut Preview Does Not Match the Export
CapCut preview is not always the same as the final exported video.
The preview is designed to help you edit smoothly. The export has to render the full video, audio, captions, effects, animations, and settings into one final file.
So a caption can look synced inside CapCut but feel slightly late or early after export.
3. The Export Settings Change the Timing
Export settings can also affect caption timing.
Frame rate mismatches, unusual codecs, unstable bitrate settings, or hardware encoding issues can make the final video behave differently from the timeline preview.
This is one reason you should always test the exported file before uploading it anywhere.
4. TikTok, Instagram, or YouTube Reprocesses the Video
Even if your exported file is perfect, the platform can still change it.
TikTok, Instagram, and YouTube usually compress or re-encode videos after upload. That processing can sometimes affect timing, especially if the file has unusual settings.
If the exported file looks fine on your device but the uploaded version is out of sync, the problem is probably happening after upload.
5. The Viewer’s Device Causes Playback Delay
Sometimes the video file is fine, but the viewer’s device creates the delay.
This can happen on older phones, weak browsers, low-end devices, slow connections, or when someone is watching with Bluetooth headphones.
Bluetooth audio delay can make the sound arrive slightly later than the video, which makes captions feel wrong even when the file itself is okay.
How to Check Where the Caption Sync Problem Is Happening
Before you fix anything, do one simple test.
Export the video from CapCut and play the exported file before uploading it to TikTok, Instagram, YouTube, or any other platform.
This tells you whether the problem is inside the CapCut export or only happening after upload.
Test the Exported File First
- Export your video from CapCut.
- Play the exported video file on your phone or computer.
- Use a reliable media player if possible.
- Watch a section where the captions are easy to compare with the audio.
- Check whether the captions appear early, late, or drifting over time.
Do not skip this step.
If you upload first and only check the video inside TikTok or Instagram, you will not know whether CapCut caused the sync issue or the platform changed something after upload.
What the Test Results Mean
If the captions are out of sync in the exported file: the problem is likely inside the CapCut project, the source footage, or the export settings.
If the exported file is synced, but the uploaded version is out of sync: the problem is likely caused by TikTok, Instagram, YouTube, or another platform reprocessing the video.
If the captions are synced for you but not for someone else: the issue may be caused by their device, browser, app, internet connection, or Bluetooth audio delay.
Once you know where the problem is happening, the fix becomes much easier.
If you want maximum control and faster accuracy from the start, here’s how to add captions to CapCut directly from a script.
How to Fix CapCut Captions Out of Sync
Now that you know where the problem might be happening, you can start fixing it.
Do not apply every fix at once. Start with the first one, export a short test clip, and check the timing. If the captions are still off, move to the next fix.
This saves time because you do not want to keep exporting the full video again and again.
Fix 1: Convert Variable Frame Rate Footage
If your CapCut captions start synced but slowly drift away from the audio, variable frame rate is one of the first things to check.
Variable frame rate means the video does not keep the exact same frame rate from start to finish. Many phones and screen recorders do this to save space or improve performance.
The problem is that video editors usually work better with constant frame rate footage. When the timing of the original file is not steady, captions can slowly move out of sync as the video plays.
How to Tell If Variable Frame Rate Is the Problem
- The captions start correctly but become more delayed over time.
- The audio and video seem fine, but the captions drift.
- The video was recorded on a phone.
- The video came from a screen recording.
- The issue gets worse the longer the video plays.
If this sounds like your problem, convert the footage to constant frame rate before editing or captioning it in CapCut.
How to Convert Your Video to Constant Frame Rate
The easiest beginner-friendly option is HandBrake.
- Open your video in HandBrake.
- Go to the video settings.
- Set the frame rate to your target frame rate, such as 30fps.
- Choose Constant Framerate, not variable frame rate.
- Export the new file.
- Import the converted file into CapCut.
- Add or adjust your captions again on the converted video.
For most TikTok, Instagram Reels, and YouTube Shorts videos, 30fps is a safe choice.
If you prefer FFmpeg, you can use a command like this:
ffmpeg -i input.mp4 -c:v libx264 -r 30 -c:a copy output.mp4This creates a 30fps version of the video while copying the audio track.
Small warning: converting after you have already finished captioning can mean you need to recheck the caption timing. For best results, convert the footage before you start adding captions.
Fix 2: Match the Frame Rate Across All Clips
Mixed frame rates can also cause CapCut caption timing problems.
For example, your project may include one clip recorded at 24fps, another at 30fps, another at 60fps, and a screen recording with variable frame rate. CapCut may still edit the project, but the timing can become less stable.
To make your project cleaner, use one frame rate across your clips, project, and export settings.
What to Do
- Check the frame rate of your main video clips.
- Choose one frame rate for the project.
- Use 30fps for most short-form social videos.
- Convert unusual clips before importing them if needed.
- Set CapCut export frame rate to match the project.
If your main footage is 30fps, keep the project and export at 30fps too.
The goal is simple: avoid making CapCut translate timing between too many different frame rates.
Fix 3: Turn Off Hardware Acceleration on Desktop
If your captions look perfect in CapCut preview but shift after export, hardware acceleration may be part of the problem.
Hardware acceleration uses your computer’s GPU to help render the video faster. Most of the time, this is useful. But on some setups, GPU-based exporting can cause timing problems with captions, effects, or overlays.
When to Try This Fix
- The captions look synced in CapCut preview.
- The captions are wrong only after export.
- The export finishes unusually fast.
- The issue happens on CapCut Desktop.
- Other timing fixes have not worked.
What to Do
- Open CapCut Desktop settings.
- Look for performance, export, or hardware encoding settings.
- Turn off hardware acceleration or hardware encoding if the option is available.
- Export a short test clip again.
- Check whether the captions stay synced.
On mobile, you may not have the same control over hardware acceleration. If the mobile export keeps causing problems, try opening the project on CapCut Desktop and exporting from there.
Fix 4: Move Captions Slightly Earlier or Later
Sometimes the simplest fix is to shift the captions a little.
This works best when the captions are consistently late or consistently early after export. It does not work as well when captions slowly drift more and more over time. For drifting, fix the frame rate first.
How Much Should You Move the Captions?
Start small.
- If captions appear late, move them slightly earlier.
- If captions appear too early, move them slightly later.
- Try a small adjustment of about 0.1 to 0.3 seconds.
- Export a short test clip before exporting the full video.
At 30fps, even a few frames can make a noticeable difference.
Do not drag captions by a full second unless the delay is clearly that large. Most sync fixes only need a small adjustment.
Fix 5: Use the Audio Waveform to Manually Sync Captions
If the video is short and accuracy really matters, use the audio waveform.
The waveform is the visual shape of the audio on the timeline. Spoken words often create visible peaks. You can use those peaks as anchors for your caption timing.
How to Use the Audio Waveform
- Open your project in CapCut.
- Zoom in on the timeline.
- Turn on or view the audio waveform if available.
- Find the spike where a word or phrase begins.
- Place the caption so it starts near that audio spike.
- Play the section back and adjust if needed.
This method takes more time, but it can help when you need captions to land exactly with the spoken words.
Use it for short videos, important hooks, ads, client work, or any section where bad timing would be very noticeable.
Fix 6: Recreate the Captions After Fixing the Footage
If you converted the footage, changed frame rates, or rebuilt the project, your old captions may still carry the old timing problem.
In that case, it may be faster to recreate the captions instead of trying to rescue the broken timing.
When to Recreate Captions
- The captions drift badly across the video.
- You converted the original footage to constant frame rate.
- The project has been edited and exported several times.
- Auto captions created inaccurate timing from the start.
- Manual adjustments are taking too long.
This can feel annoying, but it often saves time.
A clean video file plus fresh captions is usually easier to fix than a messy timeline with broken timing everywhere.
Best Export Settings to Keep CapCut Captions in Sync
Export settings matter because the final video has to play smoothly on TikTok, Instagram, YouTube, and other platforms.
If your settings are unusual, the platform may compress or reprocess the video more aggressively. That can increase the chance of timing issues.
For most short-form videos, use these settings:
- Resolution: 1080×1920 for vertical videos
- Aspect ratio: 9:16
- Frame rate: 30fps
- Codec: H.264
- Format: MP4
- Audio: AAC
- Audio sample rate: 44.1kHz or 48kHz
- Audio bitrate: 128kbps or higher
- Video quality: high or recommended
Avoid switching between different frame rates unless you have a reason.
For example, do not edit at 30fps, export at 60fps, then upload to a platform that compresses it again. Keeping the workflow consistent makes caption timing more stable.
If your captions are already giving you problems, use simple, standard export settings instead of trying unusual codecs or formats.
Platform-Specific Fixes for Caption Sync Problems
If your exported video looks fine but the uploaded version is out of sync, the problem is probably happening after upload.
TikTok, Instagram, and YouTube can all compress or reprocess your video. That does not always break caption timing, but it can make existing timing problems more obvious.
Use the platform-specific fixes below after you have already checked that the exported file plays correctly on your device.
CapCut Captions Out of Sync on TikTok
If your captions are synced in the exported file but delayed after uploading to TikTok, try uploading through the TikTok mobile app first.
Native mobile upload is often more reliable than sending the video through a third-party scheduler or unusual desktop workflow.
Try this TikTok workflow
- Export from CapCut as MP4.
- Use 1080×1920 resolution.
- Use 30fps if your project was edited at 30fps.
- Use H.264 video and AAC audio where possible.
- Send the file to your phone without compressing it.
- Upload through the TikTok app.
- Preview the post before publishing.
If the TikTok version still drifts, try a clean re-export from CapCut with standard settings instead of using a heavily compressed file.
You can also re-import the exported video into CapCut, export it again with TikTok-friendly settings, then upload that final version. This can sometimes help flatten the project into a cleaner file before TikTok processes it.
CapCut Captions Out of Sync on Instagram Reels
Instagram Reels can also reprocess your video after upload.
If captions are synced before upload but feel off inside Instagram, keep your export settings simple and avoid unusual formats.
Try this Instagram Reels workflow
- Export as MP4.
- Use 1080×1920 resolution.
- Use 30fps for most Reels.
- Use H.264 video.
- Use AAC audio at 128kbps or higher.
- Upload through the Instagram mobile app.
- Check the preview before posting.
If Instagram trims the first moment of your video or the captions feel like they start too suddenly, add a tiny bit of space at the beginning of the timeline before exporting.
You do not need a long blank intro. Even a small buffer can make the start feel less abrupt.
CapCut Captions Out of Sync on YouTube Shorts
For YouTube Shorts, clean vertical formatting helps reduce extra processing issues.
Use a standard 9:16 video instead of uploading a horizontal video with black bars or letterboxing. If the video is meant to be a Short, make the exported file match that format from the start.
Try this YouTube Shorts workflow
- Use a 9:16 vertical project.
- Export at 1080×1920.
- Use MP4 format.
- Use H.264 video.
- Use AAC audio.
- Keep the same frame rate from edit to export.
- Upload the exported file directly to YouTube.
If the captions are synced before upload but not after processing, wait for YouTube to finish processing the video fully before judging the final timing.
Also check the uploaded Short on more than one device before changing the CapCut project again.
How to Prevent CapCut Captions From Going Out of Sync Again
The best fix is a cleaner workflow before the problem starts.
If you often edit talking-head videos, tutorials, Reels, TikToks, or Shorts in CapCut, a consistent workflow will save you a lot of re-exporting.
A Safer Caption Workflow
- Record clean footage: Use steady recording settings when possible.
- Convert problem clips first: If your footage comes from a phone or screen recording and captions often drift, convert it to constant frame rate before editing.
- Use one frame rate: Keep your source footage, CapCut project, and export settings consistent.
- Create captions after setup: Add or generate captions after the footage and frame rate are stable.
- Test a short export: Export 10 to 15 seconds first and check the sync.
- Fix small delays early: If captions are slightly late or early, adjust them before exporting the full video.
- Use simple export settings: MP4, H.264, AAC audio, and 30fps work well for most short-form videos.
- Check before uploading: Play the exported file on your device before sending it to TikTok, Instagram, or YouTube.
- Upload natively: Use the TikTok, Instagram, or YouTube app when possible instead of third-party schedulers.
This may add a few extra minutes to your workflow, but it can save you from repeating the same export over and over.
Once you build the habit, caption sync becomes much easier to manage.
What If Captions Are Only Out of Sync on Some Devices?
Sometimes the problem is not your CapCut project or your export.
If captions look synced on your phone but wrong on someone else’s device, the issue may be caused by the way their device plays the video.
Common device-specific causes
- Older phones with weaker video decoding
- Low-end Android devices
- Battery-saving modes that affect playback performance
- Bluetooth headphone or speaker delay
- Browser playback lag
- Slow internet or buffering
- Apps that have not finished processing the video properly
Bluetooth audio delay is especially common. The video may be fine, but the sound reaches the viewer slightly late through their earbuds or speaker. That can make captions feel out of sync even when they are not.
How to Reduce Device-Specific Caption Problems
- Keep caption phrases short.
- Avoid showing too many words at once.
- Give captions enough time to be read.
- Avoid rapid-fire captions in important sections.
- Use simple export settings that most devices can play easily.
- Check the final video on at least two devices when possible.
You cannot control every viewer’s device, but you can make your captions easier to read even when playback is not perfect.
Frequently Asked Questions
Why are my CapCut captions out of sync after export?
CapCut captions can go out of sync after export because of variable frame rate footage, mixed frame rates, hardware acceleration issues, export settings, or timing changes during rendering. First, play the exported file before uploading it anywhere. If the exported file is already out of sync, the issue is likely inside the project, footage, or export settings.
Why do my captions look synced in CapCut but wrong after export?
CapCut preview does not always match the final exported render. Preview playback may be lighter, cached, or less demanding than the full export. If this happens, export a short test clip, check the result, and try moving the captions slightly earlier or later by about 0.1 to 0.3 seconds.
How do I fix CapCut captions drifting over time?
Caption drift is often caused by variable frame rate footage, especially from phones or screen recordings. Convert the footage to constant frame rate before importing it into CapCut, then keep the project and export frame rate consistent.
Why do captions go out of sync after uploading to TikTok or Instagram?
If the exported file plays correctly but the uploaded version is out of sync, the problem is likely platform compression or reprocessing. Export with simple settings like MP4, H.264, AAC audio, 1080×1920, and a consistent frame rate, then upload through the native TikTok or Instagram app.
What export settings are best for keeping CapCut captions synced?
For most short-form videos, use MP4, H.264 video, AAC audio, 1080×1920 resolution, 9:16 aspect ratio, and 30fps if your project was edited at 30fps. Avoid unusual codecs, mismatched frame rates, or overly compressed files when caption timing is already a problem.
Final Thoughts
CapCut captions usually go out of sync for one of three reasons: the footage timing is unstable, the export changes something, or the platform reprocesses the video after upload.
The fastest way to fix the problem is to test the exported file first. If the export is already out of sync, fix the footage, frame rate, captions, or export settings inside CapCut. If the export is fine but the uploaded version is wrong, focus on platform upload settings.
Start with the simple fixes first. Use consistent frame rates, convert problem footage to constant frame rate, export with standard settings, and test short clips before rendering the full video.
Perfect caption timing matters because captions should support the video, not distract from it.
When the words appear at the right moment, your video feels smoother, clearer, and more professional.