
CapCut Mask Keyframes: Complete Guide for Precise Animation
Ever tried animating just one part of your video like a face, a product, or a moving object—while leaving the rest untouched?
Most keyframes move or fade everything at once. That’s fine for full-scene zooms or fades, but what if you only want to highlight a tiny area without affecting the background?
That’s where CapCut mask keyframes come in. They let you animate specific areas, track a moving face, blur sensitive info, or create cinematic spotlight effects.
If you’re new to keyframing, pause here. Mask keyframing builds on the basics: position, scale, rotation, and opacity keyframes for video, text, and audio.
Without that foundation, you’ll click buttons that do nothing and wonder why “mask” options are grayed out. I recommend you start with our complete CapCut keyframe guide first, then come back here to take your videos to the next level.
What Mask Keyframes Actually Do
Here’s the simple distinction:
| Type | What Moves | What Changes |
|---|---|---|
| Standard Keyframes | Entire video clip | Zoom, position, rotation, opacity—everything in the frame |
| Mask Keyframes | Only the mask layer | Position, scale, rotation, feather (soft edge) of the mask window—revealing or hiding parts of the underlying video |
Quick example:
- Without a mask: You keyframe a zoom. The whole video grows 150%, and everything moves together.
- With a circular mask: You keyframe the mask itself to grow from 50% → 150%. Only the area inside the mask scales; the rest of the frame stays static. The mask “window” expands, revealing more of the video underneath.
Key point: You’re animating the mask, not the video clip. That means you control where the action happens, not the video itself.
Mask types that support keyframes:
✅ Circle: Position & scale
✅ Rectangle: Position, scale, corner roundness
✅ Linear: Position & rotation
✅ Star/Heart: Position & scale (shape fixed)
Mask types that don’t:
❌ Brush mask: Hand-drawn, static only
❌ Chroma key: Color-based, not mask-based
This distinction is crucial. Miss it, and you’ll end up animating the wrong layer or wondering why your mask isn’t moving.
Setting Up Your First Mask Keyframe in CapCut
Mobile (iPhone / Android)
- Add your video to the timeline.
- Tap the clip to select it.
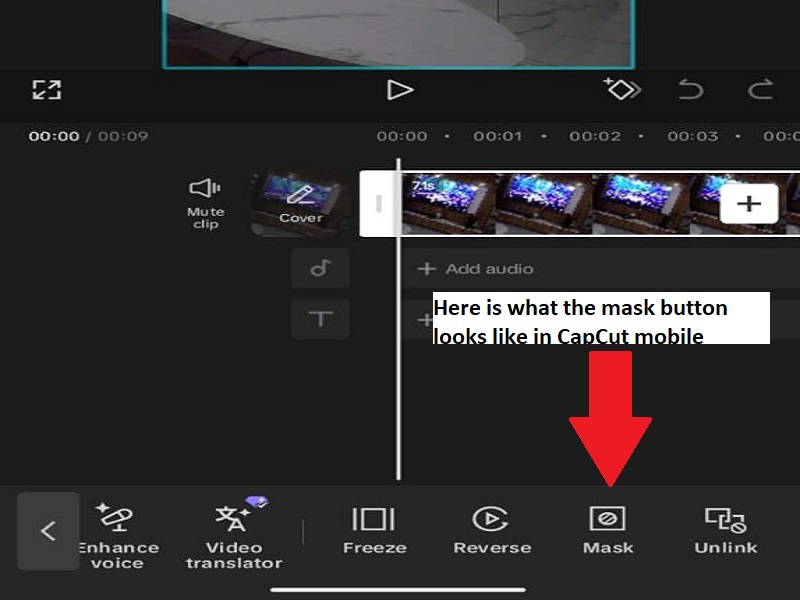
- Tap Mask (usually in the bottom menu, scroll far right).
- Choose a shape (Circle or Rectangle is easiest for beginners).
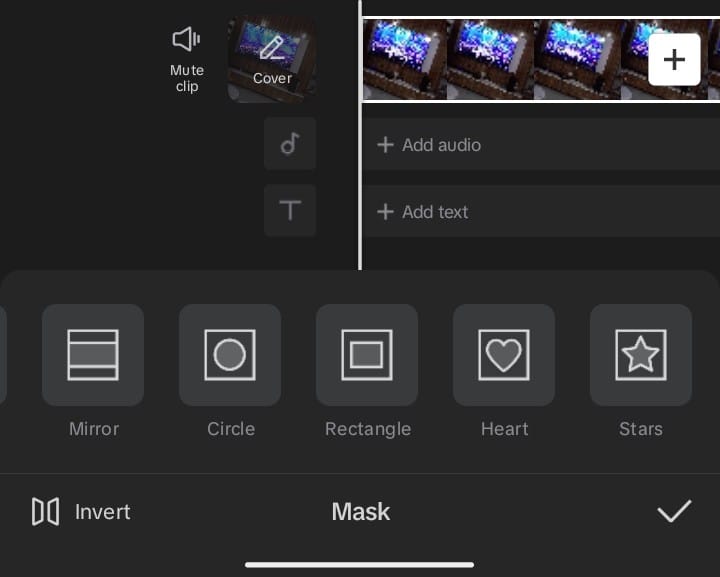
- Drag and pinch to position & size the mask over your subject.
- Important: In the timeline, tap the mask layer (it appears below or as a sub-track of the video clip) so it is highlighted/selected.
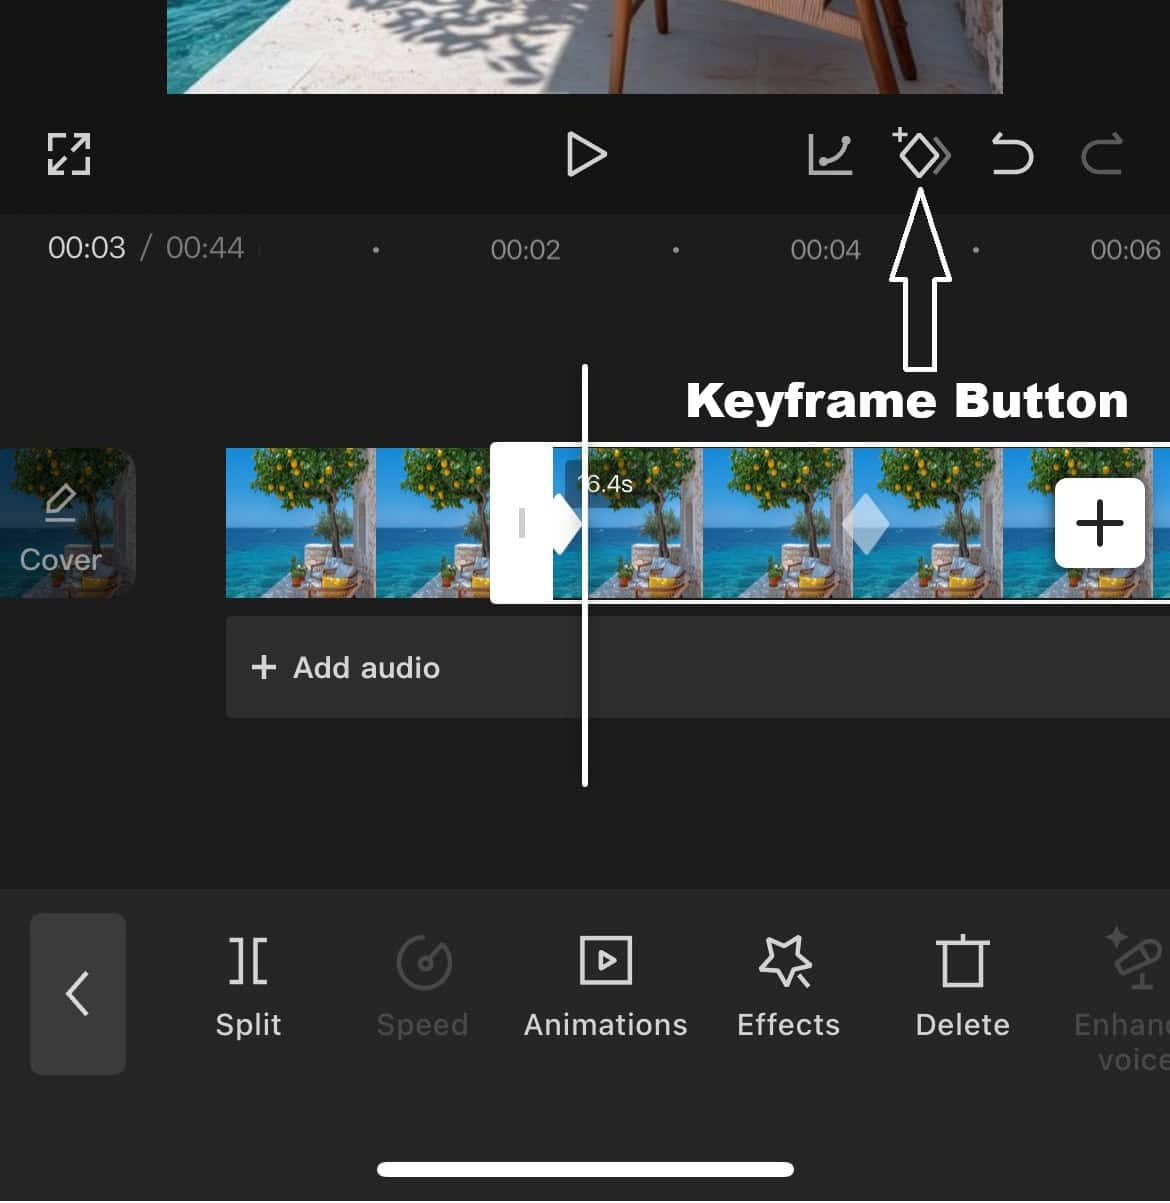
- Move the playhead to the starting point of your animation.
- Tap the diamond Keyframe icon to set the first keyframe.
- Move the playhead forward (1–2 seconds or more).
- Adjust the mask position, size, or rotation, CapCut automatically adds the second keyframe.
- Play back to preview the animation.
Important to Note: If the mask doesn’t move with your adjustments, you probably have the main video track selected instead of the mask layer. Always make sure the mask track is active before adding keyframes.
Desktop (Windows / Mac)
- Import your media and place the video on the timeline.
- Select the clip you want to mask.
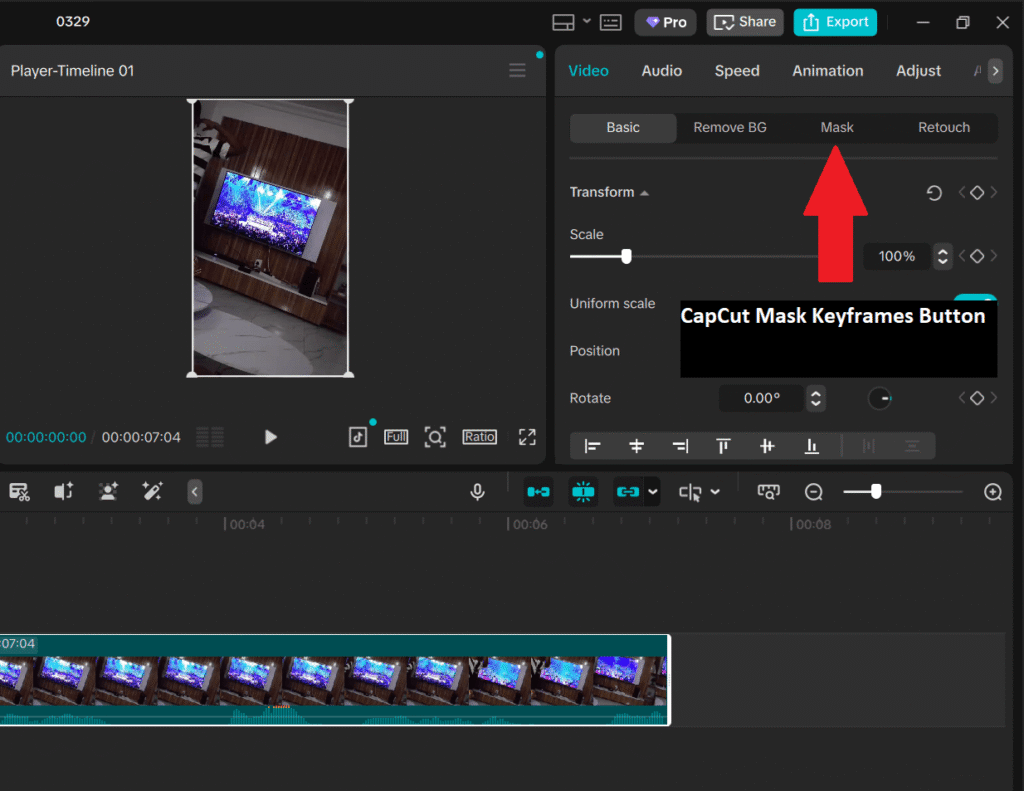
- In the right inspector panel, go to Mask and click on add mask to choose a shape (Circle, Rectangle, or others).
- Adjust the mask on the preview screen (position, size, feather, etc.).
- Make sure the mask is the active layer (click it in the timeline if needed — a separate mask track or properties appear).
- Move the playhead to your starting frame.
- In the mask properties (Position, Scale, Rotation), click the diamond keyframe icon next to the property you want to animate.
- Advance the playhead to a later point.
- Change the mask values (position, scale, rotation) — CapCut auto-creates the new keyframe.
- Optional: Click the keyframe graph or right-click options to adjust easing curves for smoother animation.
Desktop Advantage: You get precise numerical controls for position/scale and better keyframe curve editing compared to mobile.
This guide reflects the current CapCut interface as at March 2026. Steps may vary slightly with future updates please always check the in-app tooltips.
⚠️ Common Mistakes & Quick Fixes
No keyframe button: You’re not on CapCut Pro or the mask layer isn’t selected properly.
Nothing animates: You added keyframes on the video layer, not the mask layer. Click the mask track first.
If your animation still refuses to work, check these CapCut keyframes not working fixes.
Mask jumps: Keyframes are too close together. Space them out for smoother movement.
Mask disappears: You may have accidentally deselected the mask layer.
4 Practical Mask Keyframe Techniques
Technique 1: Spotlight Reveal (Circle Mask Scale)
Best for: Introductions, dramatic reveals, focusing attention on speakers or objects.
Concept: Animate a small circular mask growing to reveal the subject like a spotlight expanding across the frame.
- Add a circle mask over your subject’s face or object.
- Keyframe 1: Scale 10%, position centered on subject.
- Advance the playhead 3 seconds.
- Keyframe 2: Scale 100%, position unchanged.
- Play back to see the subject appear first, with surroundings gradually revealed.
Pro tip: Add Position keyframes along with Scale—your spotlight can follow movement (e.g., from face to hands). Two properties = four total keyframes.
Timing guide: 3-4 seconds creates emotional impact; faster feels like a transition, slower feels like a discovery.
Internal link: Combine with standard zoom keyframe techniques—see Example 1 in our pillar guide.
Technique 2: Tracking Blur (Rectangle Mask Position)
Best for: Hiding faces, license plates, or sensitive information in motion.
Concept: Apply a blur effect underneath a rectangle mask and keyframe the mask to follow moving objects.
- Duplicate your video layer (Copy → Paste).
- Top layer: Apply heavy blur (Effects → Blur → Gaussian).
- Add a rectangle mask to top layer, size it to cover the object.
- Keyframe the mask Position to track the object’s movement.
- Bottom layer: Original unblurred video shows through the mask “hole.”
Keyframe density guide: Cars → 1 keyframe per 5 frames; walking people → 1 per 10 frames; static objects → 2 total keyframes.
Efficiency tip: Only animate Scale if object size changes. Most tracking just needs Position keyframes.
Limitation: CapCut does not have automatic mask motion tracking. Manual placement is required. For complex tracking, use After Effects or DaVinci Resolve.
Technique 3: Wipe Transition (Linear Mask Rotation)
Best for: Scene transitions, cinematic wipes, slide reveals.
Concept: Rotate and move a linear mask across a top clip to reveal the clip underneath.
- Stack two clips on the timeline (top clip covering bottom clip).
- Add a linear mask to the top clip and angle it diagonally.
- Keyframe 1: Position left of frame, Rotation 45°.
- Advance 1.5 seconds.
- Keyframe 2: Position right of frame, Rotation unchanged.
- Play back to see a smooth diagonal wipe revealing the bottom clip.
Pro variation: Add rotation keyframes mid-wipe (e.g., 45° → 90° → 45°) to create complex, cinematic motion.
Timing guide: 1–1.5 seconds feels natural; faster feels rushed, slower feels sluggish.
For more transition ideas, see these CapCut transitions for Reels and TikTok.
Technique 4: Shape Morph (Limited in CapCut)
Concept: CapCut does not support true mask shape morphing (e.g., circle → rectangle). Shape is fixed at creation.
Workaround: Use overlapping mask clips and crossfade:
- Clip 1: Circle mask, 1 second.
- Clip 2: Rectangle mask, 1 second.
- Transition: Crossfade between clips (0.5 seconds recommended).
Result: Circle fades to rectangle—simulates shape change. Not true keyframing, but visually effective.
Pro tip: For real shape morphing, use After Effects or DaVinci Resolve.
Mask Keyframe Properties: What Animates vs. Static
Mask keyframes don’t work the same as standard clip keyframes. Some mask properties can be animated over time, while others remain static. Use the table below to quickly see which properties you can keyframe in CapCut.
| Property | Animates with Keyframes | Static / No Keyframes |
|---|---|---|
| Position X/Y | ✅ Yes | ❌ No |
| Scale | ✅ Yes | ❌ No |
| Rotation | ✅ Yes (linear masks only) | ❌ No |
| Feather (mask edge softness) | ✅ Yes | ❌ No |
| Mask Shape | ❌ No | ✅ Fixed at creation |
| Invert Mask | ❌ No | ✅ On/off toggle |
| Opacity | ❌ No (use video opacity keyframes) | ✅ Separate control |
Key insight: Feather keyframes allow subtle edge softening over time—edges can gradually soften or harden, giving your animations a professional, polished look.
Mobile vs Desktop: Mask Keyframe Differences
CapCut’s mask keyframe workflow differs between mobile and desktop. Desktop offers precision and advanced control, while mobile favors speed and direct manipulation.
| Feature | Mobile | Desktop |
|---|---|---|
| Mask Creation | Touch drag | Mouse drag + numerical entry |
| Position Keyframes | Pinch / drag | X/Y pixel input |
| Scale Keyframes | Pinch | Percentage slider |
| Feather Keyframes | Slider only | Slider + numerical input |
| Graph Curves | ❌ No | ✅ Bezier handles |
| Multi-mask Layers | ⚠️ Limited | ✅ Unlimited |
| Copy Mask Keyframes | ❌ No | ✅ Duplicate mask layer |
Desktop advantage: Precise numerical input and graph curves allow exact pixel positioning—essential for legal, medical, or professional work requiring exact masking.
Mobile advantage: Fast, intuitive touch controls make rough placement and social video creation quick and easy.
Advanced: Mask + Video Keyframes Combined
For more cinematic effects, you can combine standard video keyframes with mask keyframes. For example, zoom into a face while a mask spotlight follows its movement.
- Video layer: Scale keyframes (e.g., 100% → 150%).
- Mask layer: Position keyframes to track movement within the frame.
Synchronization rule: Video zoom and mask motion must share the same timing. If the video zoom lasts 2 seconds, mask keyframes should span exactly 2 seconds to avoid a “floating mask” effect.
- Set video scale keyframes first (base animation).
- Scrub through and note where the subject moves.
- Add mask position keyframes to follow the movement.
- Ensure keyframe timestamps match precisely—desktop numerical entry is recommended for accuracy.
Pro tip: On desktop, color-code keyframes (right-click → Label) to easily distinguish video vs mask keyframes in complex timelines.
Common Mask Keyframe Failures & How to Fix Them
Even experienced editors can run into problems when animating mask keyframes. Here’s a quick reference to diagnose and fix common issues.
| Symptom | Cause | Fix |
|---|---|---|
| Mask doesn’t move | Keyframes applied to video layer instead of mask layer | Select the mask track specifically before keyframing |
| Mask jumps or slides unevenly | Keyframes are too close together | Space keyframes at least 15 frames apart |
| Mask disappears | Mask layer accidentally deleted | Undo deletion or recreate the mask layer |
| Effect applies to whole frame | Mask is inverted incorrectly | Toggle “Invert” in the mask panel |
| Can’t find mask keyframe button | CapCut Pro subscription expired | Check subscription status and upgrade if needed |
| Feather won’t animate | Attempting to keyframe a static property or wrong layer selected | Ensure feather is animated on the mask layer |
CapCut Pro vs Free: Mask Keyframe Access
Mask keyframes are a CapCut Pro-exclusive feature. Free users can apply static masks but cannot animate them. Here’s a quick comparison:
| Feature | Free CapCut | CapCut Pro |
|---|---|---|
| Basic mask shapes (Circle, Rectangle, Linear, etc.) | ✅ Available | ✅ Same + more options |
| Mask application | ✅ Static + Animated (Keyframes) | ✅ Static + Animated |
| Mask keyframes (animate position, scale, rotation) | ✅ Full access | ✅ Full access + advanced tools |
| Feather keyframes | ✅ Available | ✅ Available |
| Multiple masks per clip | ⚠️ Limited (usually 1–2) | ✅ Unlimited / Advanced stacking |
| Advanced masks (AI Mask, Pen/Brush Mask, Custom shapes) | ❌ Not available | ✅ Full access |
Note: Basic mask keyframing (animating position, size, rotation) is available in the Free version. CapCut Pro is mainly needed for advanced AI-powered masks, unlimited layers, better export quality, and premium effects.
When to Use Mask Keyframes vs Standard Keyframes
Knowing when to use standard vs mask keyframes saves time and avoids overkill. Use the table below as a guide:
| Goal | Standard Keyframes | Mask Keyframes |
|---|---|---|
| Zoom whole scene | ✅ Yes | ❌ Overkill |
| Zoom face only, background static | ❌ Can’t | ✅ Yes |
| Blur moving face | ❌ Blurs whole frame | ✅ Yes |
| Color grade entire clip | ✅ Yes | ❌ Overkill |
| Color grade sky only | ❌ Can’t | ✅ Yes (with color effect + mask) |
| Transition between clips | ✅ Standard transitions | ✅ Mask wipes for style |
| Track moving object | ❌ No tracking | ⚠️ Manual only |
Export Considerations for Mask Keyframes
Mask keyframes require more processing than standard keyframes because each frame needs alpha channel calculations. Keep these tips in mind:
- Performance impact: Mask-heavy projects render slower, especially on mobile.
- Mobile export: Use 720p if 1080p lags; quality difference is minimal on small screens.
- Desktop export: Enable GPU acceleration (Settings → Performance). Masks render faster on Apple Silicon or discrete NVIDIA/AMD GPUs.
- Format: MP4 H.264 handles mask edges well; ProRes preserves quality but increases file size significantly.
- Preview lag: Lower preview quality to Draft or pre-render frames (Enter/Return) before final export.
To export cleanly after mask animations, use these best CapCut export settings.
Conclusion & Final Test
Mask keyframes separate amateur CapCut users from professionals. They let you animate just specific parts of a clip, creating cinematic effects impossible with standard keyframes. Workflow essentials:
- Always select the mask layer, not the video layer.
- Keyframe position/scale, not shape.
- Combine mask and standard video keyframes for layered motion.
Master the four main techniques, spotlight reveals, tracking blurs, wipe transitions, and feather animations to control exactly where viewer attention goes.
Final test: Create a circle mask on a face. Keyframe it growing from 20% → 80% scale over 3 seconds.
Keep the face centered while revealing the background. If it works, you’ve successfully applied selective animation using CapCut mask keyframes.