
How to Add Animated Captions in CapCut (Step-by-Step)
Static captions make your words readable, but animated captions make people stop scrolling.
Think about it: a line that gently bounces in, a phrase that slides smoothly from the side, or a key word or phrase that pops just at the right moment.
These subtle motions don’t just look cool they keep viewers engaged, improve retention, and make your content feel professional.
Here’s the catch: CapCut doesn’t have a single “animate captions” button.
The animation tools are scattered across menus, some only work with auto captions, others need manual text, and a few effects exist only on certain versions or devices.
Most creators stick to the same three presets and call it a day. That’s why your captions might look flat, even when your video content is fire.
In this guide, i will show you how to create polished, professional animated captions in CapCut.
From subtle motions that enhance readability to bold effects for high-energy clips, we’ll cover both mobile and desktop workflows, workarounds for auto caption limitations, and methods for crafting animations that feel unique to your brand.
Animated Captions in CapCut: What You Need to Know First
Before you start adding animations, you need to understand how CapCut actually handles captions.
The way animations work depends on how your captions are created, and this affects how much control you get.
Auto Captions: What You Can (and Can’t) Do
- Batch Edit lets you apply the same animation to all captions at once
- You can’t apply different animations to individual caption blocks
- Some animation presets override your font and color settings
- Animations are limited to entrance effects—no exit animations
Manual Captions: Full Animation Control
- Each text layer can have its own animation
- Access to entrance, emphasis, and exit animations
- Keyframes allow custom motion and advanced effects
- You can combine multiple animations on a single text layer
Mobile vs Desktop Differences
- Mobile offers more preset animations but less precision
- Desktop gives you keyframe control for custom motion paths
- Some animation presets are only available on specific platforms
- Template styles vary depending on your app version
Understanding these limits helps you choose the right approach. If you want quick, consistent animations, auto captions work fine. But if you want unique, high-impact animated captions, manual text is where you get full control.
Method 1: Animating Auto Captions in CapCut (Updated Method)
CapCut no longer uses a separate “Batch Edit” button for auto captions. Instead, animations are applied through the caption editing panel using an “Apply to all” option.
Step-by-Step: Animate Auto Captions
1. Select a caption
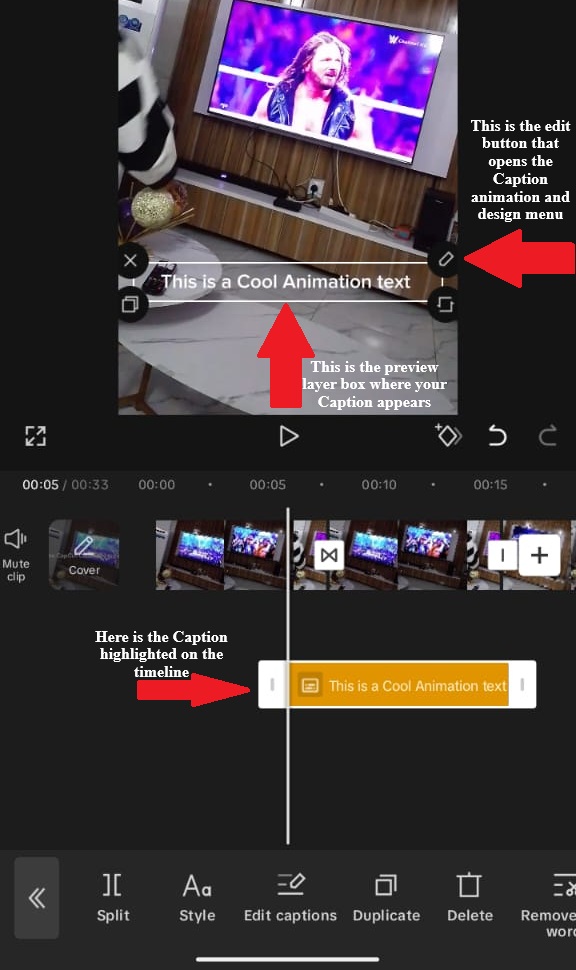
- Tap any caption block on the timeline
- A text layer will appear on the preview screen
- Tap the edit (pencil) icon
2. Open animations
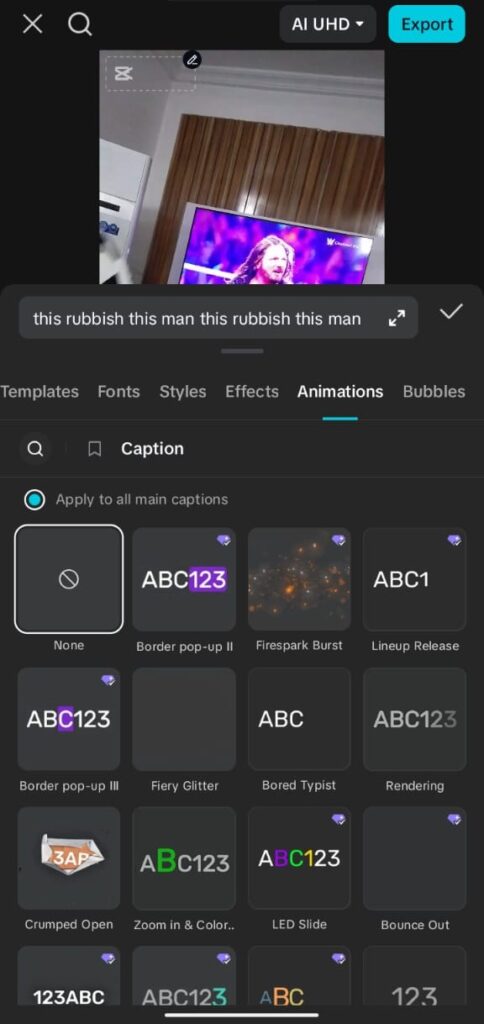
- Go to the Animations tab( on Desktop it is located at the top-right of your screen)
- Browse animation styles like Pop, Slide, Fade, or Bounce
3. Apply to all captions
- Enable “Apply to all main captions”
- Select your preferred animation
- Adjust the duration to control speed
Once enabled, the animation will automatically apply to every caption block in your video.
Important Limitation
All captions will use the same animation. You cannot assign different animations to individual caption blocks using auto captions.
For a beginner auto caption on CapCut understanding, including generation, editing, and basic styling before you add animations—see our complete guide on how to add captions on CapCut.
Method 2: Manual Animated Captions in CapCut (Full Control)
Manual captions take more time, but they give you complete control over animations. This is the method to use when you want different lines to have different effects.
Step-by-Step: Create Animated Manual Captions
1. Create your first caption
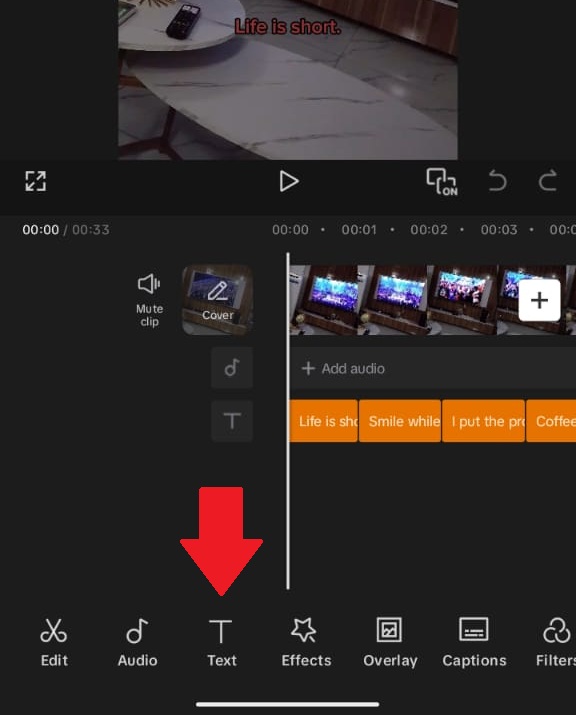
- Go to Text > Add Text
- Type your first line (keep it short—3–6 words works best)
- Position it on screen and apply your font and color
Struggling to keep phrases short enough for smooth animation without them feeling rushed or cut off? See our guide to fixing captions that are too long in CapCut.
2. Add animation to the first caption
- Tap the text layer (It’s on the preview screen)
- Tap the Edit button (pencil), it will take you to the Animations screen
- Under the In tab, choose an entrance animation (Pop, Slide, Fade, Bounce, Typewriter)
- Adjust the duration (0.2–0.4s feels natural)
3. Add exit animation (optional but recommended)
- Go to the Out tab
- Select how the text disappears (Fade Out, Slide Out, Shrink)
- Keep it quick (~0.2s) so it doesn’t feel slow
Create Smooth Flow Between Captions
Instead of captions appearing and disappearing abruptly, overlap them slightly:
- Caption A appears and stays visible
- Caption B starts animating before Caption A disappears
- Caption A fades out as Caption B settles in
This creates a smooth, professional “handoff” instead of rigid, stop-start timing.
Duplicate and Build Faster
- Once your first caption is styled and animated, copy it
- Paste it at the next point on the timeline
- Update the text
You can keep the same animation for consistency—or switch it up slightly to emphasize key lines.
When to Use This Method
Use manual captions if you want:
- Different animations for different lines
- Precise timing control
- More engaging, high-retention content
For a complete step-by-step on creating and timing manual captions before layering animations, check out our full manual captions tutorial in CapCut.
Method 3: Smooth Bounce Animated Captions (Trending Style)
You’ve seen this style everywhere—captions that bounce in, slightly overshoot, then settle smoothly. It’s not just a preset. The effect comes from how you adjust the animation.
How to Create the Bounce Effect (Mobile)
- Create a manual text caption
- Tap the text layer, then go to Animations
- Under In, select Bounce
- Set duration to ~0.4–0.5 seconds (slightly slower than default)
- If available, increase intensity to ~70–80%
This creates the “overshoot” effect—where the text goes slightly past its final position, then settles back. That’s what makes it feel smooth instead of stiff.
How to Improve the Effect
- Use bold, clean fonts (avoid thin styles)
- Add a subtle shadow or background for depth
- Keep captions short so the motion feels snappy
Optional: Add Sound for Impact
Pair the bounce with a subtle “pop” sound effect. Time it right as the text hits its peak (just after it appears). This makes the animation feel more satisfying without being distracting.
Method 4: Custom Animated Captions (Keyframes – Desktop)
If you want animations that don’t look like everyone else’s, you’ll need keyframes. This is only available on desktop.
Basic Motion Animation
- Add a text layer and place it off-screen (left or top)
- Move the playhead forward (e.g. 0.5 seconds)
- Drag the text to its final position
CapCut automatically creates motion between those two points.
Make It Feel Natural
- Use ease-in / ease-out (if available) to smooth movement
- Avoid perfectly straight motion—slight curves feel more natural
Simple Custom Effects You Can Try
Slide + Settle
Start text off-screen → slide into place → slightly overshoot → settle.
Fade + Move Combo
Combine a fade-in with a small upward movement for subtle, clean captions.
Staggered Text
Break one sentence into parts and animate each piece with small delays (0.1–0.2s).
Method 5: Using CapCut Caption Templates
CapCut also offers pre-made caption templates with built-in animations. These are fast but less flexible.
How to Use Templates
- Go to Text > Templates
- Browse styles like Social, Minimal, or Cinematic
- Select one and replace the placeholder text
Limitations to Know
- Text length is often restricted
- Fonts and colors may be locked
- Animation timing is usually fixed
When Templates Work Best
- Quick content where speed matters
- Testing different caption styles
When to Avoid Them
- Brand content with strict fonts or colors
- Videos with unusual pacing
- Long-form content where repetition becomes noticeable
Method 6: Hybrid Animated Captions (Auto + Manual)
If you’re working on longer videos, the smartest approach is to combine auto and manual captions. You get speed where it doesn’t matter—and control where it does.
How the Hybrid Method Works
- Use auto captions for the majority of your video
- Use manual captions only for key moments that need emphasis
Step-by-Step Workflow
1. Generate auto captions
- Create auto captions for the full video
- Apply a simple animation (Fade or Slide)
- Use “Apply to all main captions” for consistency
2. Find key moments
- Punchlines
- Important points
- Calls-to-action
3. Replace with manual captions
- Delete the auto caption at that moment
- Add a manual text layer
- Apply a stronger animation (Bounce, Pop, or Slide)
4. Keep styling consistent
- Match font, size, and color with your auto captions
- Only change animation or emphasis—not the overall style
If your script includes voiceover elements or you need consistent pronunciation for key phrases before animating, consider generating timed captions with CapCut’s text-to-speech feature first.
Example
- Most of the video: Auto captions with subtle Fade animation
- Punchline: Manual caption with Bounce + sound effect
- Ending CTA: Manual caption with Slide Up or emphasis animation
Why This Works
You save time by not manually animating everything, but still create standout moments that grab attention. It’s the balance between efficiency and impact.
Platform-Specific Animation Tips
TikTok
- Use fast animations (~0.2–0.3s)—people scroll quickly
- Pop and Bounce work best in the first few seconds to grab attention
- Avoid empty screens between captions—keep text flowing
- Always preview on mobile (subtle animations can disappear on small screens)
YouTube Shorts
- Slightly slower animations (~0.3–0.4s) feel natural
- Typewriter and Fade work well for storytelling
- Keep animations consistent to build a recognizable style
Instagram Reels
- Fade and Slide animations feel cleaner and more polished
- You have slightly more freedom with placement, but avoid UI overlap
- Keep visuals aesthetic—don’t overuse aggressive animations
Common Animation Mistakes (And How to Fix Them)
Animations Too Slow
Problem: Long animations (0.6–0.8s) feel sluggish.
Fix: Keep entrance animations between 0.2–0.4 seconds.
Too Many Animation Styles
Problem: Every caption moves differently, creating visual chaos.
Fix: Stick to 1–2 main styles. Use subtle animations for most captions and stronger ones only for key moments.
Blocking Important Visuals
Problem: Animations cover faces or key content.
Fix: Adjust position and preview before exporting. Make sure motion paths don’t cross important areas.
Poor Timing with Audio
Problem: Captions appear too early or too late.
Fix: Start the caption slightly before the spoken word (~0.2s) so the animation matches speech.
Overusing Sound Effects
Problem: Every caption has a sound, which becomes annoying.
Fix: Use sound effects only for key moments (3–5 times per video).
Fast Workflow: Animated Captions by Time
5-Minute Setup
- Generate auto captions
- Apply a simple animation (Bounce or Fade) using “Apply to all”
- Export
15-Minute Setup
- Generate auto captions with a simple animation
- Identify 3–5 key moments
- Replace those with manual captions using stronger animations
- Add 1–2 sound effects
45-Minute Setup
- Create manual captions throughout
- Use varied animations based on content
- Add custom timing and motion
- Sync sound effects with key moments
Match your effort to the content. A quick post doesn’t need perfect animation—but high-impact videos benefit from the extra work.
Final Thoughts
Animated captions in CapCut require choosing your tradeoffs: speed versus control, uniformity versus variety, presets versus custom creation.
The methods in this guide range from one-tap batch animations to frame-by-frame keyframe editing.
Start with Method 1 (auto caption batch animations) for your everyday content. Graduate to Method 2 (manual per-caption control) when you need emphasis variation.
Explore Method 4 (custom keyframes) when you’re creating signature content that defines your brand.
Remember that animation serves the content, not the other way around. The best animated captions are the ones viewers notice subconsciously—engaging enough to keep eyes on screen, subtle enough not to distract from your message.