

Have you ever watched a beautifully color-graded video and wondered how creators achieve that polished cinematic look?
Maybe you’ve heard people talking about LUTs and thought, “What exactly is a LUT, and can I use one in CapCut?”
The short answer is yes.
CapCut supports LUTs, allowing creators to apply professional color grades and consistent visual styles to their videos.
If you’re trying to import a .cube LUT, create a cinematic look, or understand how LUTs work inside CapCut, this guide covers everything you need to know.
Table of Contents
- Can You Use LUTs in CapCut?
- What Are LUTs Used for in CapCut?
- Why Creators Use LUTs for Color Grading
- Can You Import LUTs in CapCut Mobile?
- Can You Use LUTs in CapCut Online?
- What LUT File Formats Does CapCut Support?
- Where Can You Get LUTs?
- LUTs vs Filters: What's the Difference?
- Common LUT Mistakes to Avoid
- How to Get Better Results With LUTs
- Do LUTs Make Videos Look More Professional?
- Frequently Asked Questions
- Final Thoughts
Can You Use LUTs in CapCut?
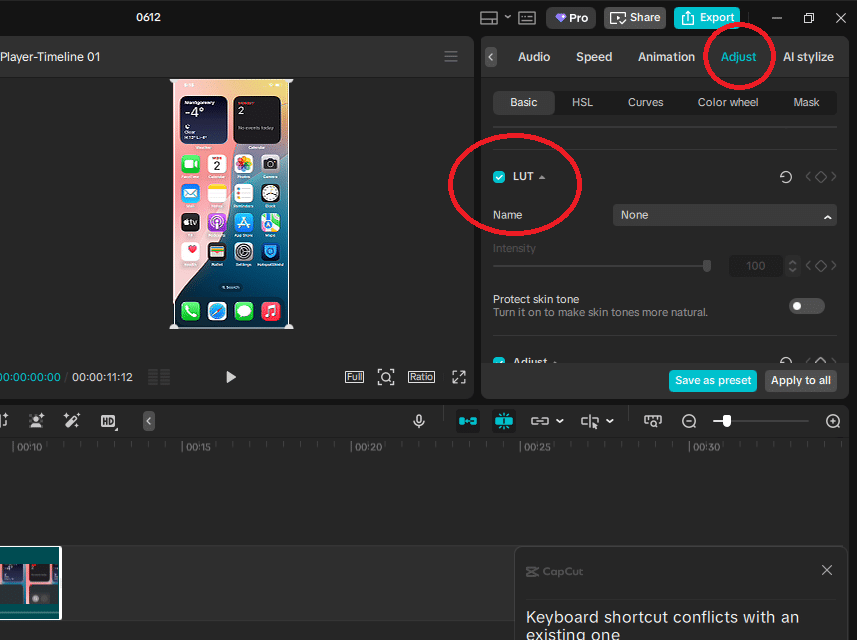
Yes, CapCut allows creators to use LUTs as part of the color grading process.
CapCut Desktop supports importing custom LUT files, including industry-standard .cube LUTs. CapCut’s online editor also provides LUT-based color grading tools and supports LUT imports.
Depending on the LUT, it can produce cinematic tones, vintage aesthetics, stronger contrast, warmer skin tones, or more consistent color across multiple clips.
CapCut LUT Support Overview
| Feature | Desktop | Online (Web) | Mobile (iOS/Android) |
|---|---|---|---|
| Custom LUT Support | ✅ Yes | ❌ No | ❌ No |
| .cube LUT Compatibility | ✅ Yes (.cube & .3DL) | ❌ N/A | ❌ N/A |
| Built-in LUTs/Filters | ✅ Yes | ✅ Yes (filters) | ✅ Yes (filters) |
| Advanced Color Controls | ✅ Yes | ⚠️ Limited | ⚠️ Limited |
| Best For | Full Editing + Custom LUTs | Quick Browser Edits | On-the-Go Filtering |
This is one reason creators often report different experiences when following CapCut tutorials. Features can vary depending on the platform and version being used.
What Are LUTs Used for in CapCut?
Most creators use LUTs to speed up color grading and create a more polished final video.
Instead of adjusting every clip individually, a LUT provides a starting point that can quickly establish a consistent visual style.
Common uses include:
- Creating a cinematic look
- Matching colors between clips
- Building a consistent brand aesthetic
- Adding mood and atmosphere
- Improving flat-looking footage
- Saving time during editing
For example, if one clip appears slightly cool and another appears slightly warm, the right LUT can help create a more unified appearance across the entire project.
That said, LUTs aren’t magic.
They enhance footage, but they don’t replace proper lighting, exposure, composition, or camera settings.
Why Creators Use LUTs for Color Grading
The biggest advantage of LUTs is consistency.
Instead of every clip looking slightly different, LUTs help establish a unified visual style throughout a project.
This is one reason LUT-based workflows are widely used across video production, content creation, and filmmaking.
Many editors also find LUTs useful because they speed up the editing process. Rather than building a look from scratch every time, a LUT provides a starting point that can be refined with additional adjustments.
Can You Import LUTs in CapCut Mobile?
No. CapCut Mobile does not support importing custom .cube or .3DL LUT files on any device, version, or region.
This is a common point of confusion because:
- CapCut Mobile offers built-in filters and presets that look like LUTs
- Older tutorials may reference features from beta versions or different apps
- Users sometimes mistake manual color adjustment tools for LUT import
What Mobile Actually Offers:
- Pre-installed color filters/presets
- Manual adjustments (exposure, contrast, saturation, temperature)
- No custom LUT file import
If custom LUTs are essential to your workflow, CapCut Desktop is your only option within the CapCut ecosystem. CapCut Online (Web) also does not support custom LUT import.
Can You Use LUTs in CapCut Online?
No, not custom LUTs.
CapCut Online (the browser-based editor) does not support importing custom .cube or .3DL LUT files. This is a Desktop-only feature.
What CapCut Online Actually Offers:
- Built-in color filters and presets
- Manual color adjustment tools (exposure, contrast, saturation, temperature, etc.)
- Basic color grading with slider controls
What It Cannot Do:
- Import external LUT files
- Apply custom 3D LUTs created in other software
- Match colors across projects using shared LUT files
If you need custom LUT workflows, CapCut Desktop is your only option. The Online editor is suitable for quick edits using built-in tools, but it cannot replace Desktop for professional color grading with custom LUTs.
What LUT File Formats Does CapCut Support?
CapCut Desktop supports two LUT formats:
| Format | Extension | Notes |
|---|---|---|
| 3D LUT | .cube | Most common; industry standard |
| 3D LUT | .3dl | Supported; less common but fully compatible |
.cube is the most widely adopted format across professional editing software (DaVinci Resolve, Premiere Pro, Final Cut Pro, etc.). Most LUT packs you download will use this extension.
When downloading LUT packs, you’ll often find styles such as:
- Cinematic LUTs
- Travel LUTs
- Vintage LUTs
- Film-inspired LUTs
- Documentary LUTs
- High-contrast LUTs
Important: Not every LUT works well with every type of footage. Always test and fine-tune intensity using CapCut’s strength/opacity slider after applying.
Note: Custom LUT file import is only available in CapCut Desktop. CapCut Online and Mobile do not support importing external LUT files.
Where Can You Get LUTs?
You don’t need to build LUTs yourself to start using them.
Many creators begin with professionally designed LUT packs created by filmmakers, editors, and colorists. Since CapCut Desktop supports .cube and .3dl formats, you can use LUTs from most major creators and marketplaces.
Popular sources include:
- Professional creator websites (e.g., FilterGrade — free cinematic LUT pack)
- Filmmaking communities and Reddit groups
- Video editing marketplaces (Envato, Motion Array)
- Camera manufacturer resources (Sony, Canon, Blackmagic)
- Free LUT collections from color grading educators
Important: While many sites advertise LUTs as “CapCut compatible,” this only applies to CapCut Desktop. Mobile and Online versions do not support importing custom LUT files, even if the LUT itself is in the correct format.
If you’re new to color grading, focus on quality over quantity.
A small collection of well-designed LUTs is usually more valuable than hundreds of random presets you’ll rarely use.
Learning how a few LUTs affect different footage types will improve your results far more than collecting a massive library.
⚠️ Always test LUTs on your specific footage and adjust the intensity slider in CapCut Desktop. One LUT can look drastically different depending on lighting, camera profile, and exposure.
LUTs vs Filters: What’s the Difference?
LUTs and filters are often grouped together, but they’re not exactly the same thing. Understanding the distinction helps you choose the right tool for your project and avoid frustration when CapCut Desktop, Online, or Mobile behave differently.
| Feature | Filters | LUTs |
|---|---|---|
| Origin | Built into the editor | Can be imported or created externally |
| Purpose | Designed for quick styling | Built for precise color grading |
| Application | One-click appearance changes | Applied with adjustable intensity/strength |
| Control | Limited customization | Greater control over visual consistency |
| Workflow | Often beginner-focused | Common in professional workflows |
| Portability | Locked to the app | Can be shared across software (Premiere, DaVinci, Final Cut) |
| CapCut Availability | Desktop, Online, and Mobile | Desktop only |
How They Work in Practice
Filters are pre-built color combinations created by CapCut’s design team. You select one, and it applies a fixed look to your footage. You can usually adjust intensity, but the underlying color math is locked. Filters are perfect for social media content, quick turnarounds, and when you don’t need to match footage across multiple clips or projects.
LUTs are mathematical lookup tables that remap color values. A single .cube or .3dl file contains precise instructions for shifting shadows, midtones, and highlights independently. Because LUTs are files, you can:
- Use the same LUT across CapCut Desktop, DaVinci Resolve, Premiere Pro, and Final Cut Pro
- Apply them at different intensities (10%, 50%, 100%) without changing the underlying file
- Stack them with manual adjustments for fine-tuned results
- Share them with collaborators for consistent team color grading
When to Use Which
Choose Filters when:
- You need a fast, one-click look for social media
- You’re editing on CapCut Mobile or Online
- You’re experimenting and don’t want to manage external files
- Consistency across projects isn’t a priority
Choose LUTs when:
- You’re color grading footage from a dedicated camera (mirrorless, cinema, DSLR)
- You need to match colors across multiple clips, scenes, or projects
- You’re working with log or flat profiles that require specific correction
- You want to use looks created by professional colorists
- You’re collaborating with editors using different software
Can You Use Both?
Yes. Many professional workflows start with a technical LUT (to convert log footage to a standard color space), then apply a creative LUT for stylistic looks, and finally use CapCut’s built-in filters or manual adjustments for shot-specific tweaks. This layered approach gives you maximum control.
Neither option is automatically better. The right choice depends on your workflow, creative goals, and which version of CapCut you’re using.
If you’re on Desktop and serious about color, LUTs are worth the extra setup. If you’re on Mobile or Online, filters are your only built-in option for quick stylistic changes.goals.
Common LUT Mistakes to Avoid
LUTs can improve footage significantly, but they can also create poor results when used incorrectly.
Applying a LUT Before Basic Corrections
A LUT should rarely be your first adjustment.
Before applying a LUT, correct exposure, white balance, and overall image balance whenever possible.
This gives the LUT a better foundation to work from.
Using Every LUT at Full Strength
One of the most common beginner mistakes is leaving a LUT at maximum intensity.
Many LUTs produce more natural results when their strength is reduced and refined with additional adjustments.
Using the Same LUT on Every Clip
Lighting conditions vary from scene to scene.
A LUT that looks excellent outdoors may not look right indoors.
Always evaluate each clip individually rather than assuming one LUT works universally.
Trying to Fix Poor Footage With Color Grading
LUTs enhance footage.
They don’t replace good lighting, proper exposure, or strong camera work.
Starting with quality footage will almost always have a bigger impact than any color grading adjustment.
How to Get Better Results With LUTs
The best-looking color grades usually come from a combination of corrections and creative adjustments.
A simple workflow often looks like this:
- Import your footage.
- Adjust exposure.
- Correct white balance.
- Apply a LUT.
- Adjust LUT intensity if necessary.
- Fine-tune contrast, highlights, shadows, and saturation.
- Export using your preferred settings.
This approach generally produces cleaner and more consistent results than applying a LUT and exporting immediately.
Do LUTs Make Videos Look More Professional?
They can, but only when used appropriately.
The biggest advantage of LUTs is consistency.
They help create a unified visual style that carries across multiple clips and scenes.
That consistency is one reason LUTs are commonly used in professional editing workflows.
However, viewers typically notice storytelling, pacing, audio quality, and overall production value before they notice advanced color grading.
A LUT can improve presentation, but it works best when the fundamentals are already strong.
Think of it as the finishing touch rather than the foundation of a great video.
Frequently Asked Questions
Can I create my own LUTs for CapCut?
Yes, but not inside CapCut itself. You’ll need dedicated color grading software like DaVinci Resolve (free), Adobe Photoshop, or 3D LUT Creator to build custom LUTs. Once exported as a .cube or .3dl file, you can import it directly into CapCut Desktop’s LUT panel. This workflow is popular among creators who want a signature look they can apply consistently across all their content.
Why do my LUTs look different on different clips?
LUTs are not one-size-fits-all. They react differently depending on your footage’s exposure, white balance, and camera profile. A LUT designed for log footage will look terrible on standard Rec. 709 footage. Similarly, a LUT created for daylight scenes may produce odd colors on indoor footage. Always match your LUT to your source material, and use CapCut’s intensity slider plus manual color adjustments to dial in the look.
Are free LUTs safe to download?
Generally yes — if you stick to reputable sources like FilterGrade, IWLTBAP, Ground Control Color, or Color Grading Central. Avoid sketchy file-sharing sites or links that require excessive personal information. LUT files are small text-based data files (.cube or .3dl), so they don’t typically carry malware. However, always scan downloads with antivirus software and avoid executable files disguised as LUTs.
Can I use LUTs for photos in CapCut?
CapCut is primarily a video editor, so LUT functionality is designed for video clips. However, if you import a still image into a CapCut Desktop project, you can apply LUTs to it just like any other clip. For dedicated photo editing with LUTs, software like Adobe Lightroom, Photoshop, or Luminar offers more robust tools. CapCut’s strength is video — use it accordingly.
What’s the difference between 1D LUTs and 3D LUTs?
1D LUTs map each color channel (red, green, blue) independently. They’re simpler, smaller files, but limited in what they can do — mainly brightness and contrast adjustments. 3D LUTs (the .cube and .3dl files CapCut uses) map all three channels simultaneously, allowing complex color shifts, hue rotations, and saturation changes. 3D LUTs are the industry standard for professional color grading because they can transform the entire color space of your footage.
Do LUTs affect video export quality or file size?
No. LUTs are applied during the color grading stage and become part of your video’s rendered pixels. They don’t add metadata, watermarks, or extra data to your export. Your final file size depends on your export settings (resolution, bitrate, codec) — not on whether you used a LUT. However, heavy color transformations from aggressive LUTs can sometimes reveal compression artifacts, so export at higher bitrates for best results.
Can I stack multiple LUTs in CapCut Desktop?
CapCut Desktop applies one LUT per clip at a time through the LUT panel. However, you can achieve a stacked effect by nesting clips or by applying a LUT and then using CapCut’s manual color adjustment tools (curves, HSL, temperature) on top of it. For true multi-LUT workflows, professional editors typically use DaVinci Resolve or Premiere Pro, which support node-based or adjustment-layer color grading.
Are CapCut’s built-in filters just pre-loaded LUTs?
Functionally similar, but technically different. CapCut’s filters are proprietary presets built into the app — you can’t export them, modify their underlying color math, or use them in other software. LUTs are standalone files that work across multiple programs. Think of filters as “locked presets” and LUTs as “portable color tools.” If you want flexibility and cross-platform consistency, stick with custom LUTs on CapCut Desktop.
What’s the best way to organize a large LUT library?
Create a clear folder structure on your computer before importing into CapCut. Common categories include: Cinematic, Vintage, Travel, Black & White, Teal & Orange, Log Correction, and Client-Specific. Name your LUT files descriptively (e.g., Cinematic_Warm_01.cube instead of LUT1.cube). CapCut Desktop will display your imported LUTs in the order you add them, so organizing beforehand saves time when browsing during edits.
Can LUTs fix poorly exposed or white-balanced footage?
No — and this is a critical misconception. LUTs transform color values; they don’t recover lost information. Blown highlights, crushed blacks, or severe color casts should be corrected before applying a LUT. CapCut Desktop’s manual adjustment tools (exposure, highlights, shadows, temperature) are designed for this correction phase. Apply your LUT only after the footage is properly balanced. Professional colorists follow this same two-step workflow: correct first, grade second.
Final Thoughts
Yes, you can use LUTs in CapCut.
CapCut Desktop and CapCut Online both provide documented LUT workflows, making them strong options for creators who want greater control over color grading and visual consistency.
Mobile features may vary depending on version and device, so it’s worth checking the tools available within your specific installation.
If you’re new to color grading, start with the fundamentals.
Learn how exposure, white balance, contrast, and saturation affect your footage before relying heavily on LUTs.
Once those basics are in place, LUTs become a powerful tool for creating a polished and consistent visual style across your videos.
