
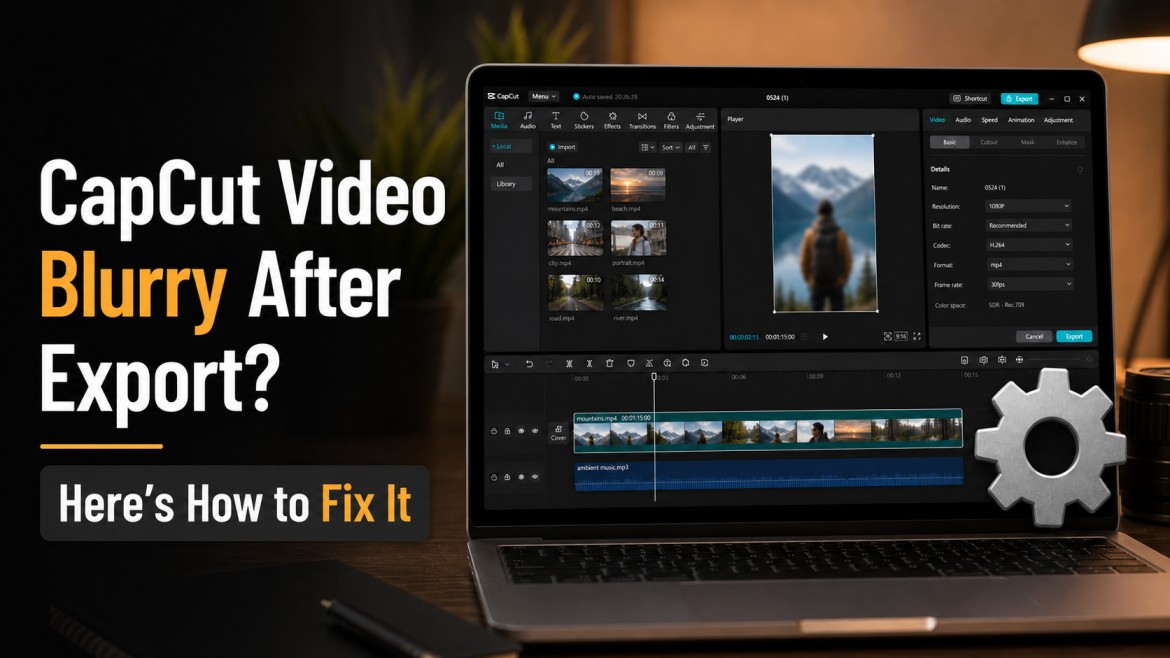
Have you ever edited a video in CapCut, loved how clean it looked, then exported it and thought, “Wait… why does this look blurry now?”
Yeah, that hurts.
The good news i have for you is that CapCut usually does not ruin your video for no reason. Most CapCut video blurry after export come from a few fixable things, such as low resolution, weak bitrate, compressed source footage, heavy effects, wrong project setup, or upload compression after saving.
Here’s the thing: once you know where the blur happened, fixing it gets much easier.
So let’s walk through the real reasons your CapCut video looks blurry after export and what actually works to make it clear again.
Quick Answer: Why Your CapCut Video Looks Blurry After Export
If your CapCut video looks blurry after export, it is usually because the export resolution is too low, the bitrate is too compressed, the original clip was already low quality, or the video got compressed again after uploading. On CapCut PC, Proxy settings can also make preview and export quality confusing.
Start by exporting at 1080p or 4K, setting bitrate to High, Highest, or Custom, checking the original clip quality, and watching the saved file before posting it anywhere.
Why CapCut Videos Sometimes Look Blurry After Export
Blurry CapCut exports usually come from a small group of problems. The trick is finding out whether the blur happened before export, during export, or after upload.
1. Your Export Resolution Is Too Low
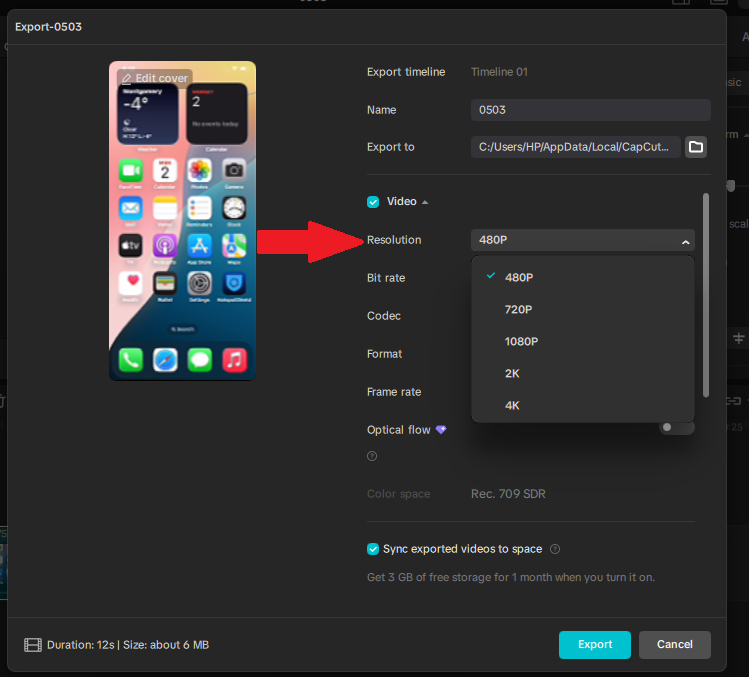
This is one of the most common reasons CapCut exports look blurry.
If your video was shot in 1080p or 4K but you export it at 720p, the final file loses detail. That loss becomes even more obvious when your video has captions, graphics, fast movement, or small details in the background.
For most social videos, 1080p should be the minimum. If your original footage is 4K and your phone or computer can handle it, exporting in 4K can help keep more detail.
But there is one catch: exporting a bad clip at 4K will not magically make it sharp. It only helps if the original footage already has enough detail.
If you want a deeper breakdown of resolution, bitrate, frame rate, and export presets, see this guide to the best CapCut export settings.
2. Your Bitrate Is Too Low
Resolution gets most of the attention, but bitrate is just as important.
In the same export window where you choose resolution, CapCut also lets you adjust bitrate, which controls how much detail is kept in the final file. (See image example above)
Think of bitrate like the amount of detail CapCut is allowed to pack into the final video file. If the bitrate is too low, the video may still say 1080p, but it can look soft, blocky, muddy, or pixelated.
Low bitrate is especially noticeable when your video has:
- fast motion
- small text
- detailed backgrounds
- screen recordings
- gaming clips
- lots of effects or transitions
If CapCut gives you bitrate options, avoid the lowest setting. Use High, Highest, or Custom when quality matters.
3. The Original Video Was Already Low Quality
This is the sneaky one.
CapCut cannot bring back detail that was never there. If the original clip was already compressed, blurry, noisy, or low resolution, the exported version may still look bad even with better settings.
This often happens with videos that were:
- downloaded from TikTok, Instagram, or YouTube
- sent through WhatsApp, Messenger, or Telegram
- screen recorded at low quality
- saved from another editing app
- shot in poor lighting
- stored as an optimized cloud version instead of the full file
Before blaming CapCut, open the original video outside the app. Watch it in your gallery, Photos app, or file manager. If it already looks soft there, export settings alone will not save it.
4. You Zoomed or Cropped the Video Too Much
This catches a lot of people.
If you zoom into a clip too far, CapCut has fewer pixels to work with. So even if you export at 1080p or 4K, the zoomed-in part can still look blurry or pixelated.
Think of it like cropping a tiny part of a photo and stretching it across a whole wall. The file may still be large, but the detail is gone.
This is common with vertical edits where people zoom into horizontal footage to fit TikTok, Reels, or Shorts. A little zoom is fine. Too much zoom can wreck the sharpness.
5. Your Project Setup Does Not Match the Footage
Another common issue is starting the project with a lower-quality clip, then adding better footage later.
CapCut may set the project or timeline based on the first clip you import. So if the first clip is low resolution, then you add a sharper clip after it, your project may not treat the whole edit the way you expect.
The safer move is simple: start the project with your highest-quality main clip, then add the rest of your videos, photos, overlays, and audio after that.
This matters most when you mix different file types, like camera footage, screen recordings, social media downloads, and clips sent through messaging apps.
6. Effects, Filters, or Sharpening Made the Video Worse
Some effects make a video look cleaner in preview but softer after export.
This can happen with beauty filters, blur effects, glow, smoothing tools, heavy color changes, stacked filters, or too much sharpening. The edit may look fine while you work, then fall apart once CapCut compresses everything into the final file.
If the video became blurry after adding effects, duplicate the project and export a short version with those effects turned off. That quick test can tell you whether the problem is your footage, your settings, or one effect making the image worse.
7. CapCut’s Preview Looked Different From the Export
This one is confusing, but it happens.
Sometimes, the preview inside CapCut does not show the exact final quality. The app may lower preview quality to make editing smoother, especially with heavy projects. Other times, the preview may look cleaner than the exported file because you are viewing it in a smaller window.
That is why you should always check the saved export outside CapCut before you upload it anywhere.
Open the exported file in your phone’s gallery, Photos app, file manager, or desktop video player. That saved file tells you more than the editor preview.
8. The Video Was Compressed Again After Uploading
Sometimes, CapCut is not the real problem.
If your exported video looks clear on your device but blurry after posting, the platform probably compressed it. TikTok, Instagram, YouTube Shorts, WhatsApp, and Telegram can all reduce video quality after upload.
That is a different problem from a blurry CapCut export. The test is simple: watch the saved file before you post it.
If the saved file looks sharp but the posted version looks bad, focus on upload settings and platform compression.
How to Fix a Blurry CapCut Export
Do not change everything at once. That only makes the problem harder to find. Start with the fixes that affect quality the most.
1. Export at 1080p or 4K
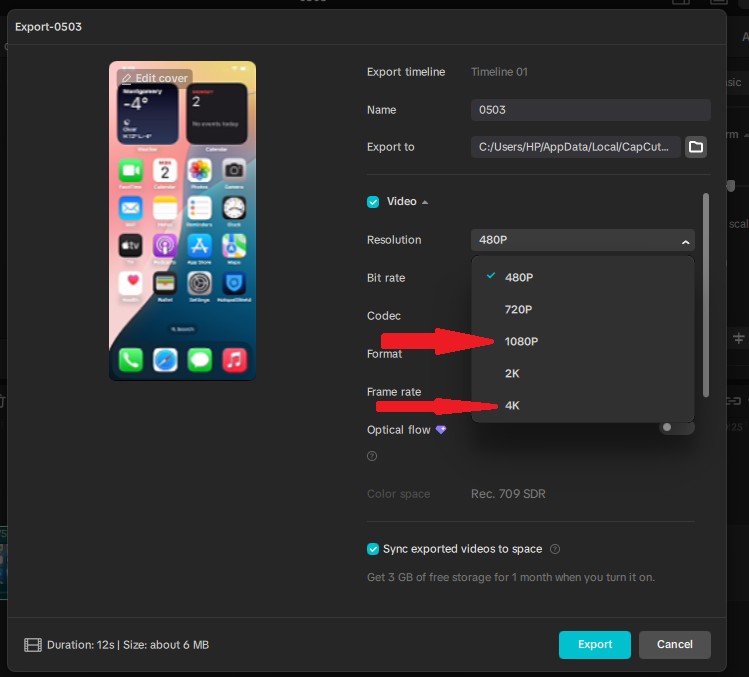
If your export looks blurry, check the resolution first.
For most videos, choose 1080p. If your original footage is 4K and you want the cleanest result, export in 4K.
This is especially useful for videos with small text, detailed backgrounds, or clips that will be uploaded to platforms that compress videos again.
A simple rule:
- Use 1080p for most TikTok, Reels, Shorts, and regular social videos.
- Use 4K only when the original footage is actually 4K.
- Do not expect 4K export to fix a blurry or compressed source clip.
2. Set Bitrate to High, Highest, or Custom
If your 1080p export still looks blurry, bitrate may be the problem.
A low bitrate squeezes the video too hard. That can move look muddy, text look fuzzy, and edges look soft.
When CapCut gives you bitrate control, choose High, Highest, or Custom instead of the lowest option.
Fast-moving videos, gaming clips, screen recordings, and edits with lots of text usually need more bitrate than simple talking-head videos.
3. Start the Project With Your Highest-Quality Clip
This is a small step, but it can save you a headache.
When starting a new project, import your best main clip first. Then add the rest of your clips, overlays, screenshots, captions, and effects.
This helps avoid a situation where your project is shaped around a weaker clip at the start.
It is especially important if your edit mixes:
- 4K camera footage
- 1080p phone videos
- downloaded social media clips
- screen recordings
- images or overlays
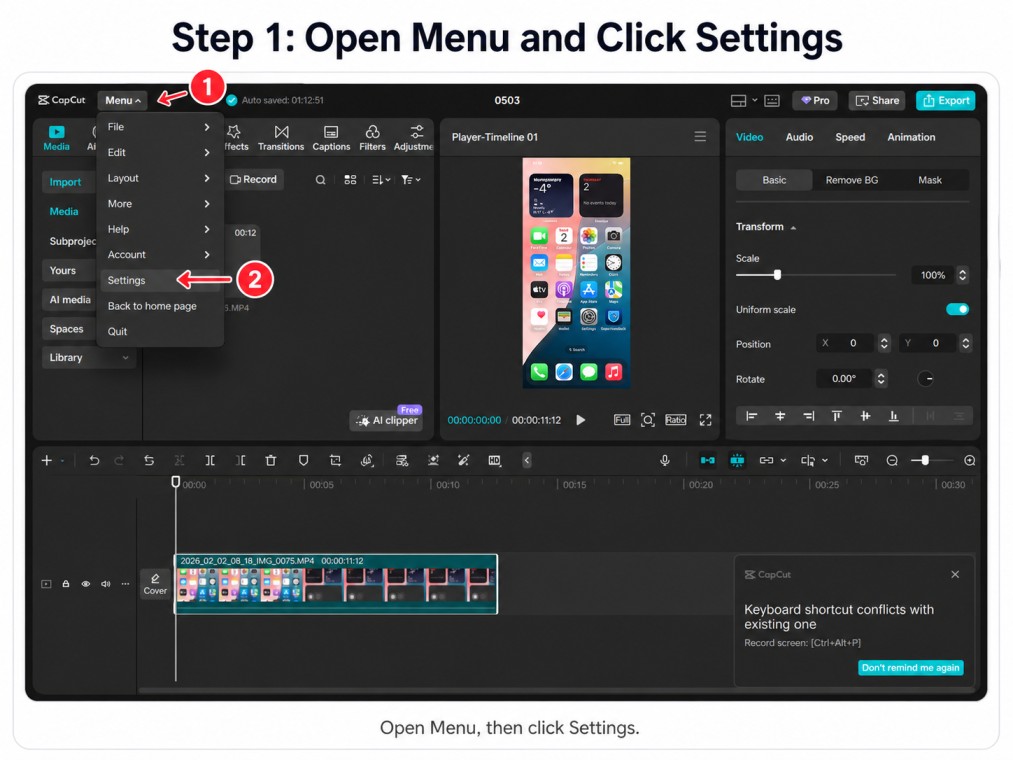
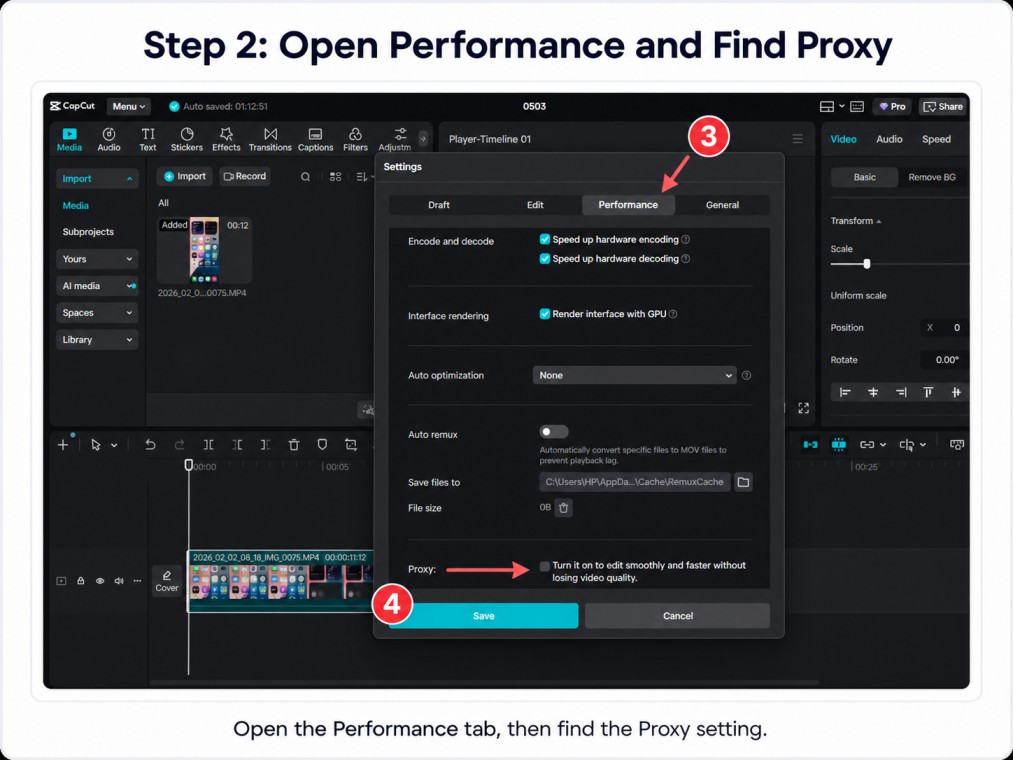
4. Turn Off Proxy on CapCut PC
If you are using CapCut on desktop, Proxy is worth checking.
Proxy helps CapCut play heavy video files more smoothly while you edit. That can be useful, but it may also make quality checks confusing because you may not be viewing the full-quality media while working.
On CapCut PC, go to Menu > Settings > Performance, then check the Proxy setting. If your video looks different after export, turn Proxy off and export a short test again.
CapCut also recommends checking custom bitrate and turning off Proxy on CapCut PC when exported video quality looks different from the editor preview. You can see CapCut’s official guidance on video quality changes after exporting.
This will not fix every blurry export, but it can help if the problem is tied to preview quality or desktop export behavior.
5. Avoid Zooming Past the Original Quality
If only one part of your video looks blurry, check whether you zoomed in too much.
Zooming into a clip does not add detail. It stretches what is already there. So if you zoom into a 1080p clip and then export in 1080p, that cropped section may still look soft.
Try reducing the zoom, using a higher-quality source clip, or replacing that part of the edit with footage that was shot closer to the subject.
6. Remove Heavy Effects and Test a Short Export
If the blur started after adding filters, beauty tools, glow, sharpening, or blur effects, test the project without them.
You do not need to rebuild the whole edit. Duplicate the project, remove the heaviest effects, and export a short section.
If the clean version looks sharper, you have found the problem. Add the effects back slowly, one at a time, until you find the one hurting the export.
7. Check the Saved File Before Blaming CapCut
Before you assume CapCut ruined the video, check the exported file on your device.
Do this before uploading to TikTok, Instagram, YouTube Shorts, WhatsApp, or anywhere else.
If the saved file already looks blurry, the problem is inside CapCut, the source footage, or the export settings. If the saved file looks sharp but the uploaded version looks blurry, the problem is probably platform compression.
How to Unblur a Video on CapCut Without Pro
You do not need CapCut Pro to fix a blurry video. Most of the common causes of blurry exports are fixable with free settings that are already inside the app.
Here is what you can do without paying for anything:
- Export at 1080p or higher: the resolution setting is free on all versions of CapCut. If you were exporting at 480p or 720p, switching to 1080p alone can make a big difference.
- Raise the bitrate: set it to High or Highest in the export window. This is a free setting and one of the most effective fixes for soft or blocky exports.
- Use the Enhance feature: CapCut has a free Enhance option on the clip level. Tap your clip, look for Enhance or Remaster under the editing tools, and apply it. It will not rescue heavily damaged footage, but it can sharpen a mildly soft clip.
- Reduce zoom: if you cropped or zoomed in too far, pulling back is free. Less zoom means more original pixels in the final frame.
- Remove heavy effects: beauty filters, smoothing tools, and glow effects are all free to remove. Sometimes taking one effect off is all it takes.
The main thing Pro adds for quality is AI-powered video enhancement and upscaling. If your footage is severely degraded or you want to push a 720p clip up to 4K with more detail, that is where Pro helps. But for a normally blurry export caused by bad settings, the free fixes above are usually enough.
How to Tell What Caused the Blur
If you are not sure why your CapCut export looks blurry, use the blur itself as the clue. The way the video looks can tell you where the problem started.
If the Whole Video Looks Soft
If the entire export looks soft, the problem is usually one of three things: low export resolution, low bitrate, or weak source footage.
Start by checking the original clip outside CapCut. If the original looks sharp, export again at 1080p or 4K with a higher bitrate. If the original is already blurry, CapCut cannot fully fix it.
If Only Text or Captions Look Blurry
If the video itself looks fine but the text looks fuzzy, the issue is usually compression, thin fonts, small text, or low bitrate.
Use a thicker font, make the text a little bigger, and export at 1080p or higher. A light shadow or background can also help captions stay readable after export.
If your main problem is caption style or readability, this guide to the best CapCut caption fonts can help.
If the Video Looks Clear Until You Upload It
If the saved file looks sharp on your device but becomes blurry after posting, the issue is probably upload compression.
This happens often on TikTok, Instagram Reels, YouTube Shorts, WhatsApp, and Telegram. In that case, CapCut is not lowering the quality after export. The platform is compressing the file after you upload it.
If Only One Project Looks Blurry
If your other CapCut exports look fine but one project keeps coming out blurry, the issue is probably inside that specific edit.
Check for one low-quality clip, one over-zoomed section, one heavy effect, one imported overlay, or one project setting that does not match the rest of the footage.
The easiest test is to duplicate the project, remove the newest effects, and export a short section. If the test export looks better, you have narrowed down the problem without tearing apart the whole edit.
CapCut Blurry Export on iPhone, Android, PC, or Mac
The main causes of blurry CapCut exports are usually the same on every device: source quality, resolution, bitrate, effects, project setup, or upload compression. Still, each device has a few things worth checking.
On iPhone
On iPhone, make sure the original video is fully downloaded before importing it into CapCut.
This matters if your videos are stored in iCloud with storage optimization turned on. You may think you are editing the full-quality file, but the clip may not be fully available on your device yet.
Also check whether the video came from Messages, WhatsApp, Telegram, Instagram, or another app. Those files may already be compressed before they ever reach CapCut.
Open the original clip in the Photos app first. If it looks soft there, re-exporting from CapCut will not truly restore the lost detail.
On Android
On Android, start by checking the original clip quality in your gallery or file manager.
If the source file looks clear, export again at a higher resolution and bitrate. If your phone is low on storage or the project is heavy, export a short test section before rendering the full video.
When possible, save the export to internal storage instead of an SD card. This does not magically increase quality, but it can help avoid file issues on some devices.
On PC or Mac
On desktop, blurry exports are usually tied to project settings, export settings, Proxy, or the original footage.
Check the project resolution first. Then export again with a higher bitrate. If you are on CapCut PC, also check Proxy under Menu > Settings > Performance.
Proxy is useful for smoother editing, but it can make quality checks confusing. If your video looks different after export, turn Proxy off and test again.
What If the Export Looks Fine, But the Upload Looks Blurry?
This is where a lot of people blame CapCut when the real issue is the platform they posted to.
Here is the simple test: watch the exported file on your device before uploading it.
If it already looks blurry, the problem is likely your CapCut settings, source footage, project setup, effects, or zoom level.
If it looks sharp before upload but blurry after posting, the platform probably compressed it.
This can happen on:
- TikTok
- Instagram Reels
- YouTube Shorts
- Telegram
In that case, do not keep changing random CapCut settings. Focus on the platform instead. Upload quality, internet connection, app settings, and platform compression can all affect how the final post looks.
How to Fix Blurry Text, Captions, and Graphics in CapCut
Text shows compression damage faster than regular video. That is why captions can look fuzzy even when the footage still looks okay.
This is especially common with small text, thin fonts, low bitrate exports, and videos uploaded to social platforms that compress the file again.
To make text and captions look sharper:
- export at 1080p or higher
- Use a higher bitrate
- Avoid very thin fonts
- Make small text slightly bigger
- Add a light shadow or background for contrast
- Avoid placing text over very busy backgrounds
- Check the saved file before uploading
If captions are the main issue, do not treat it only like an export problem. Font choice, size, weight, contrast, and placement matter too. For that, your guide to the best CapCut caption fonts is the better next step.
How to Avoid Blurry CapCut Exports Next Time
Once you fix the current video, the next goal is simple: do not let the same thing happen again.
Start With the Cleanest Source Footage
Bad footage creates bad exports. If the clip is already blurry, noisy, or compressed, CapCut can only do so much.
Try to avoid editing videos that have been saved, downloaded, compressed, and re-uploaded many times. Use the original camera file whenever possible.
Use the Right Export Settings From the Start
Do not leave CapCut on a low export setting just to make the file smaller. That shortcut can make the final video look soft, blocky, or blurry, especially after another app compresses it.
Before you export, check the basics: resolution, bitrate, frame rate, and format, make sure you have the best CapCut export settings applied.
Be Careful With Zoom, Crop, and Effects
A clean edit usually exports better than an overloaded one.
Use zoom only when the source footage can handle it. Go easy on beauty filters, glow, blur, smoothing, aggressive sharpening, and stacked effects.
Effects are not bad. The problem starts when the video is already compressed and then you ask CapCut to process it even harder.
Export a Short Test Before the Final Version
If your project has lots of captions, overlays, effects, transitions, or mixed-quality clips, export a short section first.
This saves time and helps you catch blurry text, soft footage, or bad effects before exporting the whole project.
Check the Saved File Before Posting
This should become a habit.
Watch the exported video on your device before uploading it. If it looks sharp there, CapCut probably did its job. If it only becomes blurry after posting, you know the issue is upload compression.
If you want broader tips beyond blurry exports, this guide on how to make CapCut video quality better is the better next read.
Frequently Asked Questions
Why does my CapCut video look blurry after export but clear while editing?
This usually happens because the preview inside CapCut does not always match the final file. The export may also use low resolution, low bitrate, or compressed source footage. Check the saved video outside CapCut before uploading it anywhere.
Why does my CapCut video look blurry after saving?
Your CapCut video may look blurry after saving if it was exported at a low resolution, compressed with a low bitrate, built from a low-quality original clip, or affected by heavy effects. If it only looks blurry after posting, the issue is probably upload compression.
Why is my 1080p CapCut export still blurry?
1080p does not guarantee sharp video. A 1080p export can still look blurry if the bitrate is too low, the original footage is poor, the clip was zoomed in too far, or the video was compressed again after upload.
Why is my CapCut video pixelated after export?
Pixelation after export usually means the bitrate is too low, even if the resolution looks correct. A 1080p video with a weak bitrate can still look blocky or pixelated, especially in scenes with fast motion, small text, or detailed backgrounds. Set the bitrate to High or Highest and export again.
How do I stop CapCut from lowering video quality?
Use high-quality source footage, export at 1080p or 4K, choose a higher bitrate, avoid over-zooming, and check the saved file before posting. On CapCut PC, also check whether Proxy is affecting how you judge quality.
Why does CapCut make my video look worse?
CapCut does not intentionally reduce quality, but the export can look worse than the original if the resolution is set too low, the bitrate is too compressed, the source footage is weak, or heavy effects are applied on top of already compressed clips. Check the export settings first, then trace the problem back to the source footage or effects if the settings look correct.
Does CapCut reduce video quality automatically?
CapCut can export lower-quality video if the resolution, bitrate, or project setup is too low. It may also show a lower-quality preview while editing. The final quality depends on your source footage, project setup, effects, and export settings.
How do I export higher quality video from CapCut?
Set resolution to 1080p or 4K depending on your source footage, set bitrate to High, Highest, or Custom, and make sure the original clip was not already compressed before you imported it. Start your project with your best clip, avoid over-zooming, and check the saved file on your device before uploading anywhere.
Why does my CapCut video look blurry after uploading to TikTok or Instagram?
If the exported file looks clear on your device but blurry after uploading, TikTok or Instagram probably compressed it. That is an upload issue, not always a CapCut export issue.
Does CapCut Pro export better quality than free?
For basic exports, blurry video is usually caused by settings, source footage, effects, or upload compression, not just whether you use Free or Pro. If you want a full breakdown of what Pro actually changes, the CapCut Free vs Pro guide covers that in detail.
Can I fix a blurry CapCut export without editing again?
Sometimes, yes. If the issue is export resolution or bitrate, you can often re-export the same project with better settings. But if the original footage is low quality, the clip is over-zoomed, or effects are softening the image, you may need to adjust the edit first.
Conclusion
If your CapCut video looks blurry after export, do not panic and do not start changing random settings.
Start with the real quality killers: resolution, bitrate, source footage, project setup, zoom level, effects, and upload compression.
The fastest fix is to check the original clip, export at 1080p or 4K, raise the bitrate, and watch the saved file before posting. Once you know whether the blur happened before export, during export, or after upload, the solution becomes much easier.
Most blurry CapCut exports are fixable. You just need to find the exact place where the quality dropped.