
CapCut Text-to-Speech Captions: Full Setup Guide
You want captions, but you also want voiceover. Or your video has no human speech and needs narration.
Or you’re creating content in multiple languages without recording separate audio tracks. CapCut’s Text to Speech (TTS) feature generates synthetic voice from text—but combining it with captions requires specific workflow knowledge to avoid sync disasters and robotic-sounding results.
The common approach (type text, generate TTS, add captions separately) creates two problems: your captions and voice say different things if you edit one but not the other, and the timing never quite matches.
If you notice your TTS captions drifting out of sync, here’s a step-by-step guide to fix CapCut captions that are out of sync.
The professional approach integrates TTS and captions from the start, using CapCut’s features to create synchronized, editable, natural-sounding narration with perfect caption alignment.
In this guide, you’ll learn the complete Text to Speech caption workflow in CapCut.
This covers voice selection for natural results, the integration method that keeps captions and audio synchronized, multilingual strategies, and advanced techniques for making AI voices sound less robotic.
Understanding CapCut Text-to-Speech Captions System
CapCut’s Text-to-Speech (TTS) feature is not a standalone tool—it is integrated directly into CapCut’s text editing system, with its own capabilities and limitations.
Understanding how it works ensures you can create professional, synchronized audio for your captions or videos.
How CapCut TTS Works
- Create a manual text layer (TTS cannot use auto captions).
- Type the text you want spoken.
- Select a voice from the available options and generate the audio.
- CapCut creates an audio track synchronized to that text layer.
- The text layer remains fully editable—change the text and regenerate audio as needed.
Critical Limitation
CapCut TTS generates audio only from manual text layers. This means you cannot take auto-generated captions and then convert them directly to TTS. You must manually create each text layer to generate the corresponding speech.
Voice Options
- Default voices: Usually 4–6 options (male, female, neutral, different tones).
- Premium voices: Higher quality, more natural prosody (may require CapCut Pro subscription).
- Language-specific voices: Spanish, French, Japanese, and other languages may have dedicated voices.
- Character voices: Some versions offer stylized options such as “robot,” “cartoon,” or “narration” voices.
Quality and Technical Considerations
- CapCut TTS uses cloud processing, so an internet connection is required.
- English voices tend to sound most natural; other languages may vary in quality.
- Voice quality improves periodically as ByteDance updates TTS models.
- Audio timing aligns automatically with the text layer length, but you can adjust the layer duration to fine-tune timing.
- For long scripts, split text into multiple layers to prevent unnatural pauses or cutoff.
Practical Tips
- Keep text concise: Short phrases sound more natural than long blocks of text.
- Preview before finalizing: Listen to the generated audio for pacing, pronunciation, and clarity.
- Use emphasis wisely: Adding punctuation or capital letters can affect tone and delivery in some voices.
If your captions run too long or spill off screen, here’s how to fix long captions in CapCut.
How to Use CapCut Text-to-Speech for Captions
CapCut’s Text-to-Speech (TTS) allows you to generate voice directly from text layers, making captions more engaging and accessible.
Several workflows depend on whether you start with text or pre-recorded audio, or if you want multilingual output. Follow these methods to streamline your TTS caption process.
Method 1: Basic TTS Caption Workflow
The foundation: create text, generate speech, and ensure captions match perfectly.
- Script your narration: Write out exactly what you want spoken. Keep sentences short and clear—TTS works best with phrases of 3–8 words rather than long, complex sentences.
- Create text layers (caption base):
- Text → Add Text
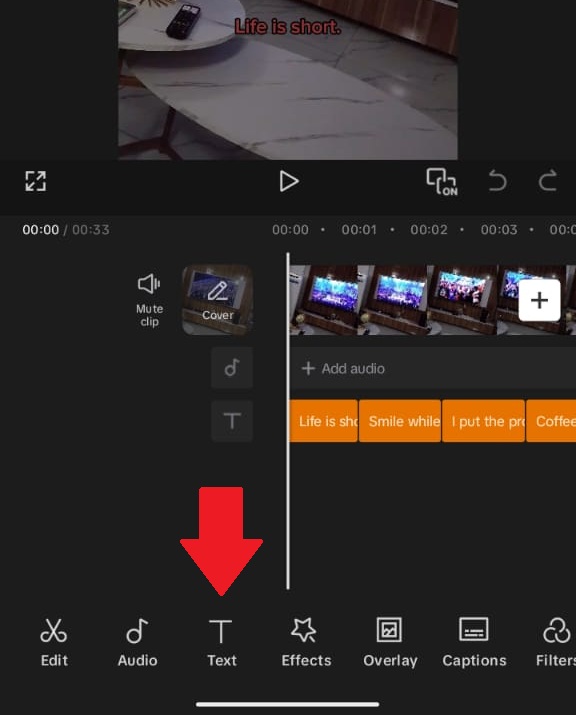
Use the Add text button to edit and create your captions - Type first sentence or phrase
- Position on screen where captions should appear
- Apply preferred styling (font, size, color, shadow)
- Text → Add Text
- Generate TTS audio:
- Select the text layer
- Tap Text-to-Speech (in the text editing panel)
- Choose voice (preview available in most versions)
- Tap Generate or Apply. CapCut links audio to this text layer
- Verify synchronization: Play the timeline. Audio should speak exactly as text appears. Adjust text layer timing if needed.
- Create subsequent captions: Duplicate the text layer to maintain styling, move to the next timestamp, update the text, and regenerate TTS. Repeat for all phrases.
Duplication advantage: Each duplicated text layer keeps its TTS generation capability and styling intact, while allowing unique audio for each caption.
Method 2: Reverse Caption Workflow (Audio First)
Use this method when you already have TTS audio or a recorded voiceover and want captions to match exactly.
- Import or generate audio: Add TTS or voiceover to the CapCut timeline. Some versions allow detaching TTS from the text layer.
- Generate auto captions: Select audio → Captions → Auto Captions. CapCut transcribes the synthetic voice automatically.
- Style the captions: Use Batch Edit to apply font, color, animation, and positioning.
Limitations: Auto captions may misinterpret synthetic voices or unusual pronunciation. Manual correction might still be required.
When to use this method:
- You have TTS audio from an external tool (higher quality or more languages)
- You want captions that exactly match pre-existing narration
- Adding captions to someone else’s TTS content
Method 3: Multilingual TTS Strategy
Use this workflow to create content in multiple languages without re-recording audio.
- Create master version: Build the complete video with TTS narration and captions in your primary language. Finalize timing, styling, and visuals.
- Duplicate project: Save a copy for the new language. For major changes, export and re-import the video.
- Replace TTS with new language: Update each text layer with translated text, select the corresponding TTS voice, and regenerate audio.
- Adjust timing: Different languages have different speeds. Adjust text layer duration to match the new audio length.
- German & English: usually similar timing
- Spanish: ~10–15% longer than English
- Japanese: often faster syllable rate; may need more spacing
- Update captions: If using Method 2, regenerate auto captions for the new language. If using Method 1, the manual text layers already serve as captions.
Quality considerations: TTS quality varies by language. English, Spanish, and Mandarin are usually natural, while smaller languages may sound robotic. Test before full production.
Platform-Specific TTS Caption Optimization in CapCut
TikTok
- TTS is extremely common—viewers accept it as native to the platform
- Use “Jessie” or “Bob” voices (if available) for the most natural sound
- Combine TTS narration with trending audio tracks for higher engagement
- Captions remain essential—many viewers watch with sound off, even with TTS
Instagram Reels
- TTS is less common than TikTok—use strategically, not for entire videos
- Higher quality expectations—process TTS audio with EQ and subtle reverb
- Captions can be more aesthetic, serving design as well as accessibility
YouTube Shorts
- TTS is acceptable for accessibility, anonymity, or multilingual content
- Longer videos benefit from voice variation; avoid a single TTS voice for 3+ minutes
- Captions improve SEO—YouTube indexes caption text, helping discoverability
CapCut TTS Voice Selection Guide
Educational Content
- Use “Professional” or “News” style voices
- Maintain a steady pace and clear enunciation
- Avoid overly enthusiastic voices that distract from the information
Entertainment / Comedy
- Use “Friendly” or “Casual” style voices
- Slightly faster pace works best for humor
- Consider character voices for skits or dialogue
Motivational / Inspirational
- Use “Warm” or “Deep” voice options
- Slower pace for gravitas
- Pause strategically for impact
Product / Tech Reviews
- Use “Clear” or “Crisp” voice options
- Medium pace, precise pronunciation
- Test technical terms before committing to full TTS generation
Common TTS Caption Mistakes
- Monotone Delivery: Single voice with no variation. Fix: Break into sections, vary voice, pacing, and add pauses.
- Caption-TTS Mismatch: Editing text after TTS breaks sync. Fix: Finalize text before generating TTS, regenerate audio after changes.
- Ignoring Pronunciation: Brand names or slang are mispronounced. Fix: Use phonetic spelling and test unusual words.
- Robotic Audio Quality: Raw TTS without processing. Fix: Apply EQ, compression, subtle reverb, and normalize levels.
- Over-reliance on TTS: Long, uninterrupted TTS segments reduce engagement. Fix: Use short bursts, add music, B-roll, or visual transitions.
Speed Workflow: TTS Captions for Tight Deadlines
Example 15-minute TTS caption workflow for a short-form video:
- Script (3 min): Write short phrases, one concept per caption
- Generate (5 min): Create text layers, batch generate TTS
- Sync Check (2 min): Play through, adjust any timing issues
- Style (3 min): Batch edit styling and add animation
- Export (2 min): Process and upload
Batch Generation Technique
- Create all text layers first without generating TTS
- Select multiple layers (if the CapCut version supports multi-select TTS)
- Generate TTS simultaneously for all layers
- Alternatively, use auto-captioning on the combined TTS audio track
Final Thoughts
Text-to-Speech captions in CapCut solve real problems: accessibility, anonymity, multilingual content, and voiceover without recording equipment. However, they require disciplined workflows to avoid robotic sound and synchronization errors.
Best practices:
- Final script first, then TTS generation, then styling
- Treat text layers as the single source of truth—audio is generated from text, captions are displayed from text
- Use TTS strategically. Short-form, high-volume content benefits most; long-form, intimate content may still require human narration
For the complete foundation of caption creation on CapCut, see our full CapCut caption guide.
Making CapCut TTS Sound Natural: Advanced Techniques
Raw TTS often sounds robotic. Use these advanced techniques to add a human-like quality to your generated audio while keeping captions synchronized.
Technique 1: Phrase Breaking
Break long sentences into natural speech units. Each phrase should have its own text layer and TTS generation, with brief pauses to mimic breathing.
Example:
Robotic (bad): “The quick brown fox jumps over the lazy dog and then runs into the forest where he finds a hidden treasure that changes his life forever.”
Natural (better):
- “The quick brown fox jumps over the lazy dog.” [pause]
- “Then he runs into the forest.” [pause]
- “Where he finds a hidden treasure.” [pause]
- “That changes his life forever.” [pause]
Technique 2: Punctuation Manipulation
Punctuation affects TTS prosody (rise and fall of the voice). Use it strategically to create natural pauses and tone:
- Period (.): Full stop, definite pause
- Comma (,): Short pause, continuing tone
- Ellipsis (…) : Trailing off, uncertainty
- Question mark (?): Rising tone at end
- Exclamation (!): Emphasis, energy
Tip: Add commas where you would naturally pause, even if grammatically optional. Example: “So, here’s the thing, right? You need to, like, focus on what matters.”
Technique 3: Phonetic Spelling
Correct mispronunciations for brand names, technical terms, or slang by spelling phonetically.
- “TikTok” → “Tick Tock”
- “GIF” → “Jiff” or “Giff”
- “CapCut” → “Cap Cut”
Technique 4: Voice Layering for Dialogue
Create multiple TTS voices for different speakers or characters.
- Narrator: neutral, steady voice
- Character: different TTS voice, or same voice with pitch shift via CapCut audio effects
- Use caption styling (colors, positions, name tags) to distinguish speakers visually
Technique 5: Audio Processing
Enhance TTS audio with light processing to reduce robotic sound:
- EQ: Boost 2–4kHz for clarity, reduce 200–400Hz for less muddiness
- Compression: Even out volume variations
- Reverb: Subtle room tone (10–15% wet) softens sterile TTS
- Pitch shift: ±2–3% variation between phrases for natural inflection
Synchronizing TTS with Captions
The biggest challenge: editing text or regenerating TTS without breaking sync.
Synchronization Rule
Never edit text content after generating TTS without regenerating the audio. The text layer is the “master.” Any divergence confuses viewers.
Recommended Workflow
- Phase 1: Script Finalization
- Write and finalize all text
- Read aloud to check natural flow
- Estimate timing for each phrase
- Phase 2: Generate TTS
- Create text layers for the entire script
- Generate TTS audio for each layer
- Listen through the full video to check pronunciation
- Phase 3: Edit Audio, Not Text
- If pronunciation is off, adjust spelling (phonetic)
- Regenerate TTS after changes
- Never change the meaning without updating audio
- Phase 4: Style Captions
- After TTS is locked, apply styling, animation, and positioning
- Visual changes do not affect audio sync
Safety Check
Play video with sound off to check captions onlyly). Both should convey the same information. If they differ, your text and TTS have diverged.
Play video with eyes closed to evaluate audio only
Frequently Asked Questions
How do I use text-to-speech in CapCut with captions?
To use text-to-speech with captions in CapCut, create a text layer first, type your script, then apply the Text-to-Speech feature to generate audio. The same text layer acts as your caption, ensuring both audio and text stay perfectly synchronized.
Can I convert auto captions to text-to-speech in CapCut?
No, CapCut does not allow you to directly convert auto captions into text-to-speech. TTS only works with manually created text layers, so you need to create or copy captions into text layers before generating voice.
Why is my CapCut text-to-speech not syncing with captions?
This usually happens when you edit the text after generating TTS audio. To fix it, always regenerate the audio after making any text changes. The text layer should remain your source of truth for both captions and voice.
How can I make CapCut text-to-speech sound more natural?
To make TTS sound natural, break your script into short phrases, add commas for pauses, use phonetic spelling for tricky words, and apply light audio effects like EQ or reverb. Avoid long blocks of text, which often sound robotic.
Which CapCut text-to-speech voice is the most realistic?
The most realistic voices are usually the “Professional,” “Narration,” or premium voice options. These have better pacing and tone compared to default voices, especially for English content.
Can I use CapCut text-to-speech for multiple languages?
Yes, CapCut supports multiple languages for TTS. To create multilingual videos, duplicate your project, translate the text layers, select the appropriate voice for each language, and regenerate the audio while adjusting timing.
Does CapCut text-to-speech require an internet connection?
Yes, CapCut text-to-speech uses cloud processing, so you need an active internet connection to generate or regenerate TTS audio.
How do I fix mispronounced words in CapCut TTS?
Use phonetic spelling to guide pronunciation. For example, rewrite brand names or slang the way they sound. After editing the text, regenerate the TTS audio to apply the correction.
Final Thoughts
Text-to-Speech captions in CapCut solve real problems: accessibility, anonymity, multilingual content, and voiceover without recording equipment
However, they require disciplined workflows to avoid robotic sound and synchronization errors.
Best practices recommend:
- Final script first, then TTS generation, then styling
- Treat text layers as the single source of truth—audio is generated from text, captions are displayed from text
- Use TTS strategically. Short-form, high-volume content benefits most; long-form, intimate content may still require human narration