
How to Loop a Video on CapCut (Mobile & PC Easy Guide)
Quick answer: You can loop a video on CapCut in under 2 minutes by duplicating clips on the timeline or using the copy-reverse method for seamless playback.
This guide covers mobile (iPhone/Android), desktop (PC & Mac), and audio looping—with specific techniques for TikTok, Instagram Reels, and YouTube Shorts.
Looping videos has become essential for short-form content. When a video repeats seamlessly, viewers watch longer—which signals algorithms to push your content further.
So if you’re creating hypnotic background animations, extending a 3-second clip into a 60-second Reel, or making perfectly synced music loops, CapCut handles it all without watermarks or subscription fees.
What Does Looping a Video Mean in CapCut?
Looping means making a video repeat continuously without the viewer noticing where it ends and restarts. In CapCut, there are two distinct approaches:
| Type | What It Does | Best For |
|---|---|---|
| Simple Repeat | Duplicates the same clip back-to-back | Quick length extension, meme formats |
| Seamless Loop | Reverses every second clip to hide the cut point | Background videos, aesthetic content, music visualization |
Real examples:
- TikTok loops: A dancer’s movement flows endlessly without a visible cut
- Background animations: Subtle motion graphics for website headers or presentation slides
- Looping intros: Brand stingers that repeat while voiceover continues
The key difference: simple repeats show a hard cut at each loop point; seamless loops use motion reversal to make the transition invisible.
How to Loop a Video on CapCut Mobile (iPhone and Android)
CapCut’s mobile app works identically on iPhone and Android. These methods apply to both platforms.
Method 1 – Duplicate the Clip (Fastest Way)
This is the quickest way to extend video length for platforms requiring minimum durations.
Steps:
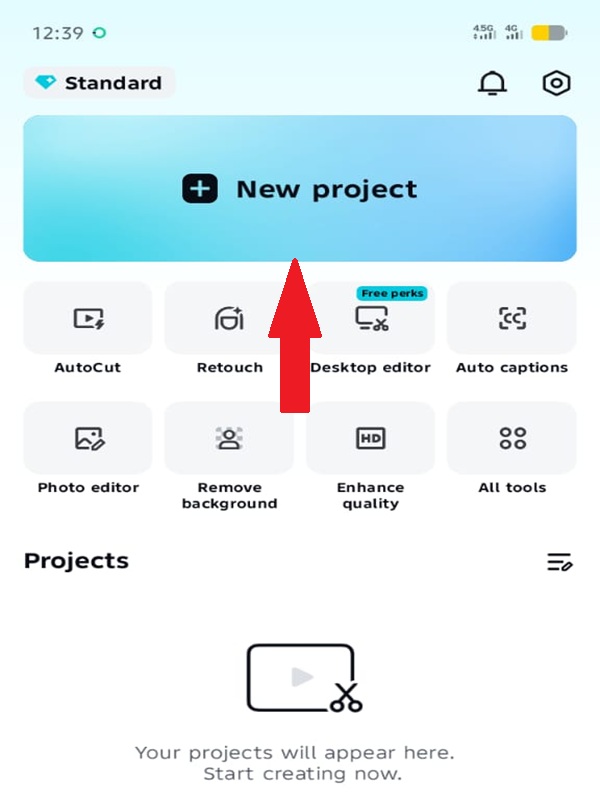
- Open CapCut → Tap “New Project”
- Import your video from the gallery
- Tap the clip in the timeline to select it
- Tap “Duplicate” (appears in the bottom menu as shown in the image below)
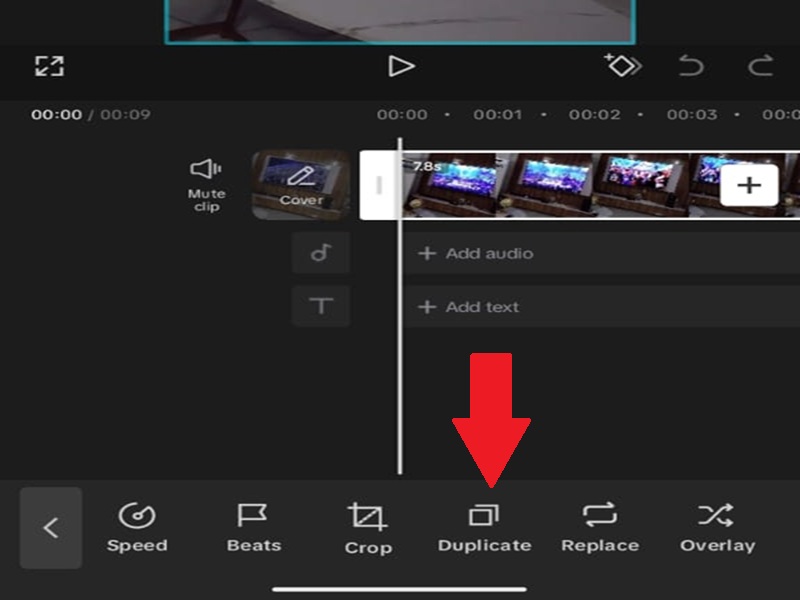
- Repeat duplication until you reach the desired length
- Tap Export (top-right corner)
Keep in mind: CapCut allows up to 10 repetitions per clip for long-form content. For TikTok or Shorts, 3-4 repetitions usually suffice.
This method is best for Beginners, quick meme edits, and hitting platform minimum length requirements.
Method 2 – Create a Seamless Loop
This technique hides the loop point by reversing every second clip—creating a “ping-pong” effect that feels continuous.
Steps:
- Import your video and trim to the exact section you want to loop
- Tap the clip → Select “Duplicate”
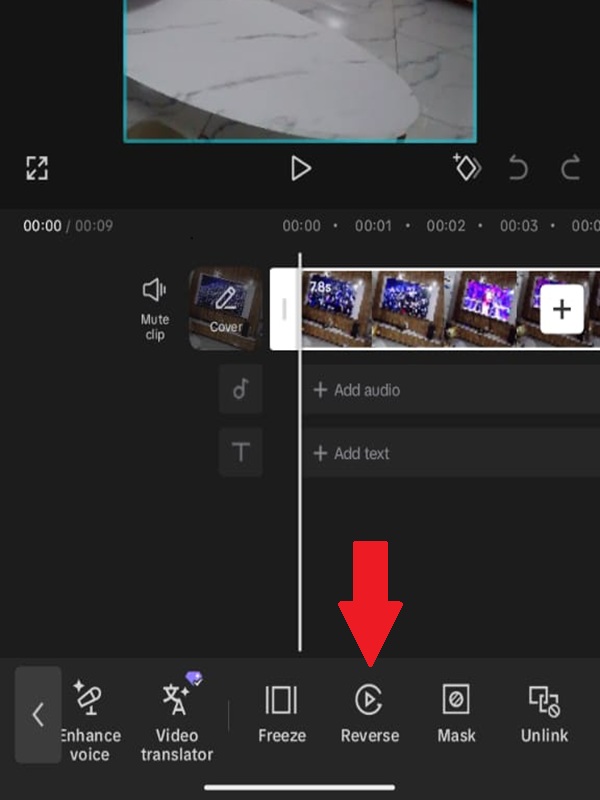
- Tap the duplicated clip → Tap “Edit” (bottom-left) → Scroll to the right → Tap “Reverse.“
- Look for the white box icon between the two clips on the timeline (this is the transition button)
- Tap the white box → Transitions menu opens at the bottom
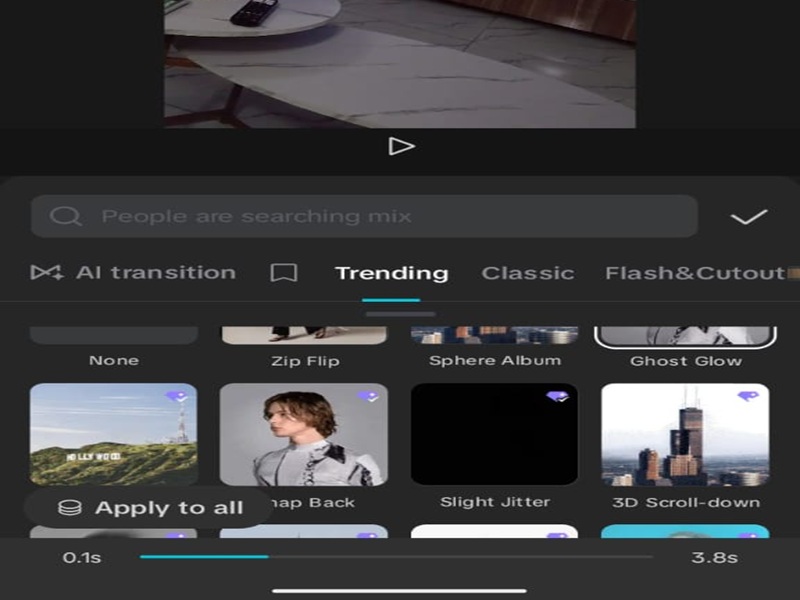
- Find “Crossfade” (under Basic category) or any other transition style you like → Tap to apply
- Adjust duration to 0.3-0.5 seconds (or max 0.9s allowed)
- Export at 1080p or higher
Why this works: The reversed clip plays the motion backward, so the end frame of the first clip matches the start frame of the second. The crossfade transition blends any minor discrepancies. For a complete step-by-step guide on how to reverse videos (including speed adjustments and audio handling), check out our detailed tutorial: How to Reverse a Video on CapCut.
This method is best for aesthetic videos, background loops, ASMR content, any video where you don’t want viewers to detect the repeat point.
iPhone-Specific Tips
The iPhone interface is identical to Android, and no separate steps are required. However, iPhone users have access to specific workflow optimizations:
- Turn on Snap: Settings → Timeline → Enable “Snap to Frame” for precise trim points
- Zoom the timeline: Pinch with two fingers to expand the timeline for frame-accurate cutting
- Use Haptic feedback: iPhone’s vibration confirms when clips align perfectly
Simplified iPhone workflow:
- New Project → Import video → Tap “Add”
- Tap clip → “Trim” to isolate loopable section
- Tap “…” (three dots) → “Duplicate” repeatedly
- Tap transition zones → Apply “Crossfade”
- Export
iPhone-specific advantage: CapCut on iOS processes reverse effects faster due to Apple’s Neural Engine optimization .
Android-Specific Tips
- Enable “Gesture controls” in settings for faster navigation
- Use split-screen mode to reference source material while editing
How to Loop a Video on CapCut Desktop (PC & Mac)
The desktop version offers superior precision for complex loops and handles longer sequences without performance drops.
Steps:
- Launch CapCut Desktop → Click “Create Project”
- Click “Import” or drag the video directly to the timeline
- Select clip → Press Ctrl+C (Windows) or Cmd+C (Mac) to copy, you can also right click and click on copy
- Position playhead at clip end → Press Ctrl+V or Cmd+V to paste
- Repeat the paste operation for the desired loop count
- Click “Export” → Select resolution (4K available on desktop)
Desktop advantages:
- Keyboard shortcuts make duplication 3x faster than mobile
- Multi-timeline support: Up to 50 timelines for complex loop layering
- Precise scrubbing: Frame-by-frame navigation for perfect loop points
- Better for long loops: Desktop handles 10+ minute loop sequences without lag
Pro workflow: For seamless desktop loops, copy the clip, paste it, then click the “Reverse” button in the top-right inspector panel instead of the mobile menu .
How to Loop Audio in CapCut
Audio looping follows the same duplication principle as video. This is crucial for maintaining consistent background music across repeated clips.
Steps:
- Import audio file (MP3, WAV, M4A supported)
- Drag to the audio timeline below the video track
- Select audio clip → Tap/click “Copy”
- Paste at the end of the previous audio segment
- Repeat to match video duration
- Add Fade In at the start and Fade Out at the end of each audio clip to prevent clicking sounds
When to loop audio:
- Background music: Extending a 15-second track across a 60-second Reel
- Ambience: Rain, fire, or city sounds for atmospheric videos
- Podcast clips: Repeating intro music while showing different visuals
Note: CapCut’s “Mix” transition does not crossfade audio between clips—manual fade adjustments are required .
How to Make a Perfect Seamless Loop in CapCut
These techniques separate amateur loops from professional ones:
1. Use symmetrical footage
Clips with cyclical motion (spinning objects, walking cycles, flowing water) loop more naturally than linear actions (a car driving past).
2. Match first and last frames
Before duplicating, trim your clip so the start and end positions are visually similar. This reduces the workload on transitions.
3. Add crossfade transition
The crossfade gradually blends the end of clip A into the start of clip B, masking any minor mismatches. Duration: 0.3-0.5 seconds optimal.
For more creative and trendy transition ideas that work great with loops (especially for TikTok and Reels), see our curated list: Best CapCut Transitions for Reels & TikTok.
4. Use the reverse trick
Duplicating + reversing creates mathematically perfect loops because the motion path becomes palindromic—guaranteed to return to the start position.
5. Avoid jump cuts
Never use hard cuts between looped segments unless stylistically intentional. Always use transitions or the reverse method.
Why Your CapCut Loop Looks Bad (Common Problems)
| Problem | Cause | Apply a consistent color filter to all clips |
|---|---|---|
| Video jump at loop point | Start/end frames don’t match | Trim precisely or use reverse method |
| Audio stops abruptly | No fade applied | Add 0.5s fade out/in at loop points |
| Loop feels unnatural | Linear motion without return path | Use reverse duplication or cyclical footage |
| Stutter on playback | Timeline snap disabled | Enable “Snap to Frame” in settings |
| Color shift between loops | Auto-exposure changes in source | Apply consistent color filter to all clips |
Critical check: After exporting, watch the loop 3 times consecutively. If you can identify where it restarts, viewers will too—refine the transition.
Best Situations to Use Looping Videos on CapCut
TikTok: Loop-friendly content gets higher completion rates, triggering algorithmic promotion. Use seamless loops for satisfying/oddly satisfying content.
Instagram Reels: Loops extend short B-roll into 30-90 second formats eligible for monetization and wider distribution.
YouTube Shorts: The platform’s “swipe to next” behavior rewards loops that make viewers watch twice, counting as 2 views.
Animated backgrounds: Website headers, presentation slides, digital signage, anywhere continuous motion adds polish without distraction.
Product promos: Rotating product shots that loop endlessly keep the viewer’s attention on the merchandise.
Meme edits: Repeating funny moments amplifies comedic impact through repetition.
CapCut Loop Timeline Explained
Understanding how CapCut handles repetition helps you plan complex edits:
Clip Duplication vs. Duration Extension:
- Duplication: Creates actual copies of the clip on the timeline. Each copy is independent—edit one without affecting others.
- Duration Extension: Dragging the clip edge only works if the source file has additional footage beyond the current trim. For true looping, duplication is required.
Timeline Behavior:
- Mobile: Vertical timeline stack, limited to ~10 duplicates per operation
- Desktop: Horizontal timeline, unlimited duplicates, supports 50 simultaneous timelines for layered loop effects
Performance Note: Each duplicate increases the project file size. For 20+ repetitions, use desktop version to prevent mobile app crashes.
Frequently Asked Questions
Does CapCut have a loop video feature?
How do you make a seamless loop in CapCut?
Why does my looped video jump at the repeat point?
Can you loop only part of a video in CapCut?
Will looping a video reduce quality in CapCut?
Final Thoughts
Looping in CapCut is straightforward but requires choosing the right method for your content. The duplicate method gets you there fastest when you just need to hit a duration minimum.
The reverse+duplicate method takes 30 seconds longer but produces professional, invisible loops that keep viewers watching.
CapCut’s free tier handles all looping needs without watermarks—no subscription required for 4K exports or unlimited loop length.
So whether you’re posting to TikTok, building a portfolio site background, or creating meme content, the tools are identical across mobile and desktop.
Start with simple duplication to learn the timeline, then graduate to seamless reverse loops once you’re ready to hide the edit completely.