
How To Use CapCut for Instagram Reels (Complete Workflow)

Instagram Reels is crowded now. If your video doesn’t look sharp in the first second, people scroll.
The good news? You don’t need expensive software to make Reels that look clean, trendy, and “native” to Instagram.
CapCut for Instagram Reels is one of the easiest ways to edit in a vertical 9:16 format, add captions, sync cuts to music, and export in settings that won’t turn your upload blurry.
In this guide, you’ll learn the exact workflow: the right project setup, the editing steps that keep Reels fast-paced, and the best export settings so your video stays crisp after you post.
Can You Use CapCut for Instagram Reels?
Yes, you can absolutely use CapCut for Instagram Reels, and it’s one of the easiest ways to make Reels look polished without overcomplicating the edit.
CapCut gives you the core tools Reels creators actually use: quick trimming, clean transitions, captions, effects, and music syncing—all in a vertical format that fits Instagram.
It’s a strong choice if you want to:
- Edit faster (short-form pacing is the whole game on Reels)
- Add captions so people can follow even with sound off
- Use templates to jump on trends quickly
- Export sharp video that holds up after Instagram compression
Next, let’s set up your project the right way (9:16 + safe zones) so nothing gets cropped or covered by the Reels UI.
CapCut Settings for Instagram Reels (Do This First)
Before you add captions, effects, or music, set up your project for Reels. This one step prevents the most common problems: weird cropping, cut-off text, and black bars.
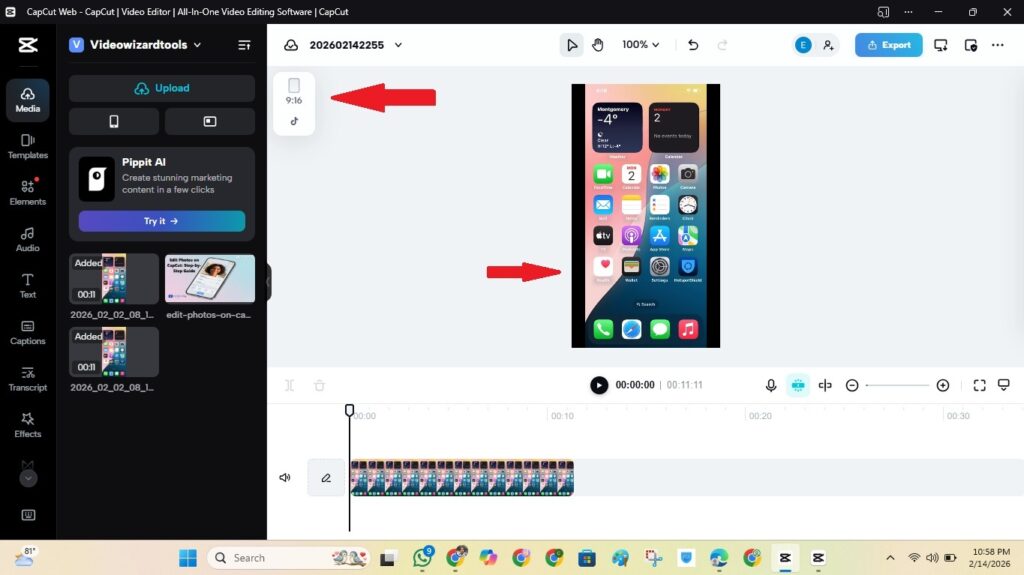
1) Use the right format (9:16)
- Aspect ratio: 9:16 (vertical)
- Best resolution target: 1080 × 1920
2) Keep text out of the Reels “danger zones”
- Keep captions and important text higher on the screen (the bottom area gets covered by buttons).
- Don’t place key text on the right side—Instagram UI can cover it.
- Leave breathing room near the edges so nothing looks cramped on smaller phones.
3) Use a simple layout rule that always works
- Keep faces and key visuals in the center of the frame.
- If you add a headline, place it in the top third.
- If you add captions, place them in the middle-to-lower third (not at the very bottom).
Once these settings are locked in, editing becomes faster—and your Reel will look right the first time you upload.
Step-by-Step: How to Edit Instagram Reels in CapCut
This is the workflow that keeps your Reels clean, fast-paced, and easy to repeat.
Step 1: Import your clips
- Tap New Project and select your clips.
- Arrange them in order on the timeline.
- Start with your strongest clip (your hook).
Step 2: Trim for pacing (make it scroll-stopping)
- Cut long pauses, mistakes, and dead space.
- Keep scenes moving—Reels reward speed.
- Use Split for quick jump cuts.
Step 3: Add captions (huge for retention)
- Add short captions that match what you’re saying.
- Keep them bold and readable on a phone.
- Place captions higher so Instagram buttons don’t cover them.
Step 4: Add transitions and effects (lightly)
- Use transitions only when you change scenes or topics.
- Stick to 1–2 effects that match your style.
- Avoid stacking effects—too much can make the video look messy.
Step 5: Sync your cuts to music
- Add music and align cuts to the beat for a “Reels feel.”
- Lower the music if you’re speaking so your voice stays clear.
- Use quick fades so audio changes don’t feel harsh.
Step 6: Quick final check
- Watch once for pacing—trim anything that drags.
- Check text placement (not too low, not on the right edge).
- Make sure faces and key visuals are centered.
Next, let’s export with the best settings so your Reel stays sharp after you upload.
Best Export Settings in CapCut for Instagram Reels
Your Reel can look perfect inside CapCut… then come out soft after posting if the export settings are too low. Use these defaults, and you’ll avoid most quality issues.
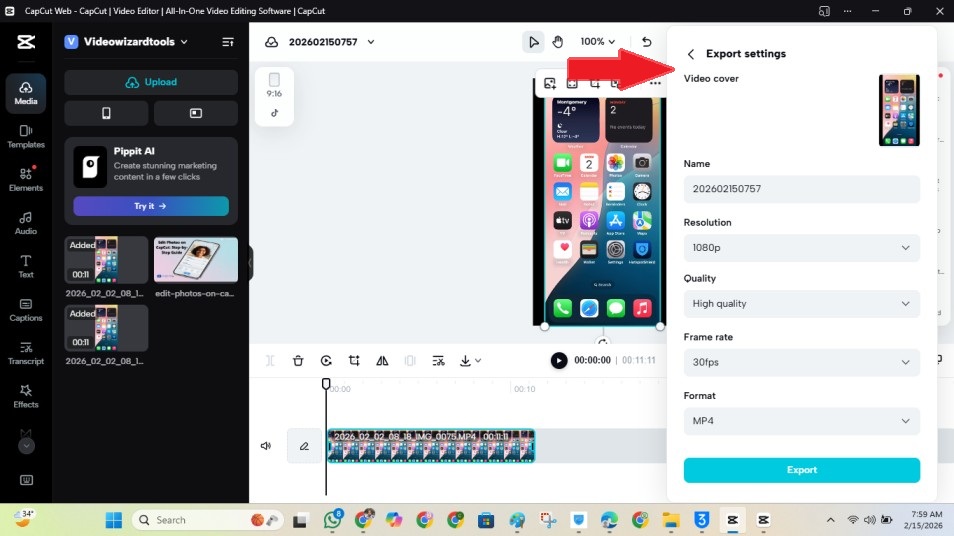
Best export settings (safe defaults)
- Aspect ratio: 9:16
- Resolution: 1080 × 1920 (1080p)
- Frame rate: match your footage (30fps or 60fps)
- Format: MP4
- Quality/bitrate: High / Best (max it if there’s a slider)
Reels export notes (so text stays readable)
- Keep captions and key text above the bottom UI area.
- Avoid placing important text on the right side (Instagram icons can cover it).
- Export once, then upload the original exported file (don’t re-download and re-upload copies).
Next, here are upload tips that help your Reels stay sharp after Instagram compression.
Upload Tips So Your Reels Don’t Look Blurry
Even with perfect export settings, Instagram still compresses uploads. These small habits help your Reel stay sharper after posting.
1) Upload the original exported file
- Don’t upload a version you downloaded from TikTok or another platform.
- Avoid screen-recording your Reel—quality drops fast.
2) Turn on high-quality uploads (if you have the option)
- In Instagram settings, enable the option for higher-quality uploads when available.
- This can reduce how aggressive compression feels on your video.
3) Don’t re-export multiple times
- Exporting again and again can slowly reduce detail.
- Always export from your original CapCut project and original clips.
4) Keep effects clean (Instagram compression hits hard)
- Heavy effects, extreme sharpening, and stacked filters can look worse after compression.
- Use subtle edits so your video stays clean when Instagram processes it.
Next, let’s look at the CapCut features that matter most for Reels (templates, captions, keyframes, and music syncing).
Best CapCut Features for Instagram Reels (That Actually Matter)
CapCut has a lot of tools, but you don’t need all of them. These are the features that make the biggest difference for Reels—without making your edit feel overdone.
Templates (fastest way to match trends)
- Use templates when you want a trend-style edit without building it from scratch.
- Pick templates that fit your niche and keep your clips high quality.
- Avoid locked assets if you don’t want Pro restrictions.
Captions + text styles (retention boost)
- Captions help when people watch with sound off.
- Use big, simple fonts and keep lines short.
- Place captions higher so Instagram UI doesn’t cover them.
Keyframes (simple zooms that look pro)
- Use keyframes for subtle zoom-ins on important moments.
- Keep movement smooth—small zooms look more professional than big jumps.
Transitions (use less than you think)
- Use transitions only when you change scenes or topics.
- Simple transitions usually look more “native” to Reels.
Music syncing (what makes Reels feel “right”)
- Align your cuts to the beat for a more engaging flow.
- Lower music under voice so speech stays clear.
- Use quick fades so audio changes feel smooth.
Common Mistakes to Avoid When Using CapCut for Instagram Reels
Most Reels don’t flop because the idea is bad. They flop because the edit is messy, the text gets covered, or the export comes out soft.
- Editing in the wrong format: If you edit in 16:9 and try to “fix it later,” your Reel can end up cropped or awkward. Start in 9:16.
- Putting captions in the UI zone: Reels buttons can cover the bottom and right side. Keep captions higher and important text away from the right edge.
- Overusing effects and transitions: Too many effects can make your Reel look chaotic—and compression can make it look worse. Use 1–2 effects max.
- Exporting below 1080×1920: Lower exports often look soft after upload. Stick to 1080×1920 for Reels.
- Using the wrong FPS: Exporting 60fps when your footage is 30fps won’t add real smoothness. Always match your footage.
- Uploading a re-downloaded copy: If you download from another platform first, the quality drops. Upload the original exported file.
Frequently Asked Questions
Conclusion
CapCut makes it genuinely easy to create Reels that look professional—without needing complicated editing software.
Start by setting your project to 9:16, keep your captions out of the Reels UI zone, and use simple edits that match your style. Then export in 1080×1920, match your FPS, and choose High/Best quality so your video stays sharp after upload.
If you want to go deeper (and use the same workflow for TikTok and Shorts), check out our full guide on CapCut for Social Media.