
How to Use CapCut for TikTok (Without Losing Quality)

TikTok moves fast. One second you’re watching a random clip… the next it’s at 2M views and everyone’s copying the edit.
If you want to keep up without spending hours in complicated software, CapCut is one of the easiest ways to make your videos look sharp, modern, and “TikTok-ready.”
In this guide, you’ll learn exactly how to use CapCut for TikTok: the right 9:16 setup, the quick editing workflow, how to add captions and sounds, and the export settings that help your video stay clear after you post.
Why Use CapCut for TikTok?
CapCut is one of the easiest editors for TikTok because it’s built for fast, trend-style edits. You can cut clips quickly, add captions in minutes, and export in the exact format TikTok wants.
- Made for TikTok-style pacing: quick cuts, clean captions, and effects that match what’s trending
- Vertical-first editing: 9:16 support means your video fills the screen properly
- Templates for trends: use ready-made formats to jump on viral edits faster
- Sound-friendly workflow: easy music syncing and timing for beats, lip-sync, and transitions
- Fast export + upload: you can export in 1080p and post without quality dropping (if settings are right)
If you also create for Reels or Shorts, you’ll probably use the same workflow across platforms. Our CapCut for Social Media guide breaks down the best settings for each one.
Set Up Your Project the Right Way (9:16 First)
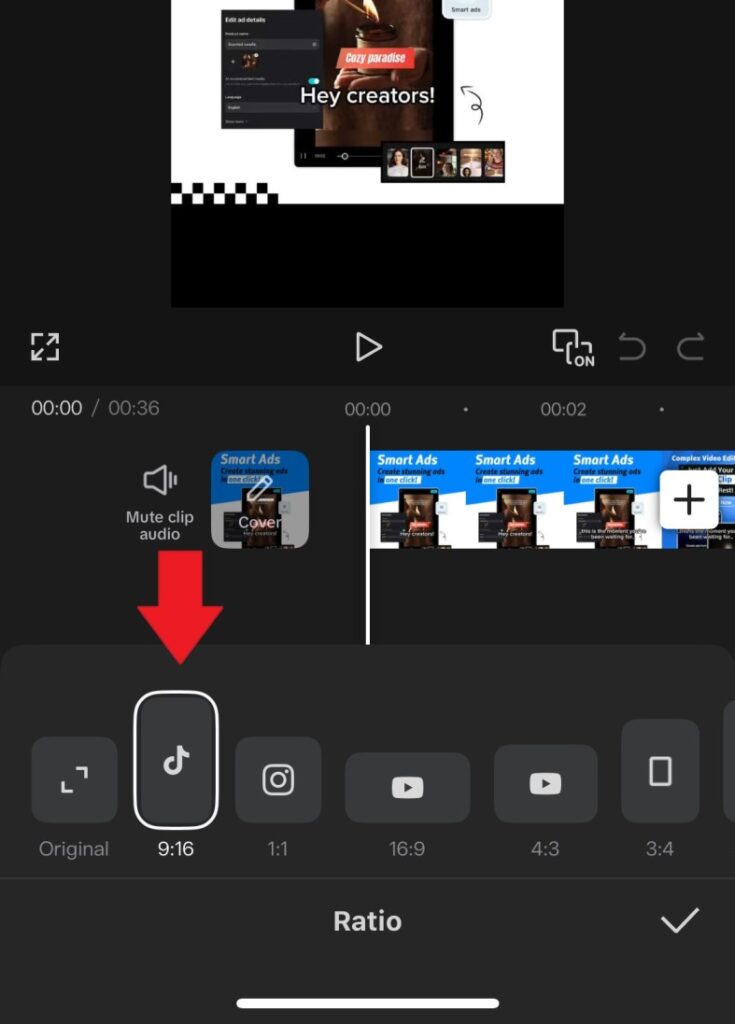
Before you add captions, effects, or music, set your format. If you skip this step, you’ll end up with weird cropping, cut-off text, or black bars.
Use TikTok’s format
- Aspect ratio: 9:16 (vertical)
- Target resolution: 1080 × 1920
Keep important stuff in the “safe zone”
- Keep captions and key text higher—TikTok buttons can cover the bottom area.
- Don’t place text right at the edges. Leave breathing room.
- If you use a face-cam, avoid placing it where captions will sit.
Once your format is set, editing becomes way faster—and your export will look correct on TikTok without extra fixing.
Step-by-Step: Edit a TikTok in CapCut
This is the simple editing flow that works for almost any TikTok style—talking videos, product clips, tutorials, and trends.
Step 1: Import clips and build a quick timeline
Tap New project, select your clips, then add them to the timeline. Put the best clip first—your hook matters more than your intro.
Step 2: Trim hard (remove pauses and dead space)
Tap a clip, choose Split or drag the edges to trim. Cut out:
- awkward pauses
- long “setup” moments
- anything that doesn’t move the video forward
Fast pacing usually beats fancy editing.
Step 3: Add captions (fast retention boost)
Go to Text → Auto captions to generate subtitles, then quickly fix mistakes. Keep captions:
- short (1–2 lines)
- big enough to read
- slightly higher on the screen (so TikTok UI won’t cover them)
Step 4: Add effects + transitions (light, not messy)
Use transitions only where the cut feels too harsh. Stick to 1–2 styles per video so it looks clean.
- Try subtle transitions like Fade or Flash
- Use effects to highlight key moments, not every second
Step 5: Sync to music or a trending sound
Tap Audio to add music, then line up your cuts with the beat (especially for templates and trend edits). If you’re using voiceover, lower the music so your voice stays clear.
Step 6: Final check (safe zones + pacing)
Before exporting, do a quick watch-through and check:
- text isn’t blocked by TikTok buttons
- Your hook lands in the first seconds
- There’s no dead space at the start or end
Best Export Settings for TikTok (So It Doesn’t Look Blurry)
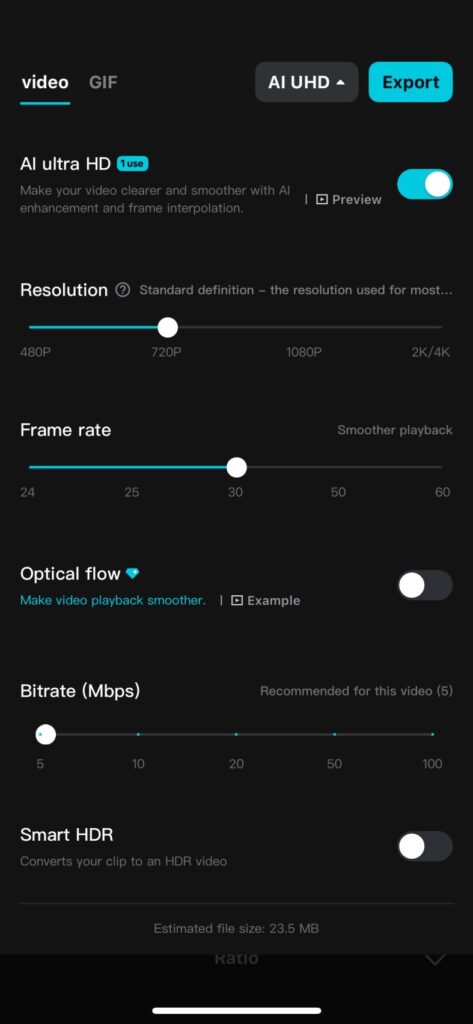
Your edit can look perfect in CapCut, then look softer on TikTok if you export the wrong way. Use these settings to maintain a crisp video quality.
- Resolution: 1080×1920 (9:16)
- FPS: match your footage (30fps or 60fps)
- Quality/bitrate: High / Best (choose the highest option available)
Two extra tips that make a big difference:
- Export once: don’t re-export the same video multiple times (quality drops each time).
- Upload the original file: avoid downloading a posted TikTok and re-uploading it (that adds extra compression).
How to Use CapCut Templates for TikTok Trends
CapCut templates are the fastest way to join a trend without spending hours editing. The trick is picking the right template and keeping the timing tight.
- Pick a template that matches the trend: search the template tab for the trend name, sound, or style you’re seeing on your For You Page.
- Swap in your clips (but keep the timing): templates work because the beat and cuts are pre-built—use clips that match the vibe and length.
- Choose your strongest moments: use clips with movement, facial expressions, or clear “before/after” changes to make the template hit harder.
- Avoid locked assets unless you want Pro: some templates include Pro effects—if you see a Pro tag, pick a free alternative if you don’t want to upgrade.
Quick tip: If your template edit feels off, replace just one clip at a time until the flow feels right.
Common Mistakes to Avoid
CapCut gives you a lot of tools, but TikTok rewards clean edits more than “everything everywhere all at once.” Avoid these mistakes, and your videos will look more professional instantly.
- Overusing effects: too many effects make your video feel messy and distract from the message. Pick 1–2 and keep it consistent.
- Wrong aspect ratio: editing in the wrong format can lead to awkward cropping or black bars. Always start in 9:16.
- Text in the wrong place: captions too low or too far right can get covered by TikTok’s buttons and caption area.
- Exporting low quality: 720p exports and low bitrate settings are a quick way to get a blurry upload. Export in 1080×1920 with High/Best quality.
- Re-uploading compressed copies: downloading from TikTok and reposting (or re-exporting multiple times) reduces quality fast. Upload the original export.
Frequently Asked Questions
Conclusion
Yes, you can absolutely use CapCut for TikTok, and honestly, it’s one of the easiest ways to make your videos look like they actually belong on the For You Page.
I’ve learned the hard way that TikTok doesn’t reward “perfect”—it rewards clear and fast. The moment I stopped over-editing and started focusing on pacing (tight cuts + readable captions), my videos instantly looked more professional and held attention longer.
If you want a simple formula that works again and again, stick to this:
- Start in 9:16 so nothing gets cropped weird
- Trim hard (cut every pause, even the small ones)
- Add captions so people can follow without sound
- Use light effects/transitions (clean beats chaotic)
- Sync to a sound when it fits
- Export in 1080×1920 on High/Best quality
One more thing I always do before exporting: I watch the whole video once with the sound off. If it still makes sense and feels smooth, it’s ready. If it feels slow or confusing, I trim again and simplify.
If you want a quick win today, try this: post one video using a CapCut template, then post another with your own editing style (same topic, same length). Check which one gets better watch time, and copy what worked. That’s how you build a style that’s actually yours—and still performs.
Posts You Might Also Like
Official Resources
Here are official CapCut and TikTok resources you can bookmark for specs, upload limits, and editing/export guidance.