

CapCut is widely known as a video editing app, but many creators don’t realise it also works surprisingly well for audio-only editing.
A common question people ask is: Can you edit just audio on CapCut?
Yes, you can edit just audio on CapCut without adding any video at all. You can import audio files, trim and split clips, adjust volume, remove background noise, apply effects, and layer multiple audio tracks inside a single project.
This makes CapCut a practical option for editing voiceovers, podcasts, background music, sound effects, or audio clips for social media content, even if no visuals are involved.
In this guide, you’ll learn exactly how to edit audio-only projects in CapCut, what audio tools are available, the limitations you should know about, and when CapCut is (or isn’t) the right tool for your audio workflow.
How to edit just audio on CapCut (quick steps)
- Create a new project and import your audio file
- Trim and split to remove mistakes and silence
- Clean the audio (noise reduction if needed)
- Balance volume and add fades
- Add music/SFX on separate tracks
- Export, then convert the file to MP3/WAV (workaround)
Table of Contents
- CapCut Audio Editing Features (What You Can Do)
- How to Edit Just Audio on CapCut (Step by Step)
- How to Export Audio from CapCut (MP3/WAV workaround)
- What CapCut Can’t Do for Audio Editing (Limitations)
- Benefits of Editing Audio on CapCut
- Best audio settings in CapCut (so it sounds clean, not “phone recorded”)
- Can You Use CapCut for Professional Audio Editing?
- Frequently Asked Questions
CapCut Audio Editing Features (What You Can Do)
CapCut includes a solid set of audio editing tools that work even when your project contains only audio. These tools are designed for creators who want clean, simple, and fast audio edits without using dedicated audio software.
Here’s what you can do when editing audio in CapCut:
Trim and Split Audio Clips
You can easily trim the beginning or end of any audio clip or split it into smaller sections. This is useful for removing mistakes, silence, or unwanted parts from music, voiceovers, or sound effects.
Adjust Volume Levels
CapCut lets you control the volume of each audio track independently. This makes it easy to balance voiceovers, background music, and sound effects so nothing sounds too loud or too quiet.
Fade In and Fade Out
Fade-in and fade-out controls help smooth the start and end of audio clips. This prevents abrupt cuts and makes transitions sound more natural and professional.
Apply Audio Effects
CapCut offers built-in audio effects such as echo, reverb, and distortion. These effects can be applied to music, voice recordings, or sound effects to change the tone or mood of your audio.
Voice Effects and Pitch Control
For voiceovers, CapCut includes voice effects that let you change pitch, speed, or tone. You can make voices sound deeper, higher, robotic, or stylized, depending on your project.
Remove Background Noise
CapCut includes a noise reduction feature that helps clean up background sounds like hiss, hum, wind, or room noise. This is especially helpful for voice recordings made in non-studio environments.
Extract Audio From Video
If your audio is inside a video file, CapCut allows you to extract the audio and edit it separately. Once extracted, the audio behaves like a normal audio clip and can be edited independently.
Use Built-In Music and Sound Effects
CapCut provides a library of royalty-free music and sound effects you can add directly to your project. You can also import external audio files from your device if you prefer custom sounds.
Layer Multiple Audio Tracks
You can add and edit multiple audio tracks in the same project. This allows you to combine voiceovers, background music, and sound effects into a single audio composition.
How to Edit Just Audio on CapCut (Step by Step)
If you meant “edit audio inside a normal CapCut video project”
Some people aren’t trying to make an audio-only file. They just want to edit sound for a video: voiceover, music, and sound effects.
Good news: the tools are the same. You still trim, split, fade, remove noise, and adjust volume. The only difference is you’re syncing audio to visuals instead of building an audio-only timeline.
If that’s what you’re doing, follow the same steps below. Just start with your video clip in the timeline first.
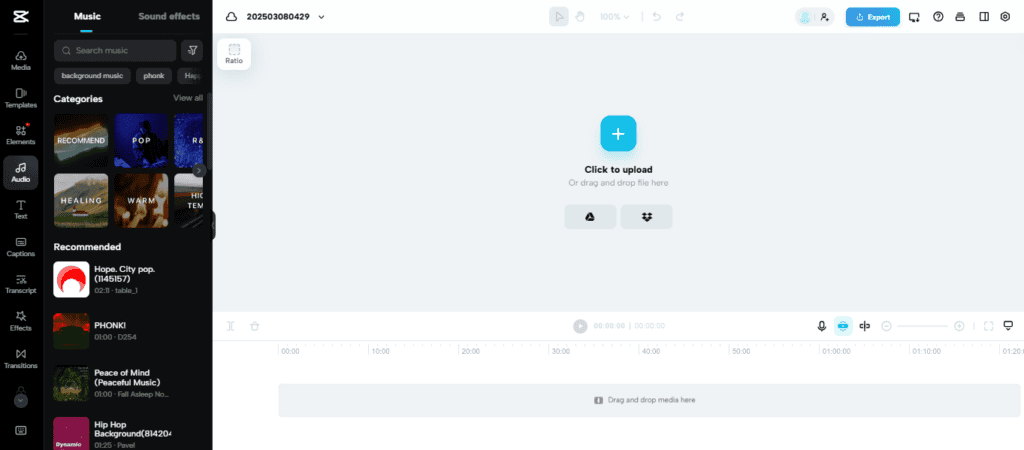
Step 1: Open CapCut and Create a New Project
Open CapCut on your phone or desktop and tap New Project.
When prompted to select media, choose an audio file instead of a video. CapCut will automatically create a project with only an audio timeline.
Step 2: Add or Import Your Audio Files
Tap the Audio option to add:
- Voiceovers
- Background music
- Sound effects
You can import audio from your device or select tracks from CapCut’s built-in library.
Step 3: Trim, Split, and Arrange the Audio
Select the audio clip on the timeline to:
- Trim the beginning or end
- Split the clip into sections
- Reposition clips to control timing and flow
This is where most audio cleanup and structuring happens.
Step 4: Adjust Volume and Apply Effects
Use the audio editing panel to:
- Increase or decrease volume
- Add fade-in and fade-out
- Apply effects like reverb or echo
- Remove background noise (for voice recordings)
These tools help your audio sound smoother and more polished.
Step 5: Layer Multiple Audio Tracks (Optional)
If your project uses more than one audio source, you can layer multiple tracks. For example:
- Voiceover on one track
- Background music on another
- Sound effects on a third
Each track can be edited independently for better control.
Step 6: Export the Project
CapCut is primarily a video editor, so it doesn’t offer a true audio-only export button.
To export your edited audio:
- Export the project as a video (with no visuals or a blank screen)
- Then extract the audio using another tool or app
This workaround is common and works reliably for audio-only projects.
How to Export Audio from CapCut (MP3/WAV workaround)
CapCut doesn’t export MP3 or WAV directly. But you can still get your finished audio out cleanly.
Here are two easy ways:
Option 1: Export as video, then convert to MP3
- Add a plain background (or leave it blank if CapCut allows)
- Export the project normally in 1080p (quality doesn’t matter much for audio)
- Convert the exported MP4 to MP3 using a converter tool
- Save the audio file and you’re done
Option 2: Export, then extract audio
- Export your project as MP4
- Use an “extract audio” tool/app to pull out the audio track
- Choose MP3 for smaller files or WAV for best quality
Tip: If you care about sound quality, choose the highest audio quality option during conversion and avoid converting the same file multiple times.
What CapCut Can’t Do for Audio Editing (Limitations)
While CapCut is useful for basic and intermediate audio editing, it’s still a video-first tool. There are a few limitations you should be aware of before using it for audio-only projects.
No True Audio-Only Export
CapCut does not currently offer a dedicated option to export audio as MP3 or WAV.
To save your audio, you’ll need to export the project as a video and then extract the audio using another tool.
Limited Advanced Audio Controls
CapCut lacks advanced audio features such as:
- Detailed EQ curves
- Audio mastering tools
- LUFS loudness targeting
- Multi-track mixing panels
These tools are commonly found in dedicated audio editors like Audacity or Adobe Audition.
No Professional-Level Audio Timeline Editing
While CapCut allows multiple audio layers, it doesn’t support advanced waveform editing, automation lanes, or precision mixing controls. This can limit complex audio production workflows.
Platform Differences
Audio features are available on both mobile and desktop, but the interface and available effects may vary slightly depending on the platform and app version.
Benefits of Editing Audio on CapCut
CapCut isn’t a full audio production studio, but it offers several advantages that make it a strong choice for creators who want fast, practical audio edits without complex software.
Easy to Use (Even for Beginners)
CapCut’s interface is simple and visual. You don’t need prior audio-editing experience to trim clips, adjust volume, or clean up voice recordings. Everything works with drag-and-drop controls.
Perfect for Social Media and Short-Form Content
If you’re creating voiceovers, TikTok audio, Reels narration, or Shorts content, CapCut gives you all the tools you need without overcomplicating the process.
Built-In Noise Reduction and Voice Tools
CapCut’s noise reduction and voice effects help improve recordings made on phones or in non-studio environments. This is especially useful for creators recording voiceovers at home.
Supports Multi-Track Audio
You can layer voiceovers, background music, and sound effects in a single project. Each track can be adjusted independently, making it easy to balance sound levels.
Works on Mobile and Desktop
CapCut lets you edit audio on your phone or computer, which is ideal if you want to work on the go or switch devices without learning new software.
Free and Cost-Effective
Most audio editing features in CapCut are available for free. For creators who don’t want to invest in dedicated audio software, this makes CapCut a very accessible option.
Best audio settings in CapCut (so it sounds clean, not “phone recorded”)
If your voiceover sounds thin, harsh, or messy, these small tweaks usually help more than fancy effects:
- Noise reduction: use lightly, just enough to reduce hiss
- Volume: keep voice consistent from start to finish
- Fades: add short fade-ins and fade-outs to avoid harsh cuts
- Background music: lower it so the voice stays clear
- Voice effects: avoid heavy presets unless it’s a style choice
The goal is simple: your voice should be easy to understand even at low volume.

Can You Use CapCut for Professional Audio Editing?
CapCut can handle basic to intermediate audio editing, but it isn’t designed to replace professional audio production software.
If your goal is to clean up voiceovers, balance audio levels, remove background noise, or add simple effects for social media or video content, CapCut does the job well.
However, for advanced audio work—such as detailed mixing, mastering, precise EQ control, or loudness targeting—dedicated audio editors like Audacity, Adobe Audition, or Logic Pro are better suited.
That said, many creators successfully use CapCut for:
- Voiceovers and narration
- Podcast-style audio for short-form platforms
- Background music editing
- Social media audio clips
- YouTube and TikTok content
If you need speed, simplicity, and convenience—especially on mobile—CapCut is a practical tool. If you need studio-level audio control, it’s best used alongside specialized audio software.
Frequently Asked Questions
Can you edit just audio on CapCut without adding video?
Yes. You can import an audio file into CapCut and edit it without adding normal video clips. CapCut lets you trim, split, arrange, fade, adjust volume, remove background noise, and layer multiple audio tracks in one project.
Can CapCut export audio-only files like MP3 or WAV?
Not directly. CapCut is still a video-first editor, so it usually exports your project as a video file. To get an MP3 or WAV file, export the project as MP4 first, then use an audio extractor or converter tool.
How do I export just audio from CapCut?
The easiest method is to export your CapCut project as a video, then extract the audio from that exported MP4 file. Choose MP3 if you want a smaller file, or WAV if you want higher audio quality.
Can I edit voiceovers in CapCut?
Yes. CapCut works well for basic voiceover editing. You can trim mistakes, split sections, remove silence, adjust volume, add fade-ins and fade-outs, and use noise reduction to clean up background sound.
Can I add background music under my voiceover in CapCut?
Yes. Add your voiceover on one audio track and your background music on another. Then lower the music volume, add fades, and make sure the voice stays clear and easy to understand.
Does CapCut have noise reduction for audio?
Yes. CapCut includes background noise reduction tools that can help reduce hiss, hum, room noise, and other unwanted sounds. Use noise reduction lightly so the voice does not become robotic or overly processed.
Can I extract audio from a video in CapCut?
Yes. If your audio is inside a video clip, CapCut lets you extract the audio and edit it separately on the timeline. This is useful for voiceovers, music clips, interviews, and repurposing sound from existing videos.
Is CapCut good enough for podcast editing?
CapCut can work for short podcast clips, simple voice cleanup, social media snippets, and basic narration edits. For full podcast episodes, detailed mixing, mastering, EQ, and loudness control, a dedicated audio editor is usually better.
Should I use CapCut or a dedicated audio editor?
Use CapCut if you want quick audio edits for social media, voiceovers, TikTok clips, Reels, Shorts, or simple background music mixing. Use a dedicated audio editor if you need advanced EQ, mastering, noise repair, precise waveform editing, or professional podcast production.