

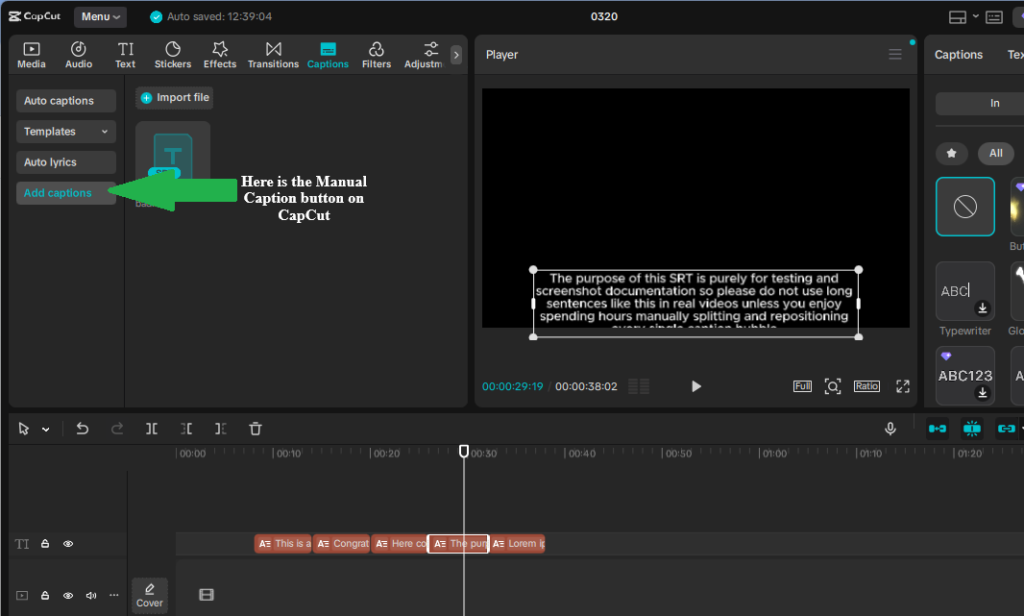
Auto captions are fast, until they get it wrong. When CapCut mangles your brand name, misses technical terms, or skips lines entirely, you need a backup that actually works.
Manual captions aren’t just a fallback, they’re often the smarter choice when precision matters.
The problem? Most creators try to avoid them because they imagine typing every word in real time is a tedious process that can turn a 60-second video into an hour of frustration.
Here’s the good news: CapCut’s manual caption workflow, done the right way, is faster than cleaning up auto captions. You get full control over timing, styling, and emphasis, without the guesswork.
This tutorial will guide you easily on how to use CapCut Manual Captions so you can stop relying on auto captions.
If you’re looking for the basic step-by-step guide (including auto captions), see our full guide on how to add captions on CapCut. This guide focuses specifically on the CapCut manual caption workflow.
Table of Contents
- When Manual Captions Are Actually Faster
- CapCut Manual Captions Workflow: Efficient Step-by-Step Guide
- Advanced Manual Caption Techniques
- Mobile vs. Desktop: Manual Caption Workflow Differences
- Common CapCut Manual Captions Mistakes to Avoid
- Speed Comparison: Manual vs. Auto + Cleanup
- Integration with Auto Captions (Hybrid Approach)
- Frequently Asked Questions
- Final Thoughts
When Manual Captions Are Actually Faster
When Manual Captions Are Actually Faster
Before diving in, know when to skip auto captions entirely. Don’t waste time generating or cleaning up auto captions when manual input is the smarter choice.
Use Cases for Manual Captions
Manual captions are faster and more reliable in these scenarios:
- Specialized vocabulary: Auto captions struggle with medical terms, legal language, technical jargon, brand names, and proper nouns. If correcting auto captions takes 10 minutes, typing them manually may take only 12 minutes—and with perfect accuracy.
- Compromised audio: Background music, overlapping speakers, heavy accents, or poor recording quality can break auto captions. Manual captions handle any audio quality.
- Timing precision is critical: Comedy relies on captions hitting comedic beats. Educational content needs captions exactly when concepts appear. Auto captions rarely get this right without heavy editing.
- Visual variety: Different caption styles for multiple speakers, color changes for emphasis, or animated text reveals all require manual layers.
- Auto caption limits reached: CapCut allows a limited number of auto caption generations per month. If your quota is exhausted, manual captions are the immediate solution. For details, see our guide on CapCut auto captions limit strategies.
Use the manual caption workflow to save time, maintain precision, and gain complete creative control.
CapCut Manual Captions Workflow: Efficient Step-by-Step Guide
This workflow prioritizes speed by batching similar tasks. Don’t try to perfect each caption one by one—set them all roughly, then refine timing and styling together.
Phase 1: Video Preparation and Caption Template Setup (2 minutes)
Split your video into logical segments:
- Import your video to the timeline.
- Play through once, listening for natural speech breaks (pauses, sentence ends, topic shifts).
- Use the Split tool at each break to create visual reference points.
Why this helps: Split lines mark where speech begins, turning caption timing from guesswork into visual alignment.
Create your caption style template:
- Place the playhead at the first split point.
- Text > Add Text.
- Type the first 3–6 words of speech (short phrases read faster than full sentences).
- Apply font, size, color, position, and shadow/background immediately.
Font Recommendations for Manual Captions
- Bold sans-serif: Montserrat Bold, Roboto Black, Open Sans Extra Bold
- Avoid: Thin weights, scripts, decorative fonts
- Size: Large enough for mobile readability, 80–100% width
- Color: White with black shadow or light text on a semi-transparent dark box
Phase 2: Rapid Caption Creation (5–8 minutes)
Copy-Paste Workflow:
- Select your styled text layer > Copy.
- Move the playhead to the next split point > Paste.
- Edit text for the next 3–6 words.
- Do not adjust timing yet; just place all text layers on the timeline.
Speed Tips:
- Desktop: Ctrl+C/V for copy/paste, arrow keys to nudge playhead.
- Mobile: Tap layer > copy > tap timeline position > paste.
- Keep phrases short: “The quick brown fox jumps over the lazy dog” → “The quick brown fox” / “jumps over” / “the lazy dog”.
Batch first: A 60-second video typically ends with 15–25 text layers roughly positioned.
Phase 3: Precise Timing Alignment (3–5 minutes)
The Waveform Method (Desktop)
- Zoom in on the timeline to view the waveform more clearly.
- Align each text layer to start at the speech onset and end at the speech pause.
- Drag layer edges to match the waveform for faster timing than repeated listening.
The Scrub Method (Mobile)
- Select a text layer > play segment.
- Drag left/right to align start and end points with speech.
Overlap & Timing Rules
- Create 0.1–0.2 second overlaps between captions to avoid flicker.
- Appear slightly before speech (0.1s early) and stay slightly after (0.1s late).
- Fast dialogue: prioritize early appearance over staying late.
Phase 4: Styling and Animation (2–3 minutes)
Batch Styling: Select multiple layers and apply consistent font, color, size, and position.
Strategic Animation:
- 80% captions: static or simple Fade (0.2s)
- 15% captions: Bounce, Pop, or Slide for emphasis
- 5% captions: Full animation for key moments or CTA
Animation Efficiency: Only animate your 3–5 key emphasis moments, keeping others static.
For tips on making your captions look extra polished and fluid, check out our guide on creating smooth captions in CapCut.
Advanced Manual Caption Techniques
Once you’ve got the basic workflow down, you can make your captions feel a lot more polished without turning the edit into a mess.
Multi-Speaker Differentiation
When two or more people are talking, captions can get confusing fast. A few simple visual cues make everything easier to follow.
Use color coding:
Give each speaker a consistent caption style. For example, Speaker 1 can use white text with a blue shadow, Speaker 2 can use white text with a red shadow, and Speaker 3 can use yellow text with a black shadow. If you want more styling ideas, readable combinations, or better visual contrast, see how to change caption colors in CapCut.
Use position coding:
You can also place captions based on where the speaker appears on screen. Left, right, or center works well when the framing stays consistent.
Add name labels when needed:
For interviews, podcasts, or group conversations, add a small name tag above the main caption. A subtle color change or italic style can help separate the label from the spoken text.
Emphasis and Emotion
Not every line should look the same. The way a caption appears can help sell the mood of the moment.
For loud or intense lines, use all caps, a slightly larger size, or a bold pop animation. If you want captions to feel more polished without looking overdone, check out how to create smooth captions in CapCut.
For quiet lines or whispers, go with smaller text, a softer color like gray, and a gentle fade. You can also add context with a label like (whispering) when it helps the viewer catch the tone.
Used carefully, these little choices make captions feel more alive and easier to follow.
Sound Effects and Non-Speech Cues
Captions are not only for dialogue. They also help viewers understand what’s happening in the scene.
- [door slams]
- [suspenseful music builds]
- [laughter]
These details add context, especially for viewers watching on mute or anyone relying on captions for accessibility.
Depth and Layering
For a more cinematic, trendy look, you can place captions behind a subject in your video instead of in front of it, so the text appears to sit naturally in the scene as the person moves.
It’s a manual technique that works well for talking-head content and adds a level of polish auto captions can’t replicate.
See our full walkthrough on putting CapCut captions behind objects for the exact steps.
Karaoke-Style and One-Word Captions
If you want captions to feel more dynamic, this is where things get fun.
Karaoke-style captions highlight words as they’re spoken, which makes them great for music clips, lyric videos, dramatic punchlines, and high-energy edits.
One-word captions work similarly, but they hit harder when you want short, punchy text that lands fast and keeps attention locked in.
For the full step-by-step process for each style, see how to make karaoke-style captions in CapCut and how to make one-word captions in CapCut.
Start by creating a separate text layer for each word or short phrase you want to highlight. Then place each one on the timeline in sequence, leaving very short gaps so the flow feels smooth and natural.
Use simple animations like Fade or Pop to give each word a bit of movement without making the screen feel chaotic.
You can also shift colors as the active word changes to guide the viewer’s eye. A simple pattern like gray, white, then yellow works well.
The most important part is timing. Each word should match the voice, beat, or rhythm closely enough that the viewer feels the caption moving with the audio, not lagging behind it.
This method takes more time than standard captions, but the payoff can be huge when you want more energy, more focus, and better retention.
Mobile vs. Desktop: Manual Caption Workflow Differences
CapCut’s manual caption workflow varies significantly between mobile and desktop platforms. Understanding these differences helps you choose the most efficient method for your setup.
Feature Comparison
| Feature | Mobile | Desktop |
|---|---|---|
| Waveform visibility | Limited | Full, zoomable |
| Keyboard shortcuts | None | Extensive (copy/paste, nudge, play/pause) |
| Multi-select layers | Possible but clunky | Shift-click, box select |
| Keyframe animation | Basic presets only | Full keyframe control |
| Precision timing | Harder (touch interface) | Easier (mouse precision) |
| Speed workflow (60s video) | 15–20 minutes | 10–12 minutes |
Mobile Optimization Tips
- Use a stylus if available—finger precision can limit timeline accuracy.
- Enable “magnetic timeline” if available—layers snap to each other and audio markers.
- Work in short segments (15–20 seconds) to reduce timeline scrolling.
Desktop Optimization Tips
- Learn keyboard shortcuts: Space (play/pause), Arrow keys (nudge 1 frame), Ctrl+Arrow (nudge 10 frames), C/V (copy/paste).
- Zoom extensively using Ctrl+Scroll or the timeline zoom slider for precise placement.
- Enable “snap to playhead” to align captions quickly and accurately.
Common CapCut Manual Captions Mistakes to Avoid
Even experienced editors make these errors. Avoid them from the start to save time and improve readability.
Mistake 1: Captions Too Long
Problem: Full sentences that viewers can’t read before they disappear.
Fix: Limit captions to a maximum of 6 words per line. Break long sentences ruthlessly.
Mistake 2: Timing Too Tight
Problem: Captions appear exactly when spoken and disappear immediately.
Fix: Add 0.1–0.2 second buffers before and after speech to give viewers time to read.
Mistake 3: Inconsistent Positioning
Problem: Captions drift up and down the screen between cuts.
Fix: Set a position template and copy it. Avoid eyeballing placement.
Mistake 4: Ignoring Safe Zones
Problem: Captions placed where TikTok or Instagram UI elements cover them.
Fix: Keep captions within the middle 60% of the screen vertically. Avoid the bottom 15% (platform buttons) and top 10% (username/notifications).
Mistake 5: Perfectionism Paralysis
Problem: Spending excessive time tweaking one caption’s animation while leaving others blank.
Fix: Follow the batch workflow: rough timing for all captions first, then refine. Don’t polish individual captions prematurely.
Speed Comparison: Manual vs. Auto + Cleanup
Let’s be honest about time investment. For a standard 60-second talking-head video, here’s how the workflows compare:
Note: These numbers are based on testing multiple 60-second talking-head videos in CapCut. Auto captions timing includes generation, reviewing errors, and styling. Manual captions timing uses the batch workflow described in this guide, from preparation to styling. Your actual times may vary depending on audio complexity and editing speed.
Auto Captions Workflow
- Generate auto captions: 30 seconds
- Review and correct errors: 8–12 minutes (technical terms, names, timing fixes)
- Style and animate: 3 minutes
- Total: 12–16 minutes
Manual Captions Workflow
- Preparation and splits: 2 minutes
- Rapid caption creation: 6 minutes
- Timing refinement: 4 minutes
- Styling and animation: 3 minutes
- Total: 15 minutes
The time difference is minimal, but manual captions provide perfect accuracy and full creative control. For content where every word matters—such as educational videos, comedy, or technical tutorials—manual captions are often the faster path to professional results.
Integration with Auto Captions (Hybrid Approach)
You don’t have to choose fully manual or fully auto captions. The hybrid approach combines the speed of auto captions with the precision of manual editing.
Hybrid Workflow
- Generate auto captions for the full video.
- Export or note the auto caption text as a reference transcript.
- Delete auto captions (or keep muted as a timing reference).
- Create manual captions using the auto transcript as a guide—no need to re-listen and transcribe.
- Apply custom styling and animation to key moments.
When the Hybrid Approach Works Best
- Long videos where transcribing from scratch is exhausting.
- Content with mixed audio quality (clear sections and noisy sections).
- When you need auto captions for speed but manual control for key moments.
- If you don’t have recorded voiceover at all, you can skip transcription entirely by generating both audio and captions from a script — see our guide on CapCut text-to-speech captions.
Frequently Asked Questions
How do I add manual captions in CapCut?
To add manual captions in CapCut, open your project, choose Text, then select Add Text. Type your caption, place it on screen, and adjust its duration on the timeline so it matches the audio. You can then customize the font, size, color, position, shadow, and animation.
When should I use manual captions instead of auto captions?
Use manual captions when your audio has background music, multiple speakers, heavy accents, technical terms, brand names, or words that CapCut auto captions keep getting wrong. Manual captions are also better when timing precision matters for tutorials, comedy, emphasis, or accessibility.
Are auto captions free in CapCut?
CapCut auto captions may be free for some users, but access can vary by account, region, device, app version, and usage limits. If auto captions stop working or become locked, manual captions are a reliable backup because you can still add and time text yourself.
How do I make manual captions faster in CapCut?
Use a batch workflow. Split your video at natural speech breaks, create one styled caption template, copy and paste it across the timeline, then edit only the text and timing. This is usually faster than creating and styling every caption from scratch.
How do I sync manual captions perfectly with audio?
On desktop, zoom into the audio waveform and align each caption with the start and end of the spoken phrase. On mobile, scrub through the audio carefully and adjust the text layer edges. A small 0.1–0.2 second buffer before and after speech can make captions feel smoother and easier to read.
How do I add speaker names or sound effects to captions?
For speaker names, add a short label before the dialogue, such as JOHN: or SARAH:. For sound effects, use brackets like [door slams], [music fades], or [laughter]. This improves clarity for viewers watching without sound.
How do I create word-by-word or karaoke-style captions manually?
Create separate text layers for each word or short phrase, then place them one after another on the timeline. You can add simple animations like Fade or Pop and use color changes to highlight the active word. This takes more time, but it works well for music, emphasis, and high-retention short-form videos.
Are manual captions better than auto captions in CapCut?
Manual captions are better when accuracy, timing, styling, or accessibility matters more than speed. Auto captions are faster for simple videos with clear audio, but manual captions give you full control over every word, line break, speaker label, and visual style.
Final Thoughts
Manual captions in CapCut aren’t the burden they seem. With a systematic workflow split, template, batch-create, refine timing and style, you can produce professional subtitles faster than most people can correct auto-caption errors.
The key is resisting the urge to perfect each caption immediately. Batch your workflow: first create all captions, then refine timing, then apply styling.
This rhythm turns manual captioning from tedious word-by-word labor into efficient video production.