

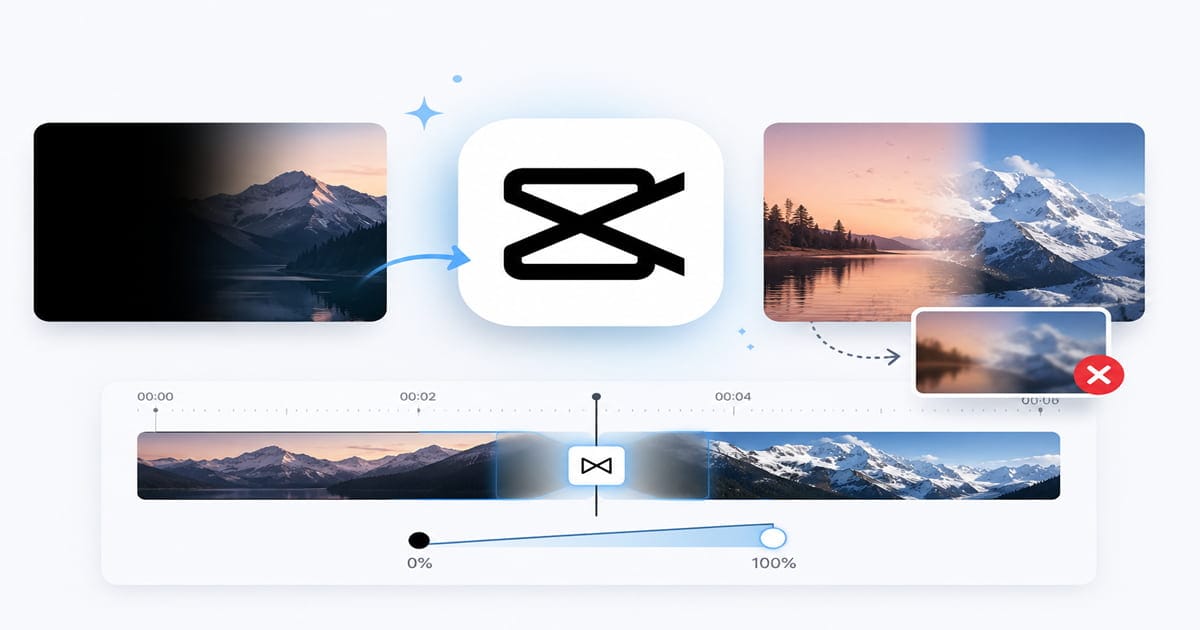
If you’re trying to add a fade in or fade out in CapCut but can’t find the option, you’re not alone.
CapCut includes several different ways to create fades, but they’re spread across different menus, which makes the feature surprisingly easy to miss.
On top of that, some users end up with a blurry fade instead of a clean dissolve, even when they think they’ve chosen the right effect.
We wrote this guide to clear up both issues at once — exactly where each fade option lives, and why your fade might be coming out blurry instead of clean.
Table of Contents
- Quick Summary
- Where Fade Actually Lives in CapCut
- Why Your Fade Might Look Blurry Instead of Clean
- How to Get a Clean Fade (No Blur)
- Building a Custom Fade With Keyframes (More Control)
- Mobile, Desktop, and Web: Small Differences Worth Knowing
- If Your Blur Issue Isn't About a Fade at All
- Frequently Asked Questions
Quick Summary
CapCut has fade-in/fade-out in three places: the clip’s Animation tab (In/Out category), CapCut’s Transitions library (between two clips), and as a searchable item inside the Effects panel.
If your fade comes out blurry, the most likely causes are picking a transition from the wrong category (some transition categories blend motion or zoom along with the fade), confusing the separate Blur effect with the fade tool, or motion blur already present in your source footage becoming more visible during the cross-dissolve.
There’s no confirmed single “bug” causing this, it’s typically one of those three.
Where Fade Actually Lives in CapCut
This part trips up more people than the blur issue itself, so it’s worth being precise about it, since CapCut’s own documentation confirms there are genuinely three separate routes:
1. The Animation tab (clip-level fade-in/fade-out). Select your clip on the timeline, open the Animation tab, and choose the “In” category for a fade-in or “Out” for a fade-out.
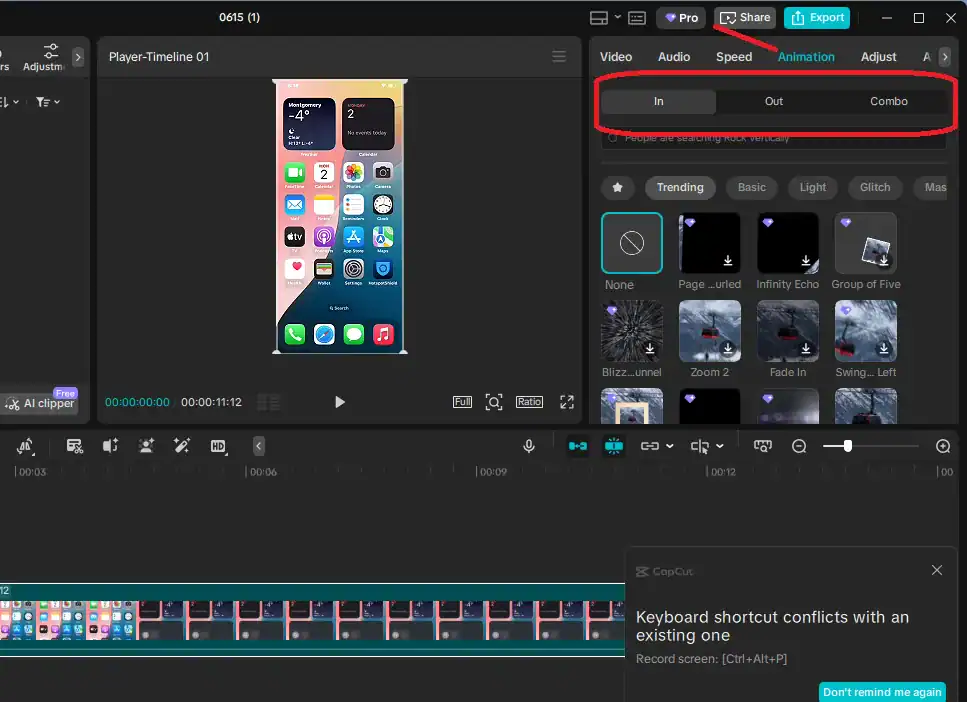
Pick the “Fade In” or “Fade Out” preset and adjust the duration slider. This applies the fade to the start or end of a single selected clip and is the most direct route if you just want your video to appear gradually from black or disappear to black.
2. The Transitions library (between two clips). If you want one clip to dissolve into the next rather than fading from black, you need a transition, not a clip animation.
Tap the small transition icon that sits between two clips on the timeline, then browse categories such as Basic, Fade, Mix, or Camera (exact category names vary slightly by app version).
Options like “Fade,” “Black Fade,” “White Fade,” or “Dissolve” give you a cross-fade between clips. This is the step where people most often end up with something other than a clean fade — more on that below.
3. The Effects panel (searchable “Fade In” effect). CapCut also lets you search “Fade In” directly inside the Effects panel and drop it onto your timeline as a standalone effect.
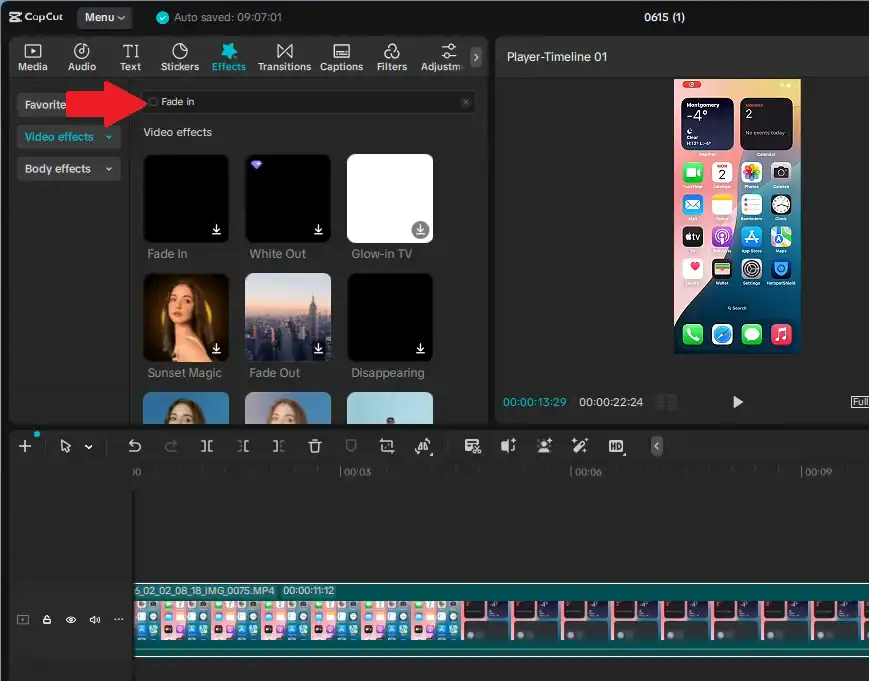
This works similarly to the Animation tab method but lives in a different part of the interface, which is part of why people report not being able to find it — they’re looking in Effects when the simpler route is Animation, or vice versa.
If you only needed to know where the feature actually is, the Animation tab method is the simplest for a standard fade-in or fade-out on a single clip.
Why Your Fade Might Look Blurry Instead of Clean
This is a real, frequently reported issue, but it doesn’t have one single confirmed cause — it’s worth ruling out each of these:
You Picked a Transition From the Wrong Category
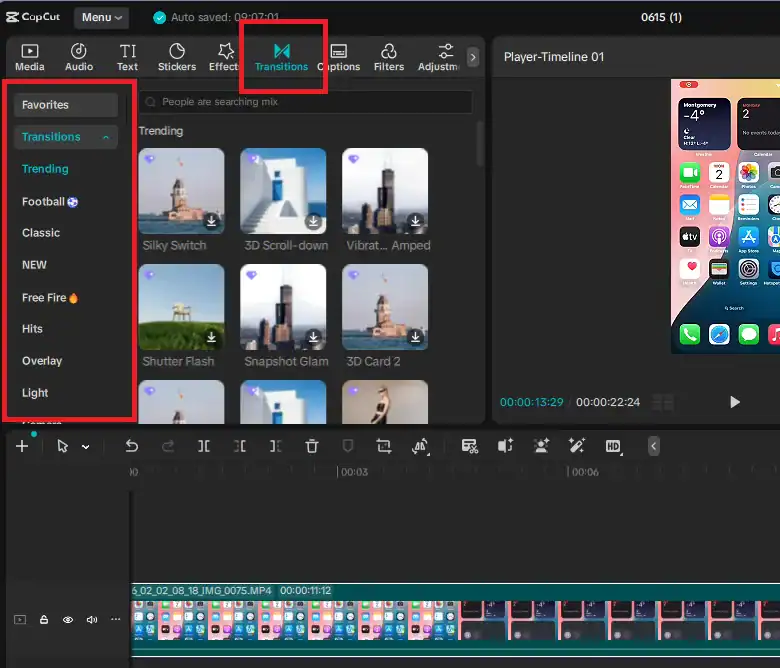
The Transitions library groups options into categories like Basic, Fade, Mix, and Camera. Categories like “Camera” or “Mix” often include movement-based transitions — zooms, pans, or blur-blended dissolves — designed for a more dynamic look.
If you were browsing quickly and grabbed something that previewed as a fade but came from one of these categories, the motion or blur you’re seeing is that transition working as designed, not a malfunction.
Always check the small preview thumbnail before applying, and stick to the “Fade,” “Black Fade,” or “Dissolve” options specifically if you want a plain fade.
You May Have Layered a Separate Blur Effect Without Realizing It
CapCut’s Effects panel includes dedicated Blur effects, browsable in the same general area as other video effects.
If a Blur effect got added to your clip or the clip above it on the timeline, it’ll show up as its own item — tap through everything attached to that clip or timeline section and remove anything you didn’t intend to add.
Motion Blur Already in Your Footage Becomes More Visible During a Cross-dissolve
If your source footage was shot with fast motion or a lower shutter speed, it can already contain natural motion blur that you don’t notice during normal playback.
A fade or dissolve blends two frames together, and that blending can make existing motion blur in the footage more visually obvious than it was before.
In this case, the fade tool isn’t adding blur — it’s revealing blur that was already in the clip.
Preview blur that resolves after export
In some cases, what looks blurry in the in-app preview is a result of preview-quality rendering (lower resolution playback to save processing power) rather than the final output. Always check your actual exported file before assuming the fade itself is the problem.
How to Get a Clean Fade (No Blur)
- For a fade on a single clip: select the clip, open the Animation tab, choose “In” or “Out,” and pick the “Fade In” or “Fade Out” preset specifically — not a different animation style.
- For a fade between two clips: tap the transition icon between the clips, and choose from the “Fade,” “Black Fade,” “White Fade,” or “Dissolve” options. Avoid categories labeled “Camera” or “Mix” if you specifically want a plain fade.
- Preview before applying. CapCut shows a small animated preview thumbnail for both animations and transitions — check it for visible motion or blur before committing.
- If you’ve already applied something and it looks blurry, tap the clip or the transition marker and check what’s actually attached. Remove any separate Blur effect, or swap out a motion-heavy transition for a plain Fade or Dissolve.
- Export a short test clip (a few seconds) rather than your whole video first, so you’re not waiting through a full render just to check whether the fade looks right.
Building a Custom Fade With Keyframes (More Control)
If the built-in presets don’t give you the exact timing or feel you want, you can build a fade manually using opacity keyframes, which gives you full control over speed and easing:
- Select your clip and go to its Opacity setting (usually under the Video or Basic tab, depending on whether you’re on mobile or desktop).
- Move the playhead to where you want the fade to start, and add a keyframe with Opacity set to 0% for a fade-in (or 100% for a fade-out starting point).
- Move the playhead forward to where the fade should finish, and add a second keyframe with Opacity at 100% (or 0% for a fade-out).
- CapCut will automatically interpolate the opacity change between your two keyframes, creating a custom-timed fade with no blur involved at all, since you’re only animating opacity.
This method is also useful for text fades, where the same opacity-keyframe approach lets you fade words or titles in and out on a precise schedule rather than relying on a fixed-duration preset.
If you’re running into trouble getting keyframes to behave at all — not just for fades, but in general — our dedicated guide on keyframes in CapCut covers the basics, and our CapCut keyframes not working guide covers the more common breakdowns.
Mobile, Desktop, and Web: Small Differences Worth Knowing
The fade mechanics are the same across CapCut’s mobile app, desktop app, and web editor, but the exact tap path and naming can shift slightly between them, which adds to the confusion:
- Mobile (iOS/Android): Tap the clip, swipe the bottom toolbar to find “Animation,” then choose “In” or “Out.” Transitions are accessed by tapping the small icon between two clips on the timeline.
- Desktop (Windows/Mac): Select the clip, and use the right-side inspector panel, which typically includes tabs like Video, Audio, Animation, Speed, and Adjustment. The Animation tab here mirrors the mobile version’s In/Out categories.
- Web editor: The fade-in effect is most easily found by clicking “Effect” in the side toolbar and searching “Fade In” directly, rather than navigating a separate Animation tab.
If a tutorial you’re following doesn’t match what you’re seeing, it’s worth checking whether it was written for a different platform than the one you’re using — this is a common source of “I can’t find that option” confusion that has nothing to do with a bug.
It’s also worth keeping CapCut updated. Older app versions occasionally render preview transitions differently than the final export, and an outdated version is more likely to have known display quirks that have since been fixed.
If Your Blur Issue Isn’t About a Fade at All
If your whole video looks soft or low-resolution after export — not just the fade transition specifically — that’s a different, more common issue tied to export settings and resolution rather than the Animation or Transitions panel. Our guide on CapCut video blurry after export covers that scenario specifically, and it’s worth ruling out your export settings generally while you’re there.
Frequently Asked Questions
Why does CapCut not have a fade in?
It does — fade-in lives in the clip’s Animation tab (under the “In” category), in the Transitions library between two clips, and as a searchable effect in the Effects panel. If you couldn’t find it, you were likely checking only one of these three locations.
Why does my fade in CapCut turn into a blur instead of a clean fade?
A few likely causes: you picked a transition from a motion-based category (like Camera or Mix) instead of the plain Fade or Dissolve options, a separate Blur effect got layered onto the clip, or motion blur already present in your source footage is becoming more visible during the cross-dissolve.
How do I remove the blur from a CapCut fade transition?
Tap the clip or transition marker and check everything attached to it. Remove any separate Blur effect if one is present, or swap a motion-heavy transition preset for a plain “Fade,” “Black Fade,” or “Dissolve” option.
What’s the difference between a fade animation and a fade transition in CapCut?
A fade animation (from the Animation tab) applies to one clip’s start or end, fading to or from black. A fade transition (from the Transitions library) blends between two adjacent clips. Use the Animation tab if you want your video to appear from black; use Transitions if you want one clip to dissolve into the next.
Can I make a custom fade in CapCut with more control over timing?
Yes — set two opacity keyframes on your clip (0% and 100%) at the points where you want the fade to start and finish. This gives you precise control over duration and avoids any blur, since you’re only animating opacity.
Sources used in this article: CapCut’s official help documentation on adding a fade-in effect; independent CapCut tutorial guides describing the Animation tab, Transitions library, and keyframe-based fade methods; user-reported troubleshooting discussions describing the fade-to-blur issue.
