

Working with a few clips in CapCut is easy.
Working with 20, 50, or 100 clips? That’s where things can get frustrating fast.
Maybe you’re building a vlog, editing a tutorial, creating a montage, or putting together a Reel packed with B-roll. At some point, you stop worrying about individual clips and start wondering how to manage the entire timeline without turning the project into a mess.
That’s where selecting multiple clips becomes useful.
Being able to grab a group of clips, move them together, delete them, copy them, or reorganize sections of your edit can save a surprising amount of time.
The catch is that CapCut doesn’t handle multi-selection exactly the same way on every device. What works on desktop may not work on mobile, and some features can change depending on your version of the app.
In this guide, you’ll learn how to select multiple clips in CapCut on mobile, desktop, and online, what you can do after selecting them, and the fastest ways to manage large projects without wasting time dragging clips around one by one.
Table of Contents
- Can You Select Multiple Clips in CapCut?
- How to Select Multiple Clips Before Importing Them
- How to Select Multiple Clips in CapCut Mobile
- Can You Select Multiple Timeline Clips on CapCut Mobile?
- How to Select Multiple Photos in CapCut
- How to Select Multiple Clips in CapCut Desktop
- How to Select Multiple Clips and Move Them Together
- What Can You Do After Selecting Multiple Clips?
- Does CapCut Have a Group Clips Feature?
- What to Do If Multi-Select Is Not Working in CapCut
- Why You May Not See a Multi-Select Button
- Faster Workflow Tips for Large CapCut Projects
- Should You Use CapCut Desktop for Multi-Clip Editing?
- Can You Select Multiple Clips and Apply the Same Effect?
- Frequently Asked Questions
- Final Thoughts
- Official Resources
Can You Select Multiple Clips in CapCut?
Yes, you can select multiple clips in CapCut, but the process depends on whether you’re using the mobile app, desktop version, or CapCut Online.
On CapCut desktop, multi-select is much easier because you can use a mouse and keyboard shortcuts to select, move, copy, or delete groups of clips.
On CapCut mobile, selecting multiple videos before importing is simple, but timeline multi-selection can be more limited depending on your app version.
If you’ve ever looked at a timeline full of clips and thought, “There has to be a faster way than moving these one at a time,” you’re in the right place.
| CapCut Version | Multi-Select Support | Best For |
|---|---|---|
| CapCut Mobile | Limited timeline multi-select | Quick edits and social videos |
| CapCut Desktop | Best multi-select controls | Large projects and advanced editing |
| CapCut Online | Moderate support depending on browser | Browser-based editing |
How to Select Multiple Clips Before Importing Them
The easiest time to select multiple clips is before they ever reach your timeline.
This works whether you’re creating a vlog, slideshow, tutorial, travel video, Reel, or TikTok.
- Open CapCut.
- Tap New Project.
- Browse your videos or photos.
- Select each clip you want to use.
- Check the order of the selected files.
- Tap Add.
CapCut will import all selected clips into the same project.
A simple trick that saves time later is selecting your clips in the order you want them to appear. Depending on your device and version, CapCut often preserves that order during import.
If your goal is combining those clips into one finished video, check out our guide on how to merge videos in CapCut.
How to Select Multiple Clips in CapCut Mobile
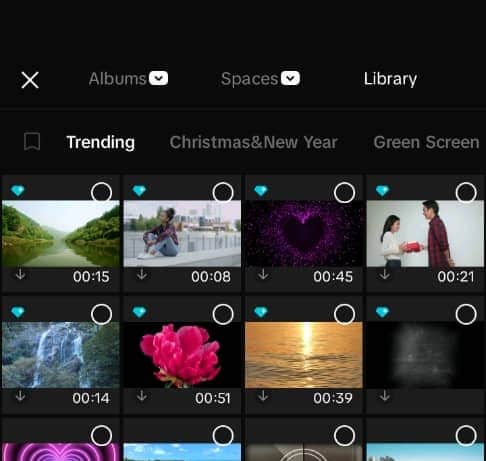
CapCut Mobile makes it easy to select multiple videos and photos during import, but things get a little different once clips are already on the timeline.
Unlike desktop editors, mobile editing has limited screen space. Because of that, some multi-select functions may be restricted or handled differently depending on your version of the app.
If you’re editing on your phone, these workflow tips can save a lot of frustration:
Use Batch Import Whenever Possible
Select all your clips before starting the project rather than adding them one at a time later.
This keeps your timeline organized from the beginning.
Arrange Clips Before Adding Effects
Move clips into the correct order before adding captions, overlays, filters, transitions, or animations.
Rearranging a simple timeline is much easier than moving fully edited sections.
Work in Smaller Sections
If your project contains dozens of clips, try editing in chunks.
For example:
- Intro
- Main content
- B-roll section
- Ending
Smaller sections are easier to manage and reduce the chances of accidentally moving the wrong clip.
Can You Select Multiple Timeline Clips on CapCut Mobile?
Sometimes, but it depends on the version of CapCut you’re using.
Many users expect desktop-style multi-selection on mobile and are surprised when they can’t find it. That’s because CapCut’s mobile timeline tools are often more limited than the desktop version.
If you’re struggling to manage a large timeline, try these alternatives:
- Zoom out to view more clips at once.
- Organize clips before adding effects.
- Keep project sections separate.
- Export completed sections and combine them later if needed.
- Switch to CapCut Desktop for complex edits.
If you regularly work with large projects, you may find desktop editing significantly faster. Our comparison of CapCut Online vs Desktop vs Mobile breaks down the differences.
How to Select Multiple Photos in CapCut
The process for selecting multiple photos is almost identical to selecting multiple videos.
- Open a new CapCut project.
- Browse your photo library.
- Select all the images you want to use.
- Tap Add.
This is especially useful for:
- Photo slideshows
- Travel montages
- Before-and-after edits
- Product showcases
- Instagram Reels
- TikTok photo trends
Just like videos, selecting your photos in the correct order before importing can save time later.
How to Select Multiple Clips in CapCut Desktop
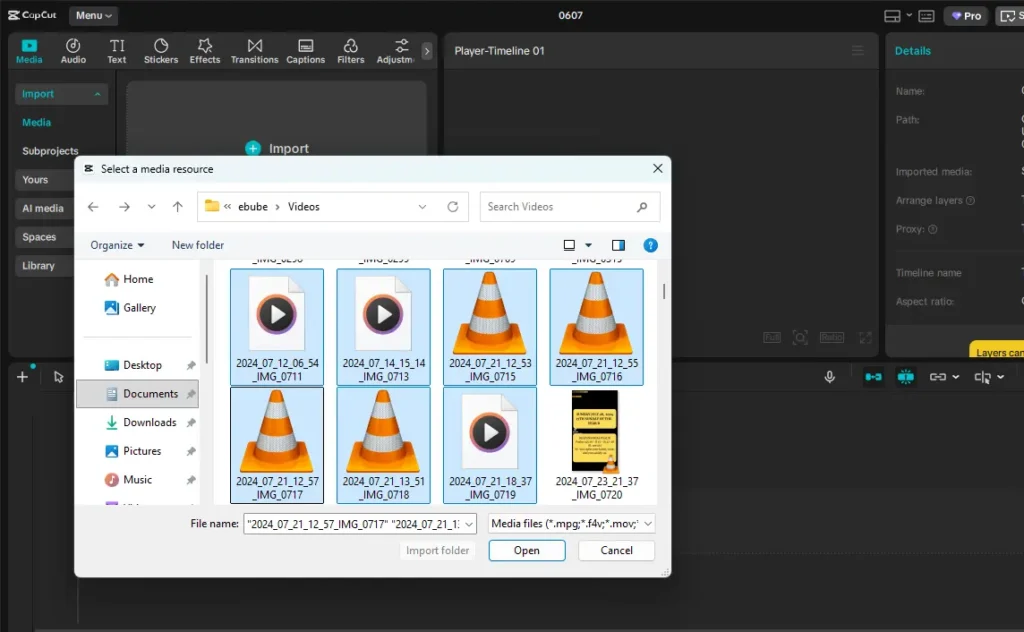
If you regularly edit videos with lots of cuts, overlays, captions, or B-roll, CapCut Desktop is usually the easiest version to work with.
The larger timeline and keyboard shortcuts make selecting multiple clips much faster than tapping around on a phone screen.
Depending on your operating system and CapCut version, these are the most common methods:
Use Ctrl-Click or Command-Click
This is useful when the clips you want are not next to each other.
- Windows: Hold Ctrl and click each clip.
- Mac: Hold Command and click each clip.
Each selected clip becomes part of the group.
Use Shift-Click
If your clips are next to each other on the timeline:
- Click the first clip.
- Hold Shift.
- Click the last clip.
CapCut may select every clip between those points, making it easy to work with large sections of your project.
Use Drag Selection
Some desktop workflows allow you to click and drag around a group of clips.
This can be one of the fastest ways to grab a section of your timeline when making larger edits.
How to Select Multiple Clips and Move Them Together
For most editors, selecting multiple clips is only half the goal.
The real reason is usually moving an entire section without destroying the timeline.
Once you’ve selected multiple clips, you can often drag the group to a new location.
This is useful when:
- Your intro needs to move.
- You want to rearrange scenes.
- A B-roll section belongs somewhere else.
- You need to shift a complete sequence forward or backward.
Before moving a group of clips, zoom out and look at the surrounding timeline.
After moving them, check for:
- Empty gaps.
- Overlapping clips.
- Broken audio timing.
- Misaligned captions or overlays.
A quick preview can save you from creating a problem somewhere else in the edit.
What Can You Do After Selecting Multiple Clips?
Multi-select becomes useful because it speeds up repetitive editing tasks.
Instead of working on one clip at a time, you can manage groups of clips together.
Depending on your CapCut version, you may be able to:
- Move multiple clips.
- Delete several clips at once.
- Copy and paste sections.
- Rearrange parts of the timeline.
- Keep related clips together while editing.
This can save a huge amount of time when editing vlogs, tutorials, reaction videos, podcasts, product demos, or long-form content.
Does CapCut Have a Group Clips Feature?
Not in the same way some professional editors do.
Many users look for a dedicated “group clips” button that permanently links clips together. CapCut focuses more on timeline selection and manual arrangement than true clip grouping.
That means you can often select and move clips together, but they do not necessarily become a permanently grouped object.
If you frequently need to move large sections around, desktop editing usually offers the best experience.
What to Do If Multi-Select Is Not Working in CapCut
If you cannot select multiple clips, the issue may be related to your device, app version, or timeline setup.
Try these fixes:
- Update CapCut to the latest version.
- Restart the application.
- Zoom in or out on the timeline.
- Check whether clips are on different tracks.
- Make sure tracks are not locked.
- Try using CapCut Desktop instead of mobile.
CapCut changes frequently, so some controls may look different from tutorials created for older versions.
Why You May Not See a Multi-Select Button
Many editing apps include a visible “Select Multiple” button.
CapCut often handles multi-selection through clicking, dragging, keyboard shortcuts, or timeline actions instead.
Because mobile devices have limited screen space, some controls may be hidden inside menus or work differently than they do on desktop.
If you’re editing a large project, desktop usually provides a much more comfortable workflow.
Faster Workflow Tips for Large CapCut Projects
Selecting multiple clips helps, but good organization helps even more.
Import Clips in Order
Choose your clips in the order you want them to appear before importing them into the project.
Build the Structure First
Arrange your clips before adding effects, transitions, captions, filters, or animations.
Changing the structure later is much harder.
Work in Sections
Break larger projects into logical parts:
- Hook
- Introduction
- Main content
- B-roll
- Conclusion
This makes it easier to move, delete, or rearrange content later.
Keep Your Media Organized
Import only the clips you actually need.
Large media libraries can make projects harder to manage and may slow down older devices.
If storage is becoming a problem, check out our guide on Why Does CapCut Take So Much Storage.
Should You Use CapCut Desktop for Multi-Clip Editing?
If your project contains lots of clips, the answer is basically yes.
CapCut Mobile is excellent for quick social content, but desktop offers more space, better visibility, and easier clip management.
Desktop is usually the better option when:
- You are editing long videos.
- You have dozens of clips.
- You need keyboard shortcuts.
- You regularly rearrange timeline sections.
- You work with multiple tracks.
For bigger projects, the extra workspace alone can make editing significantly faster.
Can You Select Multiple Clips and Apply the Same Effect?
Sometimes, depending on the CapCut version and the type of edit you’re making.
Desktop versions generally offer more flexibility than mobile when applying edits across multiple clips.
If you want a consistent look throughout your video, try:
- Applying the same filter to each clip.
- Copying edit settings where supported.
- Using project-wide effects.
- Using adjustment layers when available.
For advanced motion editing, understanding keyframes can also help. If you’re having issues, our guide on CapCut Keyframes Not Working covers common solutions.
Frequently Asked Questions
Does selecting multiple clips affect video quality in CapCut?
No. Selecting, moving, copying, or deleting multiple clips does not affect video quality. Quality is determined by your source footage and export settings.
Can I select multiple photos and videos in the same CapCut project?
Yes. CapCut allows you to import and work with both photos and videos in a single project, making it easy to create slideshows, montages, and mixed-media edits.
Will selecting multiple clips also select captions and overlays?
Not always. Captions, overlays, effects, and audio tracks may exist on separate timeline layers. Depending on your CapCut version, you may need to select those elements separately.
Can I group clips together in CapCut?
CapCut does not offer grouping tools as advanced as some professional editors. However, you can often move selected clips together or organize projects into sections to keep your timeline manageable.
Is CapCut mobile or desktop better for large editing projects?
For projects with many clips, desktop is usually easier to manage because it provides a larger timeline, keyboard shortcuts, and more precise editing controls.
Can I select multiple audio clips in CapCut?
Depending on your version, CapCut may allow multi-selection of audio clips on the timeline. Desktop generally offers more flexibility for managing multiple audio tracks than mobile.
Why does editing become harder when a project has many clips?
Large projects can become difficult to manage because the timeline gets crowded with video clips, audio tracks, captions, overlays, and effects. Keeping projects organized from the start helps prevent editing slowdowns.
Can selecting multiple clips make CapCut run slower?
No. Multi-select itself does not slow CapCut down. Performance issues are usually caused by large files, complex effects, limited device storage, or insufficient system resources.
Final Thoughts
Selecting multiple clips in CapCut can save a surprising amount of time once your projects start getting bigger.
For quick edits, mobile works well enough, especially when selecting files before import.
But if you’re constantly rearranging clips, moving sections, or managing complex timelines, CapCut Desktop is usually the better tool for the job.
The key is staying organized. Import clips in order, build your timeline structure before adding effects, and keep projects as clean as possible.
The less time you spend fighting the timeline, the more time you can spend actually editing.
