

A CapCut video can look sharp and still be way too large to upload, send, or keep on your phone.
That usually happens when the export settings are heavier than the video actually needs.
The goal is not to crush the file until it looks blurry. The better fix is to adjust the right things: video length, resolution, bitrate, frame rate, format, and export quality.
Once you know which settings actually control file size, you can make CapCut videos smaller without ruining the way they look.
In this guide, you’ll learn how to reduce your CapCut video file size without sacrificing quality.
However, if your main issue is the app itself taking up too much phone storage, check out our comprehensive CapCut Storage Guide for deeper solutions on cache, drafts, and more.
Table of Contents
- How to Reduce Video File Size in CapCut Without Losing Quality
- Why CapCut Videos Get So Large
- Best CapCut Export Settings for Smaller Files
- What Not to Do When Reducing File Size
- Why Is My CapCut Export Bigger Than the Original?
- Quick CapCut Pre-Export Checklist
- Frequently Asked Questions
- Final Thoughts
- Official Resources
How to Reduce Video File Size in CapCut Without Losing Quality
To reduce video file size in CapCut without losing quality, start with changes that remove unnecessary data before lowering visual quality.
First, trim anything the video does not need. Cutting dead space, repeated clips, long pauses, and extra intros makes the file smaller without making the video look worse.
Then adjust the export settings that control file size the most: resolution, bitrate, frame rate, and format.
Higher bitrate can improve quality, but it also creates a larger file, so the goal is balance — not maximum settings every time.
For most social videos, a clean 1080p export with MP4 format, 30fps, and a recommended or medium bitrate is enough.
It usually looks good on TikTok, Instagram Reels, YouTube Shorts, WhatsApp, email, and websites without wasting storage.
The Quality rule: Use the lowest settings that still look clear for where the video will be posted. A huge file may still get compressed after upload, so the goal is not the largest export possible. The goal is a file that looks clean, uploads smoothly, and does not waste space.
Here is the safest order to follow. Start with changes that remove unnecessary file size without hurting quality, then adjust export settings only as much as you need.
Step 1: Trim Anything You Do Not Need
The easiest way to reduce video size is to make the video shorter.
Before changing export settings, cut out dead space, repeated clips, long pauses, mistakes, extra intros, and anything that does not help the video.
This works because file size is closely tied to video length. A tight 30-second video is usually much smaller than a messy 90-second version with the same export settings.
What to cut first
- Long pauses
- Duplicate takes
- Empty beginning or ending clips
- Slow sections that do not add value
- Unused screen recordings
- Extra B-roll that makes the video drag
This is the best kind of compression because it makes the video better and smaller at the same time.
Step 2: Lower the Resolution Carefully
Resolution has a big effect on file size.
A 4K export is much larger than a 1080p export because it holds many more pixels. That can be useful for high-end projects, but it is often unnecessary for short videos watched on phones.
If you do not need 4K, export in 1080p. For many TikTok, Instagram, Facebook, YouTube Shorts, and casual videos, 1080p is the best balance between clarity and file size.
Recommended resolution choices
- 720p: Best when you need a smaller file for quick sharing
- 1080p: Best balance for most social media videos
- 2K: Useful when you want extra sharpness but do not need 4K
- 4K: Best for high-quality projects, but creates much larger files
If the video will mostly be watched on a phone, 1080p is usually enough. Do not export in 4K just because the option is there.
Step 3: Adjust the Bitrate Without Over-Compressing
Bitrate is one of the biggest file-size controls in CapCut.
Bitrate means how much data is used every second of video. Higher bitrate can make a video look cleaner, but it also makes the file larger. Lower bitrate makes the file smaller, but if you go too low, the video can look blocky, blurry, or muddy.
The goal is not to choose the lowest bitrate. The goal is to choose a moderate bitrate that still looks good.
Beginner-friendly bitrate guide
- 720p: Use a low to medium bitrate
- 1080p: Use a medium bitrate for a good balance
- 2K or 4K: Use a higher bitrate only when you truly need extra quality
If your video looks bad after compression, the bitrate is probably too low. Raise it slightly and export again.
Step 4: Use 30fps Unless You Really Need 60fps
Frame rate can also affect file size.
A 60fps video uses more frames every second than a 30fps video. That can make motion look smoother, but it can also make the file larger.
If your video is a gaming clip, sports video, action shot, or fast movement edit, 60fps may be worth it. But for talking-head videos, tutorials, product clips, screen recordings, and most casual edits, 30fps is usually enough.
Simple frame rate rule
- Use 30fps for most normal videos
- Use 60fps for gaming, sports, action, or smooth motion edits
- Avoid exporting at 60fps just because it sounds better
Choosing 30fps when you do not need 60fps can reduce file size while keeping the video natural.
Step 5: Export as MP4 for Better Compatibility
For most CapCut projects, MP4 is the best format to export.
MP4 usually gives you a good balance of quality, file size, and compatibility. It works well for TikTok, Instagram, YouTube, Facebook, websites, messaging apps, and most devices.
If you export in a format that is harder to process or less supported by your platform, you may end up with bigger files, upload issues, or extra compression after posting.
Best export format for most users
- Format: MP4
- Resolution: 1080p for most social videos
- Frame rate: 30fps for normal videos, 60fps only when needed
- Bitrate: Medium or recommended instead of maximum
If you are not sure which file type to use, this guide on CapCut supported file formats can help you avoid import and export problems.
Step 6: Remove Heavy Effects You Do Not Need
Effects can make a video look better, but they can also make the project heavier.
Filters, overlays, animations, transitions, background removal, blur effects, and AI tools may increase processing load. They may also make exports take longer, especially on older phones or low-storage devices.
You do not need to remove every effect. Just remove the ones that do not add much to the final video.
Look for effects that add weight without adding value
- Extra overlays that are barely visible
- Long animated intros
- Heavy filters on every clip
- Repeated transitions between simple cuts
- Background effects that are not needed
- Duplicate text animations
If your video looks the same without the effect, remove it. That keeps the project cleaner and may make exporting easier.
Step 7: Compress the Video After Exporting If Needed
If your CapCut export is still too large, you can compress it after exporting.
This is useful when you need to send the video through WhatsApp, email, a website upload form, or a platform with a strict file size limit.
But be careful. Compressing the same video again and again can make it look worse each time. Export once with good settings, then compress only if you really need to.
When extra compression makes sense
- The file is too large for email
- A website has an upload size limit
- You need to send the video through a messaging app
- You want to save storage after exporting
- You need a smaller preview copy for review
If the video becomes blurry after compression, the file was compressed too much. Go back and use a slightly higher bitrate or resolution.
Why CapCut Videos Get So Large
CapCut videos usually get large because the export settings are asking for more data than the video really needs.
Every export is built from video and audio data. The longer the video, the higher the resolution, the higher the frame rate, and the higher the bitrate, the bigger the final file will usually be.
That is why a short video can still export as a huge file if it is set to 4K, 60fps, or a very high bitrate. Trimming helps, but export settings still do a lot of the heavy lifting.
The biggest reasons your CapCut export is huge
- The video is long
- The resolution is set to 2K or 4K
- The bitrate is too high
- The frame rate is set to 60fps when 30fps would work
- The source clips are already high-bitrate files
- You exported several versions of the same video
- The project includes many effects, overlays, filters, or animations
If CapCut itself is also taking up too much space on your phone or computer, the issue may go beyond the final export. Drafts, cache, preview files, temporary data, and old projects can build up too. Before deleting anything important, check why CapCut takes so much storage.
Best CapCut Export Settings for Smaller Files
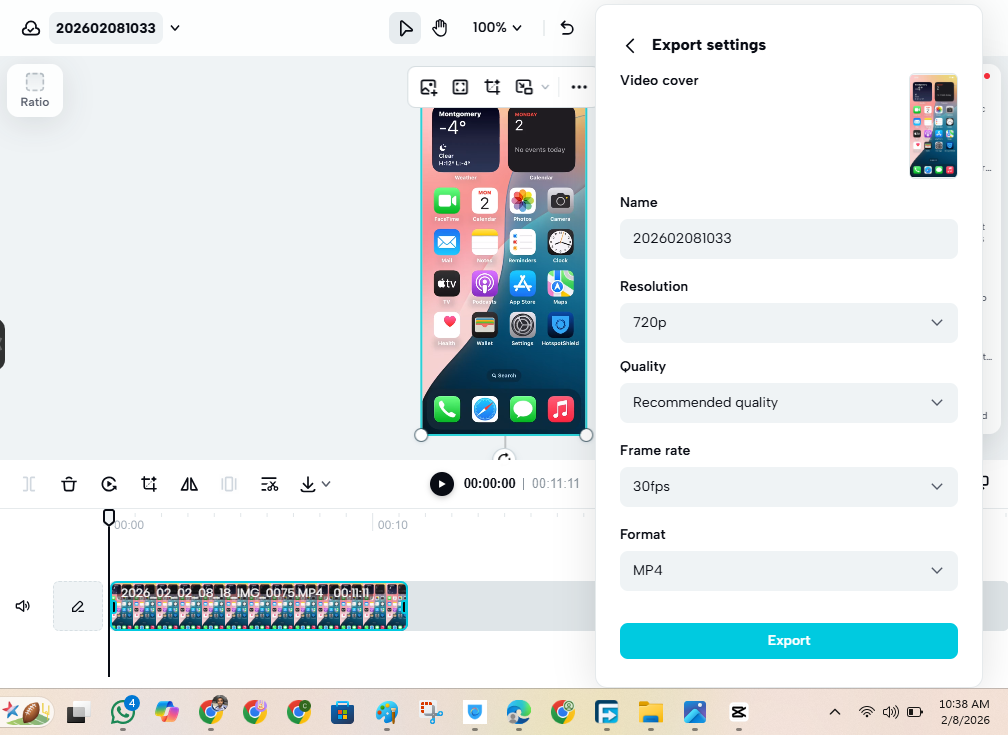
For most people, the best small-file export setup is simple: use MP4, 1080p, 30fps, and a medium bitrate.
This gives you a clean video without making the file much larger than it needs to be.
Good settings for TikTok, Reels, and Shorts
- Format: MP4
- Resolution: 1080p
- Frame rate: 30fps, or 60fps for fast motion
- Bitrate: Recommended or medium
- Codec: H.264 when available
Good settings for sending by message or email
- Format: MP4
- Resolution: 720p or 1080p
- Frame rate: 30fps
- Bitrate: Low to medium
- Length: Trim as much as possible
Before exporting for TikTok, Reels, YouTube, or email, compare the best CapCut export settings so you do not make the file bigger than it needs to be.
What Not to Do When Reducing File Size
Reducing file size is useful, but going too far can ruin the video.
The goal is to make the file smaller while keeping it clean enough for its purpose. You do not want a tiny file that looks blurry, blocky, or over-compressed.
Avoid these mistakes
- Do not drop to 480p unless you truly need a tiny file
- Do not set the bitrate extremely low
- Do not export, compress, re-import, and compress again many times
- Do not use 60fps if the video does not need smooth motion
- Do not export in 4K for a video that will mostly be watched on phones
- Do not keep long empty sections just because they are already edited
Small file size is good. Bad-looking video is not. The sweet spot is a file that looks clear, uploads smoothly, and does not waste storage.round.
Why Is My CapCut Export Bigger Than the Original?
Your CapCut export can be bigger than the original when your export settings are higher than the source video settings.
For example, if the original video was 720p and you export it at 1080p or 4K with a high bitrate, the new file may become much larger without looking much better.
The same can happen if you export at 60fps, choose a higher bitrate than the original, or add effects and layers that require CapCut to render a new version of the video.
How to fix it
- Match the export resolution to the original video when possible
- Use 1080p instead of 4K for most social videos
- Use 30fps unless the video truly needs 60fps
- Choose a recommended or medium bitrate instead of maximum
- Trim anything you do not need before exporting
If the file is still huge after that, the source clip may already be high-bitrate, the video may simply be long, or your export settings may still be heavier than the final platform needs.
Quick CapCut Pre-Export Checklist
Before exporting from CapCut, check these basics:
- Trim anything the video does not need
- Use MP4 for the export format
- Choose 1080p for most social videos
- Use 30fps unless the video needs smoother motion
- Set bitrate to recommended or medium
- Remove effects, overlays, or animations that do not add value
- Export a short test clip before exporting a long video
If the file is still too large, compress it after export or lower the resolution to 720p for quick sharing.
Frequently Asked Questions
How do I reduce video file size in CapCut?
To reduce video file size in CapCut, trim unnecessary parts, export in MP4, use 1080p or 720p, choose 30fps when possible, and lower the bitrate carefully instead of using maximum quality.
Why is my CapCut video file so large?
Your CapCut video may be large because of high resolution, high bitrate, 60fps export, long duration, heavy effects, or exporting at settings higher than the original video needs.
How do I compress a video in CapCut without losing quality?
Use moderate compression instead of extreme settings. Keep the video in MP4, use 1080p for most social videos, set frame rate to 30fps when possible, and lower bitrate only until the video still looks clear.
What bitrate should I use in CapCut for smaller files?
Use a recommended or medium bitrate for most videos. Higher bitrate can improve quality, but it also makes the file larger. If the video looks blurry or blocky, raise the bitrate slightly and export again.
Why is my CapCut export bigger than the original video?
Your export may be bigger than the original if you exported at a higher resolution, higher bitrate, or higher frame rate than the source file. Match the export settings closer to the original video to reduce size.
What is the best CapCut export setting for smaller file size?
For most users, MP4, 1080p, 30fps, and medium or recommended bitrate is the best balance. Use 720p if you need a much smaller file for messaging, email, or quick sharing.
Final Thoughts
You can reduce video file size in CapCut without losing quality if you adjust the right things instead of crushing the video with random compression.
Start with the cleanest fix: trim anything the video does not need. Then use MP4, 1080p, 30fps, and a recommended or medium bitrate for most videos. That setup gives you a good balance between clear quality, smaller file size, and smooth uploads.
Only use 4K, 60fps, or very high bitrate when the project truly needs it. For most TikToks, Reels, YouTube Shorts, email clips, and casual videos, those heavier settings can make the file much bigger without adding much visible improvement.
The best file is not always the biggest file. It is the one that looks good, uploads smoothly, and does not waste your storage.
So if your CapCut export is too large, do not panic. Trim first, lower settings carefully, export a short test, and only compress after export if the file is still too big.
