
Your captions look perfect inside CapCut.
Clean font. Smooth animation. Everything hits exactly on beat.
Then you export… and it falls apart.
They flicker. Flash. Disappear for a split second. Or jitter like something’s broken.
Sometimes it gets worse, you upload to TikTok or Instagram, and the glitches suddenly show up there instead.
Here’s the thing: this isn’t a timing issue.
It’s a rendering problem.
CapCut’s preview engine and export engine don’t process captions the same way. Add in platform compression, and certain effects or settings start breaking at the worst possible moment.
Even a subtle flicker (like a single dropped frame) makes your content feel low quality.
Viewers might not know why it looks off, but they feel it.
This guide breaks down everything about CapCut captions flickering, explaining exactly what’s happening and how to fix it based on the type of flicker you’re dealing with.
No guesswork. No generic advice. Just targeted fixes that actually work.
Understanding CapCut Caption Flicker Types
Not all flicker is the same. Identify your specific artifact to apply the right fix.
Type 1: Frame Dropout Flicker
- Caption visible for 23 frames, invisible for 1 frame, visible again
- Creates “blinking” effect during hold periods
- Usually caused by: keyframe interpolation errors, transparency conflicts
Type 2: Motion Jitter
- Caption “shakes” or vibrates during animation
- Not smooth movement—staccato, vibrating
- Usually caused by: frame rate mismatches, sub-pixel rendering errors
If your captions are not just flickering but also drifting out of place, here’s how to fix captions out of sync in CapCut.
Type 3: Export-Only Flicker
- Perfect in preview, glitches in exported file
- Disappears when re-imported to CapCut, appears on platform upload
- Usually caused by: codec incompatibility, platform re-encoding
Type 4: Platform-Specific Flicker
- Clean in CapCut, clean in exported file, glitches on TikTok/Instagram
- Only visible after platform processing
- Usually caused by: platform compression settings, color space conflicts
Type 5: Interaction Flicker
- Caption glitches when overlapping video elements (transitions, effects, other text)
- Solo caption is fine, combined scene breaks
- Usually caused by: layer blending mode conflicts, alpha channel errors
If you are still a CapCut beginner see our comprehensive guide on how to add captions on CapCut for the complete foundation of caption creation, including animation, timing, styling, and platform optimization that prevents flicker before it starts.
Fix 1: The Frame Rate Lock (For Motion Jitter)
CapCut projects sometimes auto-detect frame rate from the first imported clip, creating mismatches if subsequent clips differ.
The problem:
- Main footage: 30fps
- B-roll or stock: 24fps or 60fps
- Captions animated at project frame rate (30fps)
- 24fps clips play with duplicated frames, captions “judder” against this pattern
The fix:
Step 1: Standardize project frame rate (Desktop + Mobile)
This is where most flicker starts.
If your project frame rate isn’t consistent, your captions will jitter—no matter how good your animation is.
On Desktop (CapCut PC/Mac)

When you import footage, you can easily see your uploaded project frame rate and other metadata on the right-side panel under “Details.”
- Look for: Frame rate (e.g. 30.00fps)
To change it:
- Go to the right panel → Details
- Click “Modify”
- Adjust the Frame Rate
- Set it to:
- 30fps (best for most content)
- 24fps (cinematic)
- 60fps (gaming/action)
⚠️ Important: CapCut desktop uses a fixed project frame rate once set—but if your clips have mixed frame rates, you can still get jitter. So don’t rely on auto-detection.
On Mobile (CapCut App)
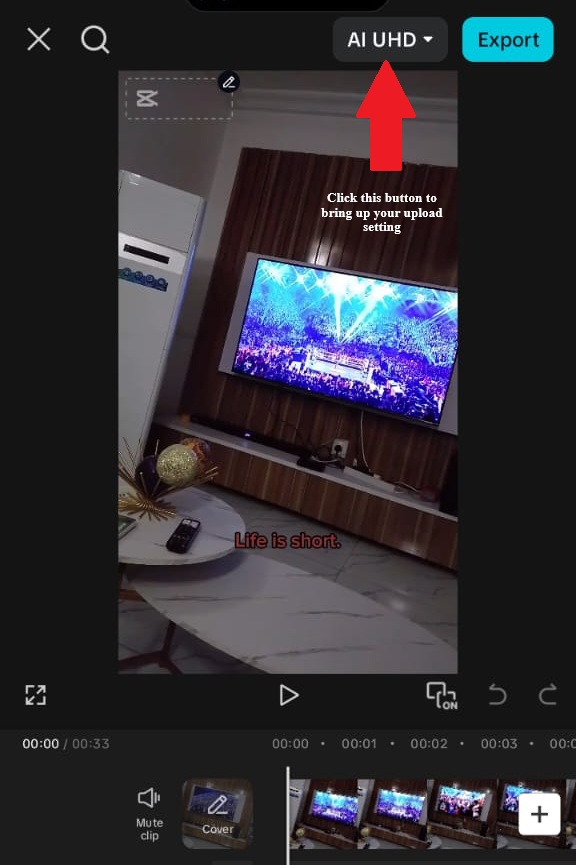
Mobile works differently—frame rate is controlled during export.
- Tap on the button beside Export (top-right arrow)
- Find Frame Rate (FPS)
- Set it to:
- 30fps (recommended)
- Avoid Auto if possible
Critical Tip: Your captions follow the project frame rate, but your footage might not. If you mix 24fps, 30fps, and 60fps clips, CapCut has to “fake” frames to make everything match, which is what causes that subtle jitter and caption stutter.
And here’s something most people miss: if you already added captions before fixing the frame rate, you’ll need to delete and recreate them. CapCut often keeps the old timing data even after you change FPS, so the flicker won’t fully go away until you reset the captions.
Step 2: Convert all footage to the Project frame rate before editing
- Import footage to HandBrake or similar
- Set output to exact project frame rate (30.000 fps, not 29.97 or 30.03)
- Re-import converted footage to CapCut
Step 3: Re-create captions after frame rate lock
- Existing captions may retain old timing data
- Delete and re-create for clean generation
Verification: Export 5-second test clip with animated caption. Play frame-by-frame (VLC: right arrow key). Motion should advance exactly one frame per keypress, never duplicate or skip.
Fix 2: The Keyframe Interpolation Fix (For Frame Dropout)
CapCut’s default keyframe interpolation sometimes creates micro-gaps in opacity or position.
The problem:
- Caption opacity keyframe: 100% at frame 0, 100% at frame 30
- Software interprets as “fade from 100% to 100%” = undefined behavior
- Creates a single-frame dip to 99% or lower, visible as flicker
The fix (Desktop):
Step 1: Identify problematic keyframes
- Select animated caption layer
- Open keyframe editor
- Look for “hold” keyframes (same value consecutive)
Step 2: Change interpolation type
- Select a keyframe pair with identical values
- Change from “Smooth” or “Linear” to “Hold” (stepped)
- This forces a constant value, eliminating interpolation calculation
Step 3: Add buffer keyframes
- Instead of 100% → 100%, use 100% → 100% → 100% with middle keyframe at hold point
- Triple-redundancy prevents interpolation errors
Alternative fix: Avoid keyframing opacity at all for “always visible” captions. Use visibility toggle (on/off) rather than opacity fade if possible
Want more on this? Learn more from this CapCut keyframes guide.
Fix 3: The Export Codec Fix (For Export-Only Flicker)
CapCut’s default export settings prioritize speed over stability. Certain codec choices trigger caption rendering errors.
The fix:
Step 1: Disable hardware acceleration
- Export > Settings > Performance
- Uncheck “Use GPU Acceleration” or “Hardware Encoding”
- Software encoding is slower but more stable for complex captions
Step 2: Select a stable codec
- Format: MP4 (H.264 AVC) — not H.265 HEVC, not MOV
- Profile: High (not Main or Baseline)
- Level: 4.2 or 5.1 (not auto-detect)
Step 3: Bitrate control
- Mode: CBR (Constant Bitrate), not VBR (Variable)
- Bitrate: 8-12 Mbps for 1080p (higher than default)
- CBR prevents bitrate drops that cause artifacting
Step 4: Color space
- Color Space: Rec. 709 (standard HD)
- Not Rec. 2020, not HDR, not “Auto”
- Mismatched color spaces cause gamma flicker on some players
Fix 4: The Alpha Channel Fix (For Interaction Flicker)
When captions overlap other elements (video transitions, effects, other text layers), alpha blending can conflict.
The problem:
- Caption has transparency/opacity
- Underlying video has transparency/opacity
- Blending mode creates “fighting” transparency calculations
- Result: flicker where layers intersect
The fix:
Step 1: Eliminate unnecessary transparency
- Caption background: Use solid color or 90%+ opacity, not 50%
- Text shadow: Use a solid shadow, not a blurred/transparent shadow
- Full opacity layers blend more predictably
Step 2: Adjust layer order
- Captions should be the top layer when possible
- If it must be behind, ensure no other transparent layers above
- Single transparent layer per pixel stack maximum
Step 3: Pre-compose complex scenes
- Export scene with caption + effects as a separate video
- Re-import as a single layer
- Eliminates real-time blending calculation
Step 4: Disable blend modes
- Select caption layer
- Blend Mode: Normal (not Screen, Multiply, Overlay, etc.)
- Blend modes increase flicker risk significantly
Fix 5: The Platform Compression Fix (For Platform-Specific Flicker)
TikTok and Instagram re-encode your video. This process sometimes destroys fine caption details.
The fix for TikTok:
Step 1: Over-specify caption styling
- Shadow: 6px offset, 6px blur (larger than needed)
- Stroke: 4-6px (thicker than aesthetic optimum)
- Compression destroys subtle effects—make them obvious
Step 2: Export at TikCut-native specs
- Resolution: 1080×1920 (exact, not 1080×1920.5)
- Frame rate: 30.00 fps (not 29.97, not 60)
- Bitrate: 8+ Mbps (TikTok compresses to ~2, start high)
Step 3: Upload method
- Direct mobile upload most reliable
- Desktop upload: Use TikTok.com, not third-party tools
- Airdrop/transfer to phone if edited on desktop
Step 4: The double-export workaround
- Export from CapCut
- Re-import that export to new CapCut project
- Export again
- Second encoding pass stabilizes metadata for platform processing
To make captions survive TikTok compression even better (beyond thicker shadows and bitrate), optimize the full set of TikTok-specific caption settings. Including the fonts, size, positioning, contrast, and export tweaks — for rock-solid results after upload.
The fix for Instagram Reels:
Reels is less aggressive than TikTok but has specific quirks:
Color space critical:
- Real processing is sensitive to color space metadata
- Export Rec. 709 explicitly
- Test upload: if colors shift (especially reds/oranges), color space mismatch is the cause
Duration padding:
- Add 0.5s black silence at the beginning
- Reals sometimes trims start, can clip into captions without a buffer
Fix 6: The Animation Simplification (For Complex Motion Flicker)
Stacking too many animations at once (position + scale + rotation + opacity) can cause rendering instability, especially during export.
It’s not that CapCut “can’t handle it,” but combining multiple animated properties increases the chance of dropped frames, jitter, or micro-flicker.
The Simplification Rule
If your caption uses 3–4 animations at the same time, scale it back.
Instead of this:
- Position (bottom → center)
- Scale (90% → 100%)
- Rotation (0° → 5°)
- Opacity (0% → 100%)
Use a maximum of 1–2 animations:
- Position + Opacity (clean and smooth)
- Scale + Opacity (subtle pop-in effect)
- Position only (simple slide = most stable)
Simple animations render more consistently—and look cleaner on mobile anyway.
The “Bake It In” Technique (Better than Green Screen)
If you really want complex animation:
- Create your animated caption in a separate project
- Export it with a solid background (black works best)
- Re-import it into your main project
- Use Blend Mode (Screen) or Remove Background (if available)
Now the animation is pre-rendered as video, so CapCut isn’t calculating it in real time during export.
That means:
- Less flicker
- Smoother playback
- More consistent results across platforms
Fix 7: The Driver/Update Fix (For System-Level Glitching)
Sometimes the problem isn’t your captions, it’s your system.
If you’ve tried everything else and the flicker still shows up, this is where to look.
Graphics Drivers
CapCut relies on your GPU for both preview and export.
If your drivers are outdated or unstable, you can get:
- Rendering glitches
- Frame drops
- Random flicker that doesn’t follow a pattern
Fix:
Update your GPU drivers (NVIDIA, AMD, or Intel) to the latest version.
CapCut Version
Not every update is stable.
Sometimes a new version introduces rendering bugs—especially with text and animations.
Fix:
- Update to the latest version if you’re behind
- Or roll back to a previous version if flicker started after updating
If something suddenly breaks, it’s usually version-related.
System Resources
If your system is under load, export quality can suffer.
Low RAM or VRAM can cause:
- Dropped frames
- Inconsistent rendering
- Subtle flickering in captions
Fix:
- Close background apps before exporting
- Avoid multitasking during export
- 8GB RAM is the minimum—16GB+ is safer for heavier projects
Thermal Throttling (Laptops)
Long exports can overheat your system—especially on laptops.
When that happens, your CPU/GPU slows down automatically, which can lead to:
- Frame inconsistency
- Stutter or flicker in the final video
Fix:
- Use a cooling pad
- Export in a cool environment
- For longer videos, a desktop setup is more stable
How To Identify Your CapCut Captions Flickering Source
Step 1: Isolate the caption
- Solo caption layer (mute/hide everything else)
- Export 5-second test
- If flicker persists: problem is the caption itself (Fix 2, 3, 6)
- If flicker disappears: interaction problem (Fix 4)
Step 2: Test export settings
- Export with hardware acceleration off
- Export with software encoding only
- If flicker disappears: codec/GPU issue (Fix 3, 7)
Step 3: Platform test
- The export file plays clean in VLC
- Same file glitches on TikTok
- The problem is platform re-encoding (Fix 5)
Step 4: Frame-by-frame analysis
- VLC: Advance frame-by-frame with arrow keys
- Identify exactly which frames flicker
- Pattern reveals cause (every 24th frame = frame rate issue, random = keyframe issue)
How to Prevent CapCut Caption Flickering
The easiest way to fix flicker is to never create it in the first place.
If you set things up properly from the start, you avoid 90% of these issues entirely.
Project Setup
Start with a clean, stable foundation.
- Use a constant frame rate (30fps is the safest default)
- Stick to the Rec. 709 color space
- Avoid mixing clips with different or variable frame rates
- Monitor your monthly auto caption generation limit early in the project because hitting the cap can sometimes lead to inconsistent rendering behavior during preview or export due to reduced cloud processing priority.
This alone eliminates most motion-related flicker.
Caption Creation
Keep your captions simple and predictable.
- Use 1–2 animations max
- Avoid heavy transparency (use solid shadows or backgrounds)
- Keep Blend Mode set to Normal
The more effects you stack, the higher the risk of rendering issues.
Export Settings
This is where a lot of flicker gets introduced.
- Use software encoding for final exports (more stable than GPU)
- Export in H.264 (MP4), CBR, 8+ Mbps
- Match exact platform specs (e.g., 1080×1920 for TikTok/Reels)
Stable settings = consistent results.
Quick Verification (Don’t Skip This)
Before exporting your full video, do a quick test.
- Export a 5-second sample clip
- Check it frame-by-frame in VLC (arrow keys)
- Upload a short test to your target platform
This takes 2–3 minutes and can save you from re-exporting everything later.
When Flicker Is Unfixable
Some flicker has no solution in CapCut:
Extreme complexity:
- 50+ simultaneous text layers
- 4K resolution with heavy effects
- Solution: Simplify the project or use After Effects
Source footage corruption:
- The original video has embedded flicker
- CapCut passes through or amplifies it
- Solution: Fix the source footage in other software first
Platform algorithm:
- TikTok/Instagram compression changes frequently
- Yesterday’s perfect export flickers today
- Solution: Monitor platform updates, adjust specs accordingly
Frequently Asked Questions
Why do my CapCut captions flicker only after exporting?
CapCut preview and export do not always render captions the same way. Flicker after export can happen because of hardware encoding, codec issues, frame rate mismatch, complex caption animations, or transparency conflicts. Try exporting as MP4, H.264, 30fps, with hardware encoding turned off.
Why do my captions look fine in CapCut but glitch on TikTok or Instagram?
If the exported file looks clean but glitches after upload, the problem is likely platform compression. Use 1080×1920, 30fps, MP4, H.264, and a strong enough bitrate. Also keep captions bold, high contrast, and avoid overly thin shadows or subtle effects that compression can damage.
Can mixed frame rates make CapCut captions jitter?
Yes. Mixing 24fps, 30fps, 60fps, or variable frame rate clips can cause captions to jitter or stutter. For the cleanest result, use one project frame rate, usually 30fps for social videos, and convert problem clips to a constant frame rate before editing.
Can too many caption animations cause flickering in CapCut?
Yes. Stacking position, scale, rotation, opacity, shadows, and effects on the same caption can make rendering unstable. Keep captions simple by using one or two animations at a time, such as Position plus Opacity or Scale plus Opacity.
Why do captions flicker when they overlap effects or transitions?
This usually happens because of layer or transparency conflicts. Captions can glitch when they overlap effects, transitions, other text, or transparent elements. Keep captions on the top layer when possible, use normal blend mode, and avoid unnecessary transparency.
How do I fix captions blinking for one frame in CapCut?
Single-frame blinking can come from keyframe interpolation or opacity glitches. Check the caption’s opacity and animation keyframes, remove stray keyframes, avoid unnecessary opacity keyframes, and export a short test clip to confirm the blink is gone.
Can hardware acceleration cause CapCut caption flickering?
Yes, especially on desktop. If captions flicker only after export, try turning off hardware acceleration or hardware encoding before exporting again. Software encoding is slower, but it can be more stable for caption-heavy or effect-heavy projects.
Can outdated graphics drivers cause random caption glitches?
Yes. Outdated or unstable graphics drivers can cause random rendering glitches, frame drops, or caption flicker in CapCut Desktop. Update your NVIDIA, AMD, or Intel graphics drivers, restart CapCut, and test a short export again.
What is the fastest way to diagnose CapCut caption flickering?
Export a short 5-second test clip. If the flicker appears in the exported file, the issue is likely CapCut export, codec, keyframes, or effects. If the file is clean but glitches after upload, the issue is likely TikTok, Instagram, or YouTube compression.
Final Thoughts
Caption flickering is a technical failure, not a creative choice. It signals amateur production regardless of content quality.
The fixes are technical: frame rates, codecs, keyframes, and alpha channels, but the impact is on viewer perception.
Systematic diagnosis saves time. Don’t apply random fixes; identify your flicker type, apply a targeted solution, and verify with a test export.
The 5-minute diagnostic process prevents 30 minutes of ineffective troubleshooting.
Stable captions are invisible to viewers, which is exactly what you want. They notice content, not technology. Flicker makes the technology visible, breaking immersion.