
How To Reverse Video on CapCut (2026): An Easy Editing Guide
Want to add instant visual impact to your videos without complex editing?
The reverse feature on CapCut does exactly that easily. A drink refilling itself. A dancer defying gravity.
A shattered object pulling itself back together. These moments grab attention and keep viewers watching.
CapCut makes these effects accessible to everyone, with no steep learning curve.
So whether you’re editing TikToks, YouTube Shorts, or Instagram Reels, you can apply a reverse effect in under 60 seconds.
By the end of this guide, you’ll learn how to:
- Reverse video on CapCut (mobile and desktop) in under a minute
- Isolate and reverse specific segments instead of the entire clip
- Fix audio issues that arise when reversing footage
- Apply the effect strategically for transitions, comedy, and visual impact
- Troubleshoot common problems like slow processing or missing options
Why Use the Reverse Effect?
Reversing footage isn’t a gimmick. When used right, it solves real creative problems:
1. Create impossible moments
A shattered glass reassembling. A diver flying out of the water. These moments stop the scroll because they break physics.
The effect works best with actions that have clear start and end points, viewers recognize something is wrong (in a good way), and keep watching to figure it out.
2. Hide cuts in transitions
Reverse the last 1–2 seconds of a clip, then cut to your next scene. The backward motion masks the transition point, making two separate shots feel like one continuous moment.
This works especially well for travel vlogs or product showcases where smooth flow matters.
3. Add comedy timing
Reverse a fail, a missed catch, a stumble, a spill, and it becomes slapstick. The action reads as intentional skill, not an accident.
This format dominates short-form platforms because it delivers a complete joke in 3–5 seconds.
When to skip it: If your clip relies on dialogue or lip-sync, reverse will break it. Audio doesn’t reverse with the video (more on fixing this later).
How to Reverse Video on CapCut (Mobile & Desktop)
Mobile (iOS & Android) Step
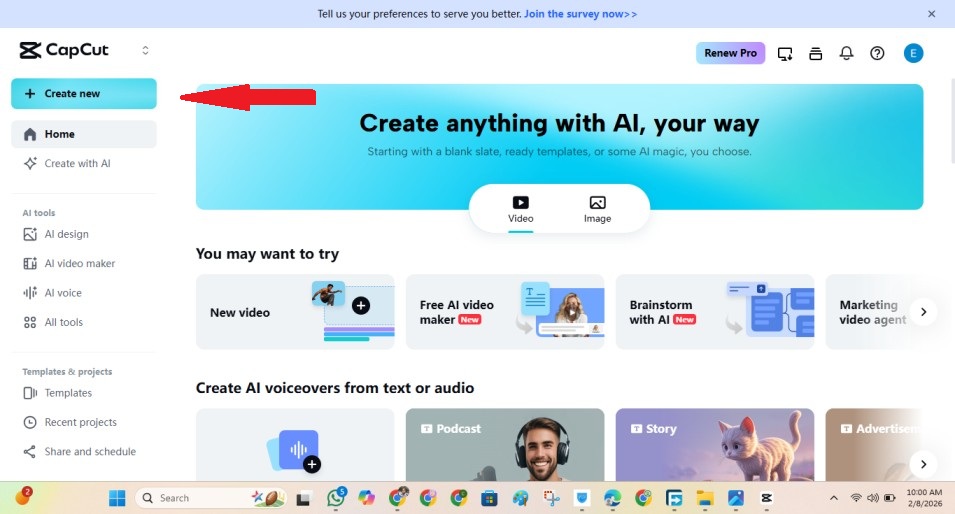
Step 1: Create a new project and import your video
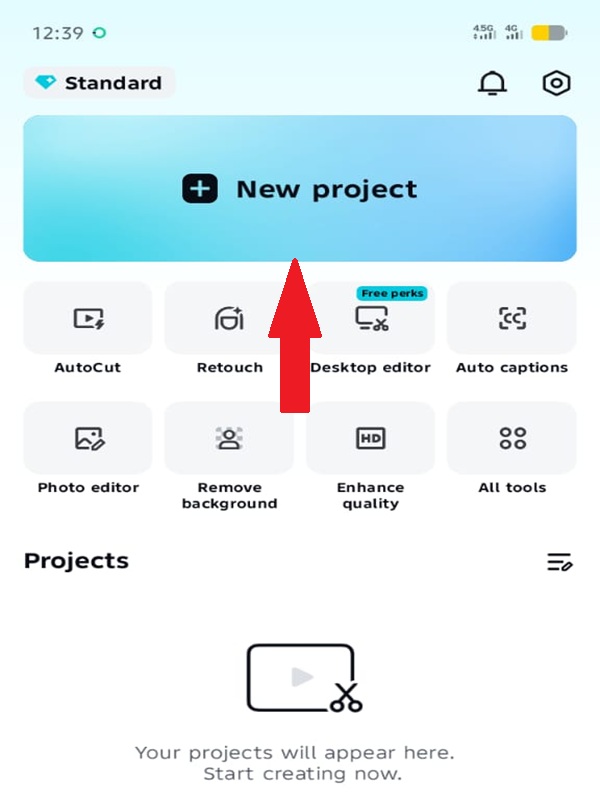
Open the CapCut app. On the home screen, tap the large New Project button (as shown in the image above). This opens your device’s photo gallery.
Navigate to the video you want to edit. Tap it once to select, and a checkmark will appear. You can select multiple clips, but for this tutorial, stick to one.
Tap Add (bottom right). The app loads your video onto the editing timeline.
What you see: The timeline runs horizontally across the bottom third of your screen. Your video appears as a colored bar with a thumbnail preview. Above it, the main preview window shows the current frame.
Step 2: Select your clip and locate the Reverse tool
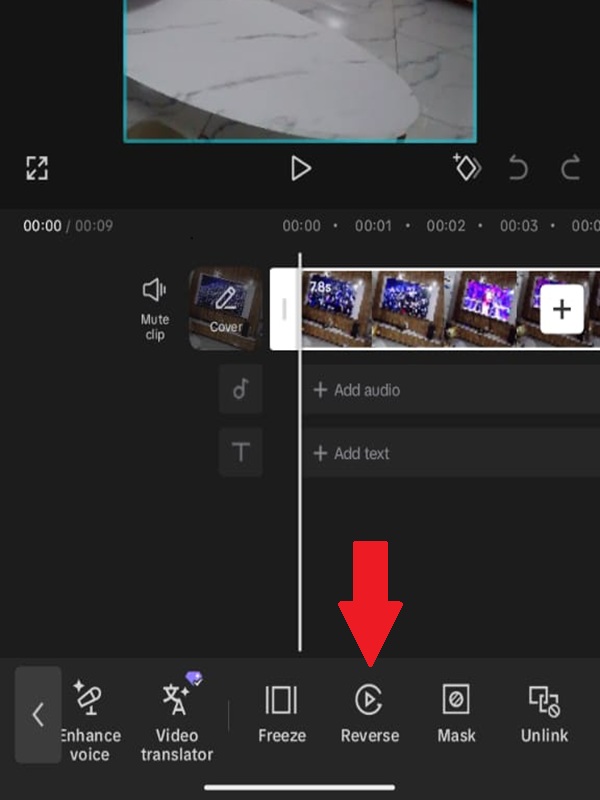
Tap directly on the video bar in the timeline. It highlights with a white border — this means it’s selected. A toolbar appears at the bottom.
Swipe this toolbar left (scroll right) through the editing options. You’ll pass Split, Speed, Animation, Adjust, and others.
Can’t find it? The toolbar holds 15+ tools. Reverse typically sits between Freeze and Mask. If you reach the end without seeing it, swipe back right — you may have passed it.
Step 3: Apply the reverse effect
Tap Reverse. CapCut immediately begins processing. You’ll see:
- A progress percentage (e.g., “Processing 45%”)
- A spinning indicator
- The timeline grayed out temporarily
Processing time varies: A 10-second 1080p clip takes 3–5 seconds. A 2-minute 4K clip can take 60+ seconds. Do not close the app or switch apps during processing — this can corrupt the file.
Once complete, the timeline reactivates. The clip looks identical visually, but the content now plays backward.
Step 4: Preview your reversed clip
Tap the Play button (center of the preview window, or tap the timeline and drag the playhead). Watch the entire clip to confirm the effect works as expected.
Check these details:
- Movement direction (people walking should move backward, objects should fall upward)
- Audio (it will sound garbled or silent — this is normal, covered in the next section)
- Clip length (reversing doesn’t change duration)
Step 5: Reverse only a portion of your clip (optional)
Often, you don’t want the entire video reversed, just a specific moment. Here’s how to isolate it:
Position the white playhead (vertical line with the red tip) at the exact frame where you want the reverse effect to begin. Use a two-finger pinch on the timeline to zoom in for frame-accurate placement.
Tap Split. The clip divides into two parts — left and right of the playhead.
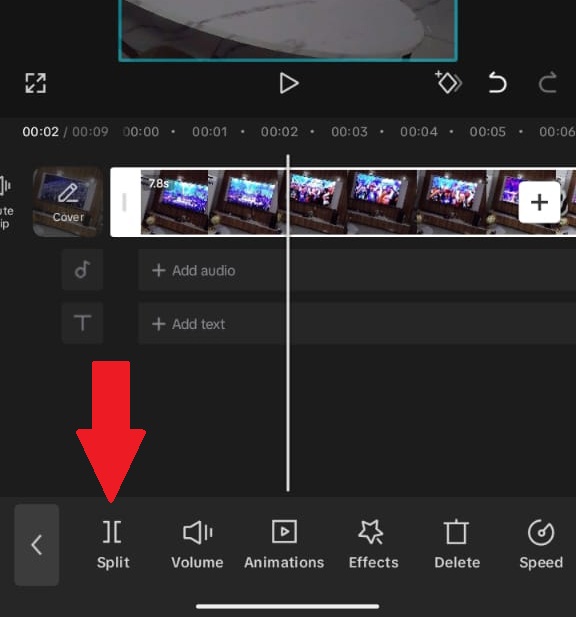
Move the playhead to where you want the reverse effect to end. Tap Split again. You now have three segments: beginning, middle, and end.
Tap only the middle segment to select it. Apply Reverse to this segment only.
The beginning and end play normally; the middle plays backward.
To fine-tune: Tap and drag the split points left or right to adjust timing. Tap a segment, then select Delete to remove it entirely.
Step 6: Adjust speed (optional enhancement)
Reversed footage often looks better slowed down. With your reversed clip selected, tap Speed in the toolbar.
Choose Normal and drag the slider to 0.5x or 0.3x. This creates a smooth, dreamy effect for action shots.
Step 7: Export your final video
Tap the Export icon (upward arrow, top-right corner). The export settings screen appears:
- Resolution: 720p, 1080p, 2K, 4K. Select 1080p for social media (best balance of quality and file size). Choose 4K only if your original footage was 4K and you need maximum quality.
- Frame rate: 30fps standard, 60fps for smooth motion. Match your original footage’s frame rate.
- Format: MP4 (default, leave unchanged).
Tap Export (bottom right). The video is rendered and saved to your device’s gallery. A “Saved to album” confirmation appears.
Desktop (Windows & Mac)
CapCut’s desktop version uses the same reverse logic with interface differences.
Step 1: Import and add to the timeline
Open CapCut. Click Import (top-left). Select your video file. Drag the file from the media library (top-left panel) down to the timeline track at the bottom.
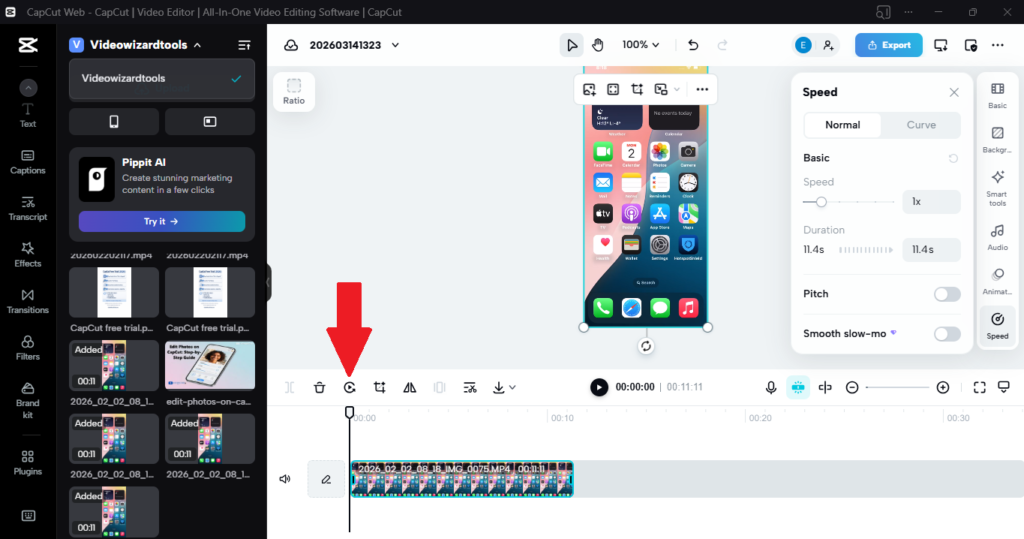
Step 2: Apply reverse
Click the clip in the timeline to select it (highlighted in blue). Look to the right-side panel, the Video tab should be active.
Look for the Reverse button as shown in the image below:
Alternative path: Right-click the clip in the timeline. Select Reverse from the context menu.
Step 3: Partial reverse (split method)
Place your playhead at the desired start point. Click the Split icon (scissors in the toolbar above the timeline, or press Ctrl/Cmd + B).
Move the playhead to end point. Split again. Select the middle segment, check the Reverse box.
Step 4: Export
Click Export (top-right). Choose resolution, frame rate, and destination folder. Click Export again to render.
To avoid any quality drop after reversing, be sure to optimize your export settings to keep full quality after reversing.
Troubleshooting during setup:
| Problem | Cause | Fix |
|---|---|---|
| “Reverse” option missing | Outdated app version | Update CapCut via App Store/Google Play |
| Clip won’t select | Timeline not responding | Tap directly on the colored bar, not the track area below it |
| Processing stuck at 0% | Insufficient storage | Free up 2GB+ space; restart app |
| Reversed clip is black | Corrupted source file | Re-import original; check it plays normally in gallery first |
Extra Tips to Note: Audio, Quality & Performance
Audio Handling (The Most Common Mistake)
The problem: CapCut reverses video frames, not audio. Your reversed clip will have garbled, backward-sounding audio — or silence if the app mutes it automatically.
Three solutions i recommend:
1. Mute and add music (easiest)
- Tap the clip in the timeline
- Tap Volume (speaker icon)
- Drag the slider to 0%
- Tap Audio → Sounds → select a track that matches the reversed action (rising notes work well with “pulling back” motions)
2. Replace with sound effects
- Reverse a water splash → add a “whoosh” sound at the impact point
- Reverse a fall → add a “rewind” tape sound effect
- CapCut’s sound library has these under Effects → Whoosh or Comedy
3. Manual audio reversal (advanced) If you need the original audio reversed (rare, but useful for dialogue tricks):
- Export just the audio from your original clip (use a separate audio extractor app)
- Reverse the audio in an app like Audacity or GarageBand
- Import the reversed audio file back into CapCut via Audio → Extracted
Note: Lip-sync will never match reversed video. Don’t attempt this for talking-head content. Find out more about Lip-sync on CapCut.
For more on handling and replacing audio, learn how to edit and replace audio tracks in CapCut.
Preserve Video Quality
Reversing doesn’t degrade quality but exporting can. Check these settings below:
| Setting | Wrong Choice | Right Choice | Why |
|---|---|---|---|
| Resolution | 720p for 4K footage | Match source (1080p → 1080p, 4K → 4K) | Upscaling blurs; downscaling wastes detail |
| Bitrate | “Recommended” (often low) | “High” or custom 8-12 Mbps | Higher bitrate = less compression artifacting |
| Codec | H.265 (compatibility issues) | H.264 (default) | Plays everywhere, including older devices |
| Frame rate | 30fps for 60fps footage | Match source | 60fps slowed to 30fps loses smoothness |
Where to find these: Export screen → tap Resolution → Custom → adjust bitrate slider.
Speed Up Processing
Reverse rendering is CPU-intensive. If CapCut lags or crashes:
Before editing:
- Close all background apps (Instagram, TikTok, games)
- Free up 3GB+ storage (CapCut needs temp space for processing)
- Lower screen brightness (reduces thermal throttling on some phones)
During editing:
- Split long clips into 30-second segments, reverse individually, then recombine
- Work in 1080p even if final output is 4K — reverse the lower-res version, replace with 4K before export
- On desktop: Close Chrome tabs, pause Dropbox sync
If processing still fails: The clip may have variable frame rate (common with screen recordings). Re-encode it first: Import into CapCut, export as MP4 without edits, then reverse that new file.
When to Combine Reverse with Other Effects
| Effect | How to Apply | Result |
|---|---|---|
| Slow motion | Speed → 0.5x → then Reverse, OR Reverse → then Speed 0.5x | Smooth, hypnotic action; order doesn’t matter |
| Freeze frame | Reverse clip → Split at key moment → Delete right side → Extend left frame | Action rewinds, then freezes at peak moment |
| Zoom | Reverse clip → Add keyframe at start (zoom 1.0x) → keyframe at end (zoom 1.5x) | Rewinding action with intensifying focus |
| Glitch transition | Reverse last 0.5s of Clip A → hard cut to normal Clip B | Jarring, energetic transition for music videos |
Avoid: Filters that add motion blur (Reverse already creates unnatural motion; blur compounds the confusion).
Creative Ways to Use Reverse
Generic advice won’t help your content. Here are 6 proven formats, broken down by platform and execution.
1. The “Magic Trick” (TikTok/Instagram Reels)
The format: Object manipulation that defies physics.
How to shoot:
- Film yourself dropping an object (keys, coffee, phone) in slow motion
- Keep camera locked on a tripod — no movement
- Let the object hit the ground, then stop recording
How to edit:
- Import to CapCut
- Trim to keep only the fall and impact
- Apply Reverse
- Add Speed 0.5x for dreaminess
- Layer with “whoosh” sound effect at the “catch” point
Why it works: The brain registers the impossibility instantly. Comments spike with “how??” — algorithmic gold.
2. The Rewind Transition (YouTube/Vlog)
The format: Seamless scene change using backward motion as a bridge.
How to shoot:
- Scene A: Walk away from camera, out of frame right
- Scene B: Start walking into frame from left (different location, same pace)
How to edit:
- Reverse the last 1 second of Scene A (you walk backward into frame)
- Cut to Scene B playing forward (you walk out)
- The motion direction matches: backward → forward looks like one continuous movement
Pro tip: Match lighting and color temperature in both scenes, or the cut betrays the trick.
3. The Comedy Fail (All platforms)
The format: Slapstick reversal of an embarrassing moment.
How to shoot:
- Film a stumble, spill, or missed catch — keep recording through the reaction
- Capture 2 seconds of “recovery” face after the fail
How to edit:
- Split at the fail’s lowest point (mid-stumble)
- Reverse from that point backward
- Cut the actual recovery — the reversed stumble now looks like intentional skill
- Add triumphant sound effect (brass fanfare, “ta-da”)
Example: Trip over shoelace → reverse to look like elaborate breakdance move.
4. The Reveal (Product/food content)
The format: Unpacking or deconstruction shown in reverse = creation.
How to shoot:
- Film yourself destroying or unpacking something (unwrapping gift, smashing piñata, pouring out cereal)
- Work cleanly — remove hands from frame between actions
How to edit:
- Reverse entire clip
- Add text overlay: “POV: You’re [product] being made”
- Speed 2x if the reversed action feels too slow
Why it works: Satisfying to watch. High completion rates. Works for unboxing channels, cooking, and DIY.
5. The Dance Loop (TikTok trends)
The format: Infinite motion cycle for trending audio.
How to shoot:
- Dancer performs a move ending in pose A
- Holds pose A for 1 second
- Cuts. Dancer starts in pose A, performs different move ending in pose B
How to edit:
- Clip 1: Reverse so dancer flows into pose A
- Clip 2: Play forward from pose A to pose B
- Transition at pose A — motion flows: backward → forward
- Loop back to start
If you want to make this sequence repeat seamlessly, check out our guide on how to loop a video on CapCut for smooth, continuous playback.
Result: Dancer appears to move continuously through impossible transitions.
6. The Environmental Reveal (Travel/nature)
The format: Time manipulation in scenic footage.
How to shoot:
- Clouds moving across landscape
- Waves receding from shore
- Crowd dispersing from landmark
How to edit:
- Reverse 3–5 second segment
- Layer with ambient music (no lyrics — reversed audio clash)
- Slow to 0.3x speed
Use case: Openers for travel vlogs. Sets contemplative mood. Differentiates from standard timelapse.
Quick Reference: Platform Optimization
| Platform | Best Reverse Format | Length | Audio Strategy |
|---|---|---|---|
| TikTok | Magic trick, Comedy fail | 3–7 seconds | Trending sound + muted original |
| Instagram Reels | Dance loop, Product reveal | 5–15 seconds | Original audio replaced with music |
| YouTube Shorts | Rewind transition, Environmental | 10–30 seconds | Sound effects layered, music secondary |
| Long-form YouTube | Transition tool only | 1–2 seconds | Full audio replacement |
Reverse Video on CapCut Troubleshooting and Solutions
Most reverse problems have one of three causes. Work through these in order.
Problem 1: Reverse Option Missing or Grayed Out
Check these in order:
| Check | Action | Result |
|---|---|---|
| App version | App Store/Google Play → search CapCut → tap Update if available | Reverse added in v5.5+; older versions lack it |
| Clip selection | Tap the colored timeline bar until white border appears | Unselected clips hide the toolbar |
| Clip length | Split segment must be 0.5+ seconds | Shorter segments disable Reverse |
| Video format | Screen recordings, MKV files, or downloads from Telegram may fail | Re-export through phone’s native editor first, then import |
Still missing? Force-close CapCut, restart phone, re-import project. Corrupted cache occasionally hides tools.
Problem 2: Processing Freezes or Crashes
CapCut needs three things to reverse reliably:
- Free storage: 3GB minimum for 1080p, 8GB for 4K
- Check: Phone Settings → Storage
- Fix: Delete downloads, clear WhatsApp media, offload unused apps
- Thermal headroom: Phones throttle CPU when hot
- Check: Does the phone feel warm? Is your battery below 20%?
- Fix: Charge to 50%+, lower screen brightness, edit near AC or fan
- Memory availability: Background apps compete for RAM
- Check: Recent apps screen
- Fix: Close everything except CapCut
Nuclear option for 4K files: Split into 30-second chunks, reverse individually, export each, then re-import and stitch together. Inconvenient but stable.
Problem 3: Exported Video Quality Loss
Symptom: Reversed clip looks soft, blocky, or has compression artifacts.
The cause is almost always export settings, not the reverse effect itself.
| Wrong Setting | Right Setting | Where to Find |
|---|---|---|
| “Smart HDR” or auto-adjust ON | OFF | Export screen → toggle above resolution |
| Bitrate “Recommended” | “High” or 12 Mbps | Export → Resolution → Custom → bitrate slider |
| Resolution mismatched (720p export for 1080p source) | Match source exactly | Export → Resolution dropdown |
Verify before exporting: Tap the preview window fullscreen. If it looks sharp there but soft after export, your settings are wrong. If it looks soft in preview, the source file is low quality — reverse can’t fix that.
When you should Abandon CapCut
Two scenarios where CapCut’s reverse tool fails:
| Scenario | Better Tool | Why |
|---|---|---|
| Frame-accurate reverse for professional work | Adobe Premiere Pro, DaVinci Resolve | CapCut processes in 1-second increments; precise frame control unavailable |
| Batch reversing 50+ clips | FFmpeg command line | ffmpeg -i input.mp4 -vf reverse output.mp4 — processes entire folders automatically |
Frequently Asked Questions
Can you reverse just part of a video in CapCut?
Does reversing a video in CapCut change the file size?
Why does my reversed video have no sound?
Can I reverse a video on CapCut PC the same way as on mobile?
How long does CapCut take to reverse a video?
Will reversing a video reduce its quality?
Can I un-reverse a video after saving it?
Conclusion
Reversing video in CapCut takes under 60 seconds once you know the path: import, select, tap Reverse, export.
The effect itself is simple. What separates forgettable content from shareable content is when and why you use it.
Use reverse to:
- Break physics for attention (magic tricks)
- Hide edits for flow (transitions)
- Flip failure into comedy (slapstick)
Avoid it when dialogue, lip-sync, or audio clarity matters — reverse breaks those.
Your next step: open CapCut, pick a 10-second clip from your camera roll, and reverse it now. Test one effect from this guide. The gap between reading and doing is where skill actually builds.
Final note: CapCut updates frequently. If a button location shifts, the core logic — select clip, apply effect, adjust remains identical. Adapt the specifics, trust the workflow.