
If you create videos for TikTok, YouTube, or Instagram, adding captions is no longer optional. Most people scroll with the sound off.
So, how do you add captions on CapCut? You can either use CapCut’s automatic caption generator (fastest method) or manually add and customize subtitles for full control.
In this guide, you’ll learn both methods step-by-step, how to fix common caption mistakes, and how to make your subtitles look clean and professional.
Table of Contents
- Quick Answer: How to Add Captions on CapCut
- Why Adding Captions on CapCut Improves Video Performance
- Method 1: How to Use Auto Captions on CapCut (Fastest Way)
- Method 2: How to Add Captions Manually on CapCut
- Adding Captions on CapCut: Mobile vs Desktop Differences
- Can You Export Captions as an SRT File on CapCut?
- How to Edit, Fix, or Delete Captions in CapCut
- How to Style and Customize Captions on CapCut
- Is CapCut Auto Caption Free?
- Best Caption Settings for TikTok, YouTube & Instagram
- Common Caption Mistakes to Avoid
- Frequently Asked Questions
- Conclusion
Quick Answer: How to Add Captions on CapCut
- Import your video into CapCut (mobile or desktop).
- Tap or click Captions.
- Select Auto Captions to generate subtitles automatically, or choose Manual Text to type them yourself.
- Review and edit the captions for accuracy.
- Customize the font, color, and position.
- Export your video.
Why Adding Captions on CapCut Improves Video Performance
Adding captions on CapCut does more than improve accessibility. Captions increase watch time, boost retention, and improve engagement on platforms where users watch without sound.
- Higher completion rates
- Better accessibility compliance
- Improved clarity in noisy environments
- Stronger viewer retention
Many creators report better performance when subtitles are clear and properly timed.
Method 1: How to Use Auto Captions on CapCut (Fastest Way)
If you want the quickest way to add captions on CapCut, the Auto Captions feature is the best option. CapCut uses speech recognition to detect spoken words and automatically generate subtitles.
On Mobile (iPhone & Android)
- Open CapCut and import your video.
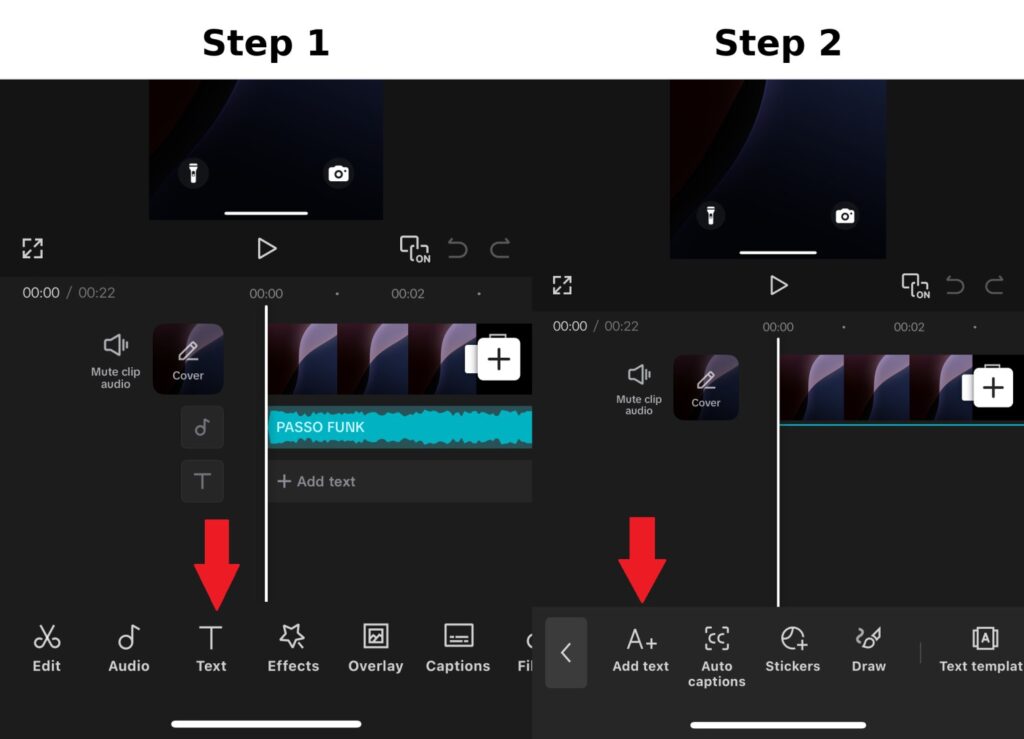
- Tap Captions from the bottom menu.
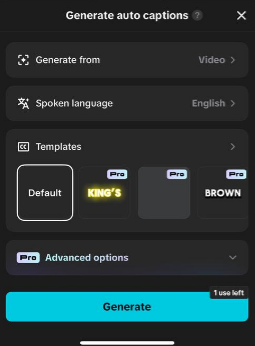
- Select Auto Captions.
- Choose the correct language.
- Tap Generate and wait for CapCut to process the audio.
Once generated, review each caption block carefully. Auto captions are fast, but they are not always perfect.
On Desktop (Windows & Mac)
- Open your project and add your video to the timeline.
- Click the Text or Captions tab.
- Select Auto Captions.
- Choose your language and confirm.
- Edit the generated subtitles directly on the timeline.
Tip: Always double-check spelling and timing before exporting. Background noise, accents, or fast speech can reduce accuracy.
If the feature freezes, disappears, or fails to generate text, here’s how to fix CapCut auto captions not working.
Method 2: How to Add Captions Manually on CapCut
If you want more control over timing, styling, and workflow, here’s a full guide to manual captions in CapCut.
On Mobile (iPhone & Android)
- Open your video project in CapCut.
- Tap Text from the bottom menu.
- Select Add Text.
- Type your caption, or if you’d rather skip typing entirely, generate captions using text-to-speech instead.
- Adjust the caption duration by dragging the text layer on the timeline.
- Repeat for each new caption segment.
On Desktop (Windows & Mac)
- Open your project and place the video on the timeline.
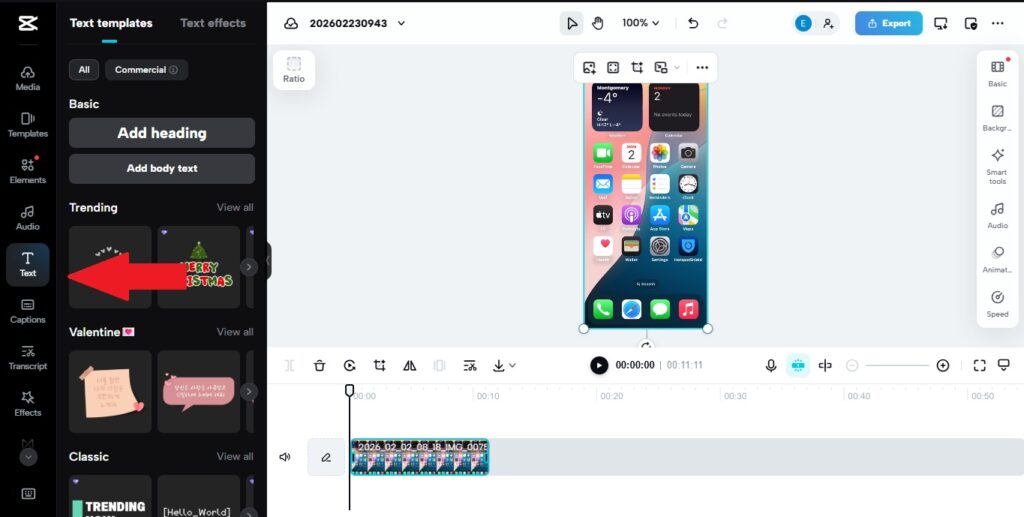
- Click Text from the top menu.
- Select Default Text or Add Text.
- Enter your caption in the text panel.
- Drag the edges of the text layer to match the spoken audio.
When should you use manual captions?
- When auto captions misinterpret words.
- When your video includes names, slang, or technical terms.
- When you want stylized captions for branding.
Manual captions take more time, but they give you complete control over wording, timing, and design.
Adding Captions on CapCut: Mobile vs Desktop Differences
While the steps to add captions on CapCut are similar on mobile and desktop, the interface layout is slightly different.
- Mobile: Captions are accessed through the bottom menu under “Captions” or “Text.”
- Desktop: Caption tools are located in the Text or Subtitle panel at the top interface.
- Customization: Desktop offers slightly more control over layout precision.
If you’re working on longer videos, the desktop version may provide easier timeline management.
Can You Export Captions as an SRT File on CapCut?
Currently, CapCut primarily embeds captions directly into the video. In some versions, subtitle file export options may be limited.
If you need a separate SRT file, you may need to use external subtitle tools after exporting your video.
How to Edit, Fix, or Delete Captions in CapCut
After generating or adding captions, you’ll usually need to make adjustments. Auto captions are rarely 100% accurate, and timing often needs fine-tuning.
How to Edit Caption Text
- Select the caption text layer on the timeline.
- Tap (mobile) or click (desktop) to open the text editor.
- Correct spelling, punctuation, or wording.
- Confirm changes.
Always review names, brand terms, and slang. Speech recognition often misinterprets these.
How to Fix Caption Timing
- Tap or click the caption layer.
- Drag the edges of the text block to match the spoken audio.
- Play the video to check synchronization.
Even a half-second delay can feel off. Make sure captions appear exactly when the words are spoken — and if you’re instead dealing with captions that loop or repeat unexpectedly, that’s a different fix entirely.
If you’re struggling with captions that don’t sync properly, check out our step-by-step guide on how to fix CapCut captions that are out of sync for a quick and precise solution.
How to Delete Captions
- Select the caption text layer.
- Tap or click Delete.
You can remove individual caption blocks or delete all captions and regenerate them if needed.
Pro tip: If auto captions are very inaccurate, delete them and regenerate in a quieter environment or double-check the selected language before processing.
How to Style and Customize Captions on CapCut
Adding captions is only half the job. If they’re hard to read or poorly styled, viewers will skip your video. CapCut lets you fully customize the look of your subtitles on both mobile and desktop.
Change Font, Size, and Color
- Select the caption text layer on the timeline.
- Open the Style or Text panel.
- Choose a readable font (avoid thin or decorative fonts).
- Adjust font size so it’s clear on small screens.
- Pick a high-contrast color (white text with black shadow works best).
Adjust Caption Position
Drag the caption directly on the preview screen to reposition it. Most creators keep captions slightly above the bottom edge to avoid platform UI overlays (like TikTok or Instagram buttons), though sometimes you’ll want captions to appear behind objects in your scene for a cleaner cinematic look.
Add Background or Shadow for Better Visibility
Use text background boxes or shadows to improve readability. This is especially important if your video has bright or busy scenes.
Use Caption Animations (Optional)
CapCut allows you to add simple animations like fade-in or pop effects. Use them lightly. Over-animated captions can look distracting and unprofessional.
Best practice: Keep captions clean, readable, and consistent throughout the video. Clarity matters more than flashy effects.
Is CapCut Auto Caption Free?
Yes, CapCut offers a free auto caption feature that allows you to automatically generate subtitles using speech recognition.
You can use Auto Captions on both mobile and desktop without paying. The tool detects spoken words in your video and converts them into subtitle text within seconds.
However, depending on your version of CapCut, some advanced styling options, premium fonts, or extra caption templates may require a CapCut Pro subscription.
Important: The core function of generating automatic captions is available in the free version, but always check inside the app to confirm what features are included in your region or current version.

Best Caption Settings for TikTok, YouTube & Instagram
Each platform displays captions slightly differently, so formatting matters. Here’s how to optimize your captions for the most common platforms:
TikTok
- Keep captions slightly above the bottom to avoid the caption overlay and buttons.
- Use bold, high-contrast text (white with shadow works best).
- Break sentences into short phrases for fast reading.
Instagram Reels
- Use large, clear fonts for mobile viewing.
- Avoid placing text too low where UI icons appear.
- Keep each caption line short and easy to scan.
YouTube Shorts
- Center captions near the lower third of the screen.
- Maintain consistent styling throughout the video.
- Double-check spelling — YouTube audiences expect cleaner formatting.
Universal rule: Captions should be readable within 1–2 seconds. If viewers struggle to read them quickly, simplify the wording or increase font size.
Common Caption Mistakes to Avoid
Relying 100% on Auto Captions
Auto captions save time, but they are not always accurate. Always review and correct spelling, punctuation, and misheard words before exporting your video.
Poor Timing and Synchronization
If captions appear too early or too late, viewers notice immediately. Drag caption layers on the timeline so they match the spoken words exactly.
Using Hard-to-Read Fonts
Thin, cursive, or decorative fonts may look stylish but reduce readability. Choose bold, simple fonts that are easy to read on mobile screens.
Overcrowding the Screen with Text
Long sentences make captions hard to follow. Break speech into short, readable chunks that viewers can process quickly.
Low Contrast Colors
Captions should stand out clearly from the background. Use white text with a black shadow or background box to improve visibility.
Remember: Clear and readable captions improve retention. Flashy but unreadable captions hurt engagement.
Frequently Asked Questions
How do you add captions on CapCut automatically?
Import your video, tap or click Captions, select Auto Captions, choose your language, and generate subtitles. Always review and correct mistakes before exporting.
Can I add captions on CapCut manually?
Yes. Select Text → Add Text, type your caption, and adjust its timing on the timeline to match the audio.
Is CapCut auto caption free?
Yes. The basic auto caption feature is available in the free version. Some advanced styling or template options may require CapCut Pro.
How do I fix captions that are out of sync?
Select the caption layer and drag it on the timeline until it matches the spoken words exactly.
Can I change the font and style of captions on CapCut?
Yes. Tap or click the caption layer, open the style panel, and adjust font, size, color, position, and effects to match your video.
Once your captions look good, the next step is exporting without ruining quality. Here’s how to export CapCut videos without watermark (plus the settings that keep your video clean).
Conclusion
Learning how to add captions on CapCut is simple once you know where the tools are. You can generate automatic captions in seconds or manually add subtitles for full control.
Captions improve accessibility, increase engagement, and help your videos perform better on platforms where many users watch without sound.
Whether you’re editing on mobile or desktop, CapCut gives you the tools to create clean, readable, and professional subtitles with minimal effort.
For the most up-to-date details on caption features and supported languages, you can also check the official CapCut Help Center.