

Have you ever watched a smooth anime edit, gaming montage, or TikTok transition and wondered how creators move feel so fluid?
One second, the video is racing forward. Next, it slows down perfectly on the beat. Everything feels cinematic instead of choppy.
That’s usually a combination of velocity editing and motion blur.
The good news?
Yes, CapCut has both.
The confusion comes from the fact that motion blur and velocity work differently, and the exact tools can look different depending on whether you’re using CapCut Mobile, Desktop, or Web.
In this guide, you’ll learn what motion blur and velocity actually do, where to find them in CapCut, how to use them together, and the common mistakes that make edits look amateur.
Table of Contents
- Quick Answer: Does CapCut Have Motion Blur and Velocity?
- What Is Velocity in CapCut?
- What Is Motion Blur in CapCut?
- Velocity vs Motion Blur: What's the Difference?
- How to Create a Velocity Edit in CapCut
- Best Situations for Velocity Editing
- How to Add Motion Blur in CapCut
- How to Combine Motion Blur and Velocity
- Best Clips for Velocity Edits
- How to Make Velocity Edits Match the Beat
- Why Your Velocity Edit Looks Choppy
- How to Make Velocity Edits Smoother
- What to Do If Motion Blur Is Missing in CapCut
- What to Do If Velocity Is Missing in CapCut
- Does Motion Blur Make Videos Look Blurry?
- Best Export Settings for Motion Blur and Velocity Edits
- Frequently Asked Questions
- Final Thoughts
- Official Resource
Quick Answer: Does CapCut Have Motion Blur and Velocity?
Yes.
CapCut includes:
- Velocity editing through its Speed Curve tool
- Motion Blur effects that can make fast movement look smoother
- Additional blur effects, transitions, and templates that can create a similar visual style
If your goal is to create smooth TikTok edits, anime edits, gaming montages, sports highlights, or cinematic transitions, you’ll typically use:
- Velocity (Speed Curve) to control timing
- Motion Blur to smooth fast movement
Velocity changes how fast the video plays.
Motion blur changes how movement looks.
The best edits often combine both.
What Is Velocity in CapCut?

Velocity editing is the process of changing video speed at different points within the same clip.
Instead of making an entire video slower or faster, you selectively control the pace of specific moments.
For example, you can:
- Start at normal speed
- Speed up before a beat drop
- Slow down during the main action
- Return to normal speed after the impact
This technique is commonly called a speed ramp.
In CapCut, velocity editing is handled through the Speed Curve feature. You can choose from preset curves or create your own custom speed changes.
Why Creators Use Velocity Edits
Velocity edits help direct attention.
Instead of showing every moment at the same pace, you highlight the parts that matter most.
That’s why speed ramps are popular for:
- Anime edits
- Gaming clips
- Sports highlights
- Car edits
- Dance videos
- Travel content
- Product reveals
- Cinematic TikToks
A well-timed speed change can make an ordinary clip feel dramatic.
A poorly timed one just feels random.
What Is Motion Blur in CapCut?

Motion blur is the natural blur that appears when something moves quickly.
In real life, fast-moving objects aren’t perfectly sharp. Your eyes naturally perceive a small amount of blur during motion.
Motion blur effects recreate that behavior in video.
The result is movement that feels:
- Smoother
- More natural
- More cinematic
- Less jittery during fast transitions
CapCut offers motion blur effects and motion blur-style tools that can be applied to clips to soften rapid movement. Depending on your device and version, you may find the feature under Effects or related video effect categories.
Why Motion Blur Matters
Without motion blur, speed ramps can sometimes look:
- Too sharp
- Too digital
- Slightly choppy
- Artificial during fast movement
A small amount of blur can help connect frames visually.
The key word is small.
Too much motion blur turns a clean edit into a blurry mess.
Think of it like seasoning.
A little improves the final result.
Too much ruins it.
Velocity vs Motion Blur: What’s the Difference?
Many beginners assume they’re the same thing.
They’re not.
| Velocity | Motion Blur |
|---|---|
| Controls playback speed | Controls visual appearance of movement |
| Creates speed ramps | Creates smoother motion |
| Changes timing | Changes visual feel |
| Used for pacing | Used for realism |
| Found in Speed → Curve | Found in Effects or Motion Blur tools |
Here’s an easy way to think about it:
Velocity controls when something happens.
Motion blur controls how that movement feels.
You can use velocity without motion blur.
You can use motion blur without velocity.
But they often work best together.
For example:
A speed ramp without motion blur may feel abrupt.
Motion blur without a speed ramp may not add much value.
Combining both creates the smooth, professional look people associate with viral edits.
How to Create a Velocity Edit in CapCut
The easiest way to create a velocity edit is with the Speed Curve tool.
On Desktop
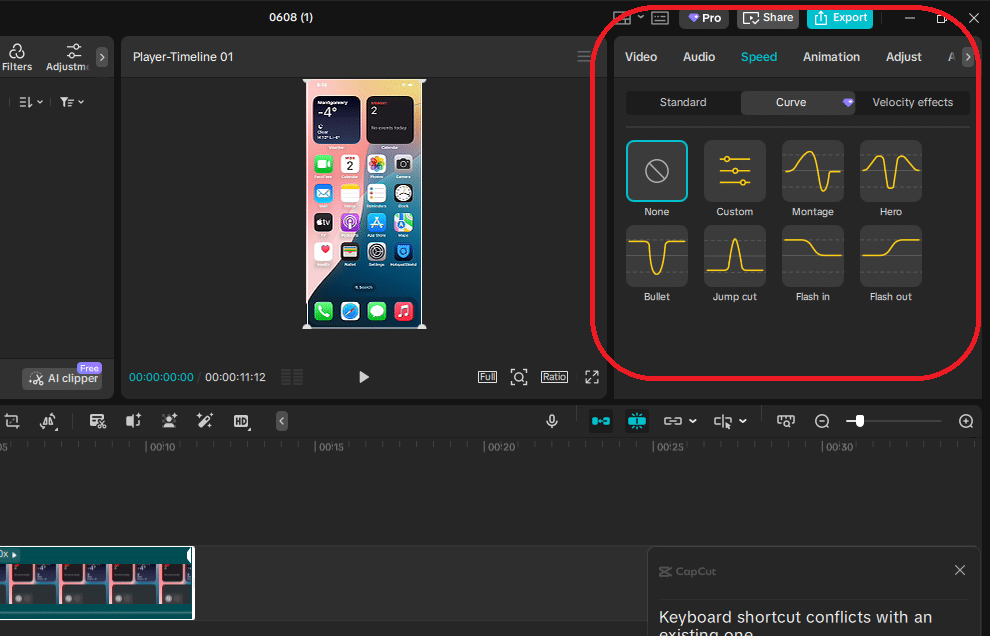
- Import your video
- Drag it to the timeline
- Select the clip
- Click Speed (at the top right of the screen)
- Open Curve
- Choose a preset or create a custom curve
- Adjust the speed points
- Preview and refine
On Mobile
1. Open your project
2. Select the clip
3. Tap Speed
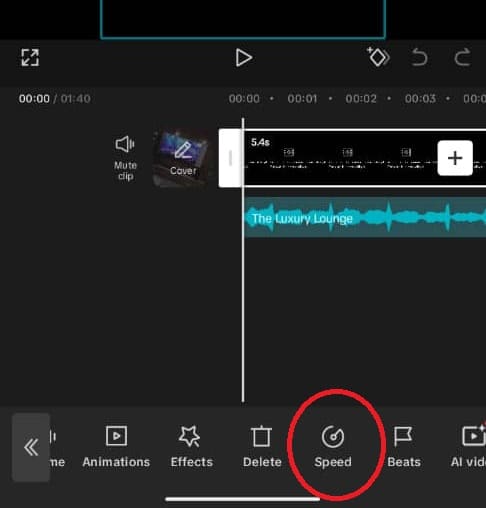
4. Tap Curve
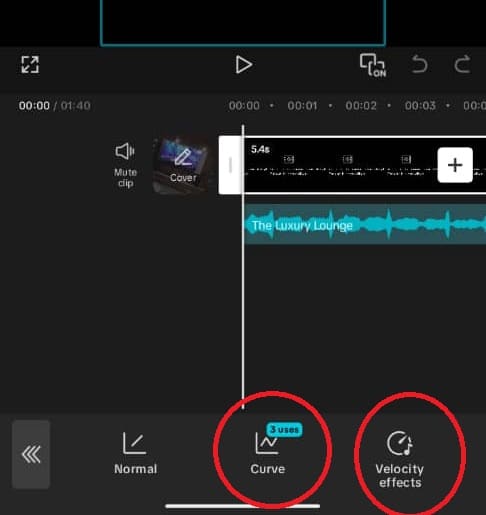
Choose a preset or create a custom speed curve
Adjust speed points
Preview before exporting
CapCut includes several built-in curve presets that provide quick starting points for speed ramp effects.
Beginner Tip to Note
Start with one speed ramp.
A lot of creators make the mistake of adding speed changes every few seconds.
More speed changes do not automatically create a better edit.
One well-timed speed ramp usually looks better than five random ones.
Best Situations for Velocity Editing
Velocity works best when there is already movement in the clip.
Good examples include:
- Sports action
- Dancing
- Running
- Jumping
- Car footage
- Travel shots
- Gaming highlights
- Anime scenes
- Product reveals
The movement gives the speed ramp something to emphasize.
If nothing is happening in the footage, velocity editing often feels forced.
Instead of asking:
“Where can I add a speed ramp?”
Ask:
“What moment deserves attention?”
That’s usually where your speed change belongs.
How to Add Motion Blur in CapCut
CapCut Desktop now includes a built-in Motion Blur option that can be applied directly to a video clip.
The exact location may vary slightly between versions, but in recent desktop releases it’s typically found in the clip settings panel after selecting a clip on the timeline.
On Desktop
- Import your video and add it to the timeline.
- Click the clip you want to edit.
- Open the Video tab in the right-side properties panel.
- Under the Basic section, scroll until you find Motion Blur.
- Enable the Motion Blur toggle.
- Adjust the settings to match your footage:
- Blur controls the strength of the effect.
- Blend controls how much frame blending is applied.
- Direction determines how the blur is rendered during movement.
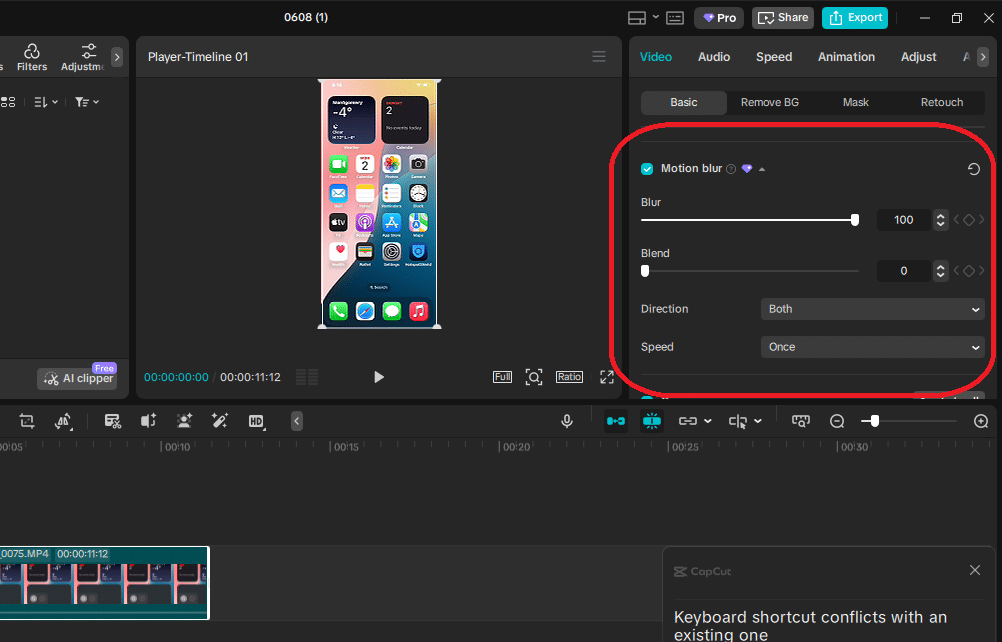
Start with a moderate blur amount and preview the clip before increasing the effect. Too much motion blur can make fast scenes look soft and reduce overall video clarity.
On Mobile
- Open your project in CapCut.
- Tap the video clip on the timeline.
- Scroll the bottom toolbar to the right until you find Motion Blur.
- Tap Motion Blur.
- Enable the effect if it’s turned off.
- Adjust the blur settings to match the amount of movement in your clip.
- Preview the video and fine-tune the effect if needed.
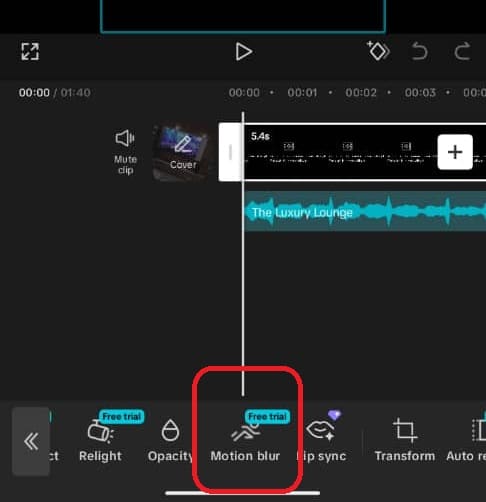
Tip: The Motion Blur tool isn’t always visible immediately. Depending on your screen size and CapCut version, you may need to swipe through several editing options before it appears.
Don’t Apply Motion Blur Everywhere
This is one of the biggest mistakes beginners make.
Motion blur works best during:
- Fast pans
- Whip transitions
- Speed ramps
- Camera spins
- Quick action scenes
- Beat transitions
Adding motion blur to an entire video usually makes everything look soft and muddy.
Instead, apply it only where the movement is fast enough to benefit from it.
How to Combine Motion Blur and Velocity
This is where edits start looking professional.
The best workflow is:
- Create your speed ramp first
- Fine-tune the timing
- Preview the movement
- Add motion blur only where needed
- Export and review
Why this order?
Because velocity controls the timing.
Motion blur only affects the visual feel.
If the speed ramp itself feels awkward, motion blur won’t fix it—it will just make the awkward movement blurry.
For example:
Imagine a basketball dunk.
- Speed up the run-up
- Slow down at the jump
- Return to normal speed after landing
Once the timing feels right, add a small amount of motion blur to the fast movement sections.
The result feels smoother without losing detail.
Best Clips for Velocity Edits
Not every video benefits from velocity editing.
The strongest results come from clips that already contain movement.
Examples include:
- Sports highlights
- Dance performances
- Gaming montages
- Car edits
- Travel footage
- Fitness content
- Anime edits
- Product reveals
- Action scenes
The more motion you have, the more useful speed ramps become.
If nothing interesting is happening in the footage, speed changes can feel forced rather than impactful.
How to Make Velocity Edits Match the Beat
The difference between an average edit and a great edit is usually timing.
Most viral edits are built around music.
Simple Beat-Matching Workflow
- Add your music first
- Listen for beat drops, bass hits, claps, or transitions
- Mark those moments on the timeline
- Create speed changes around those points
- Preview with audio enabled
- Adjust until movement and music feel connected
A common beginner mistake is editing visually while ignoring the audio.
Good velocity edits work because the eye and ear receive the impact at the same time.
When the action lands on the beat, the edit feels intentional.
Why Your Velocity Edit Looks Choppy
If your velocity edit doesn’t feel smooth, the speed curve isn’t always the problem.
Common causes include:
Low Frame Rate Footage
If your source video was recorded at 24fps or 30fps, extreme slow motion may look stuttery.
Higher frame rates (60fps or 120fps) generally produce smoother slow-motion results.
Aggressive Speed Changes
Going from 0.2x speed to 8x speed instantly can feel jarring.
Gradual ramps usually look better.
Too Many Effects
Stacking motion blur, shakes, zooms, flashes, transitions, and velocity effects can overwhelm the edit.
Sometimes removing effects improves quality more than adding them.
Weak Export Settings
A good edit can look terrible after export if quality settings are too low.
Always review your export settings before assuming the edit itself is the issue.
How to Make Velocity Edits Smoother
If your edits feel rough, try these fixes:
- Use fewer speed points
- Keep ramps gradual
- Slow down only key moments
- Use high-frame-rate footage when possible
- Add motion blur sparingly
- Preview with audio before exporting
Most professional edits are surprisingly simple.
A clean speed ramp often outperforms an overly complicated one.
What to Do If Motion Blur Is Missing in CapCut
Can’t find Motion Blur?
Try these steps:
- Update CapCut to the latest version
- Search directly for “Motion Blur” inside Effects
- Check Lens, Basic, or Video Effects categories
- Try CapCut Desktop if you’re on Mobile
- Check whether the effect is restricted to your plan or region
CapCut regularly updates its interface, so effect locations can change between versions.
If Motion Blur still isn’t available, blur transitions and directional blur effects can create a similar look.
What to Do If Velocity Is Missing in CapCut
Many users search for “Velocity” and assume the feature doesn’t exist.
In CapCut, velocity editing is usually called Speed Curve.
To find it:
- Select your clip
- Open Speed
- Choose Curve
- Select a preset or custom curve
If you don’t see Curve:
- Update CapCut
- Try Desktop instead of Mobile
- Restart the application
- Check that your clip is selected
Most of the time, the tool exists—it’s just labeled differently than the tutorials people watch.
Does Motion Blur Make Videos Look Blurry?
Only if you overuse it.
Motion blur is supposed to soften fast movement.
Used correctly, viewers barely notice it.
Used incorrectly, everything looks smeared.
A good rule:
If viewers notice the blur before they notice the edit, you’ve probably added too much.
Subtlety wins.
Best Export Settings for Motion Blur and Velocity Edits
Motion-heavy videos need strong export settings.
For most TikTok, Reels, and Shorts content:
Recommended Settings
- Resolution: 1080p
- Frame Rate: 60fps (if source footage supports it)
- Format: MP4
- Bitrate: High Quality or highest available setting
For 4K footage:
- Resolution: 4K
- Frame Rate: Match source footage
- High bitrate enabled
Remember:
Exporting a 30fps video at 60fps won’t magically create smoother motion.
The smoothness starts with the footage you record.
Good source footage always beats editing tricks.
Frequently Asked Questions
Do I need CapCut Pro to use motion blur?
It depends on your device, region, and CapCut version. Some Motion Blur tools are available in the free version, while others may require CapCut Pro. If you don’t see the feature, check whether it’s marked with a Pro badge or try updating the app.
Why does my motion blur disappear after exporting?
This can happen if the export quality is too low or if the platform compresses your video heavily after upload. Export at the highest quality available and test the file before uploading to TikTok, Instagram, or YouTube Shorts.
Can I create smooth velocity edits without motion blur?
Yes. A well-timed speed curve is more important than motion blur. Many professional editors create clean velocity edits using only speed ramps and proper timing. Motion blur should enhance the edit, not compensate for poor speed control.
Which type of footage works best for velocity editing?
Clips with clear movement usually produce the best results. Sports highlights, dance videos, gaming clips, travel footage, car edits, and action scenes tend to respond well to speed ramps because there is already motion to emphasize.
Will exporting at 60fps make my velocity edits smoother?
Not necessarily. Exporting at 60fps can improve playback on some platforms, but true smoothness comes from the source footage. If the original clip was recorded at 30fps, exporting at 60fps won’t create additional motion detail that wasn’t captured in the first place.
Final Thoughts
Yes, CapCut has both velocity editing and motion blur.
Velocity comes from the Speed Curve tool. Motion blur comes from effects designed to smooth fast movement.
The biggest mistake creators make is treating them as the same thing.
They’re not.
Velocity controls the pace.
Motion blur controls the appearance of movement.
Use speed ramps to direct attention. Use motion blur to support the motion. Keep both subtle, and you’ll end up with smoother, cleaner edits that look far more professional than simply throwing effects at every clip.
The best velocity edits aren’t the fastest.
They’re the ones where every speed change has a purpose.
And the best motion blur isn’t the strongest.
It’s the blur viewers never consciously notice.
