

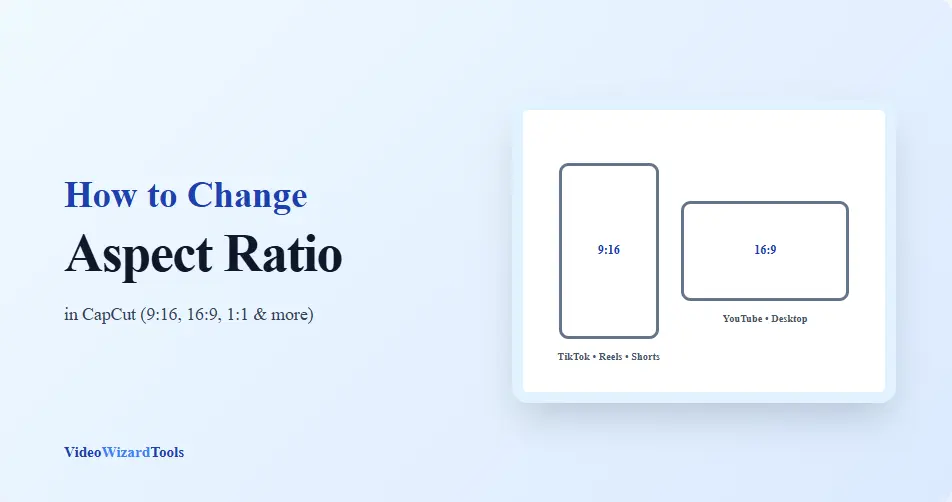
Have you ever needed to turn a YouTube video into a TikTok, convert a horizontal clip into a Reel, or make a square post for Instagram?
If so, you’ll need to change the aspect ratio.
The aspect ratio controls the shape of your video. A standard YouTube video uses a wide 16:9 format, while TikTok, Instagram Reels, and YouTube Shorts use a vertical 9:16 format.
If your project uses the wrong ratio, your video may appear cropped, surrounded by black bars, or poorly sized for the platform where you’re posting it.
The good news is that CapCut makes changing aspect ratio relatively simple. Whether you’re using CapCut Mobile, Desktop, or Online, you can switch between formats such as 9:16, 16:9, 1:1, and 4:5 in just a few clicks.
In this guide, you’ll learn how to change aspect ratio in CapCut, resize your footage correctly, avoid common framing problems, and choose the best video format for TikTok, Instagram Reels, YouTube Shorts, and YouTube videos.
Table of Contents
- What Aspect Ratio Means in CapCut
- Common CapCut Aspect Ratios and Where to Use Them
- How to Change Aspect Ratio in CapCut Mobile
- How to Change Aspect Ratio in CapCut Desktop
- How to Change Aspect Ratio in CapCut Online
- Why Your Video May Look Cropped After Changing Aspect Ratio
- How to Resize the Video After Changing Aspect Ratio
- Fit vs Fill in CapCut: What’s the Difference?
- How to Fix Black Bars in CapCut
- How to Avoid Cropping Faces, Text, and Products
- Can You Change Aspect Ratio After Editing?
- Why Your CapCut Video Looks Blurry After Changing Aspect Ratio
- Should You Create Separate Aspect Ratios for Each Platform?
- Best Export Settings After Changing Aspect Ratio
- Frequently Asked Questions
- Final Thoughts
What Aspect Ratio Means in CapCut
Aspect ratio is the shape of your video frame.
It tells CapCut how wide and tall the video should be.
For example, a vertical TikTok video is usually 9:16. A normal YouTube video is usually 16:9. A square Instagram-style video is 1:1.
Think of aspect ratio like choosing a picture frame.
If your photo is tall but the frame is wide, something has to happen. You either crop the photo, add empty space, or resize it so it fits. Video works the same way.
That is why changing aspect ratio can cause black bars, zoomed-in clips, or cropped faces if you do not adjust the video after changing the canvas.
Common CapCut Aspect Ratios and Where to Use Them
Before changing anything, choose the aspect ratio based on where the video will be posted.
Here are the common ones:
- 9:16 for TikTok, Instagram Reels, YouTube Shorts, Facebook Reels, and vertical videos.
- 16:9 for regular YouTube videos, website videos, online courses, and landscape content.
- 1:1 for square social posts.
- 4:5 for Instagram feed videos that need more vertical space than a square.
- 3:4 for some portrait-style edits or platform-specific layouts.
For most short-form content, 9:16 is the safest pick.
How to Change Aspect Ratio in CapCut Mobile
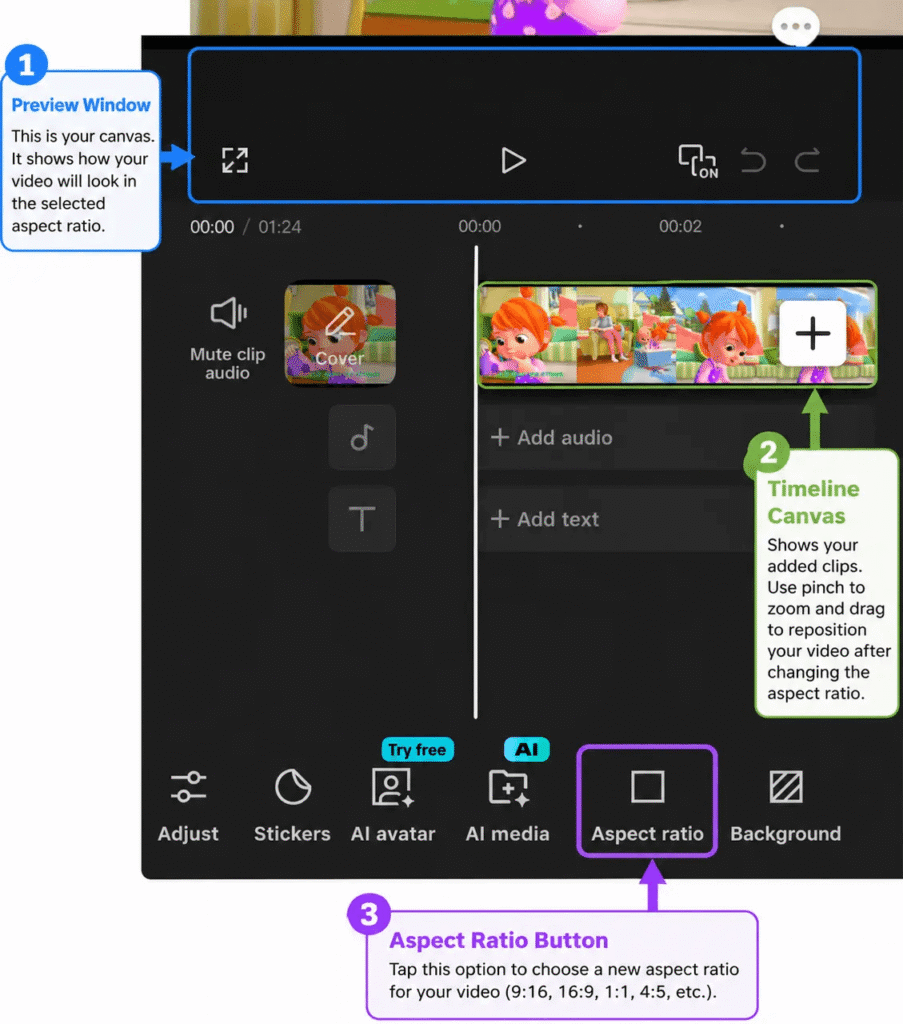
Changing the aspect ratio in CapCut mobile is straightforward. Here’s the current process on iPhone or Android:
- Open the CapCut app.
- Create a new project or open an existing one.
- Add your video(s) to the timeline.
- Deselect any clip if one is highlighted (tap the back arrow in the bottom-left corner if needed) so the project canvas settings appear.
- On the bottom toolbar, swipe left/right until you find “Aspect Ratio” (or “Ratio”) and tap it.
- Choose your desired ratio from the presets:
- 9:16 – TikTok, Reels, YouTube Shorts (vertical)
- 16:9 – YouTube, landscape videos
- 1:1 – Square posts
- 4:5 – Instagram feed
- Other options like 3:4, etc.
- Tap the checkmark (✓) or confirm to apply the new canvas.
- Select your video clip on the timeline.
- Use two fingers to pinch-zoom and drag to reposition the video so important elements (faces, text, products) stay visible in the new frame.
- Preview the full video and adjust as needed before exporting.
Tip: Always watch the entire video after resizing, movement in the clip can push important parts out of frame.
How to Change Aspect Ratio in CapCut Desktop
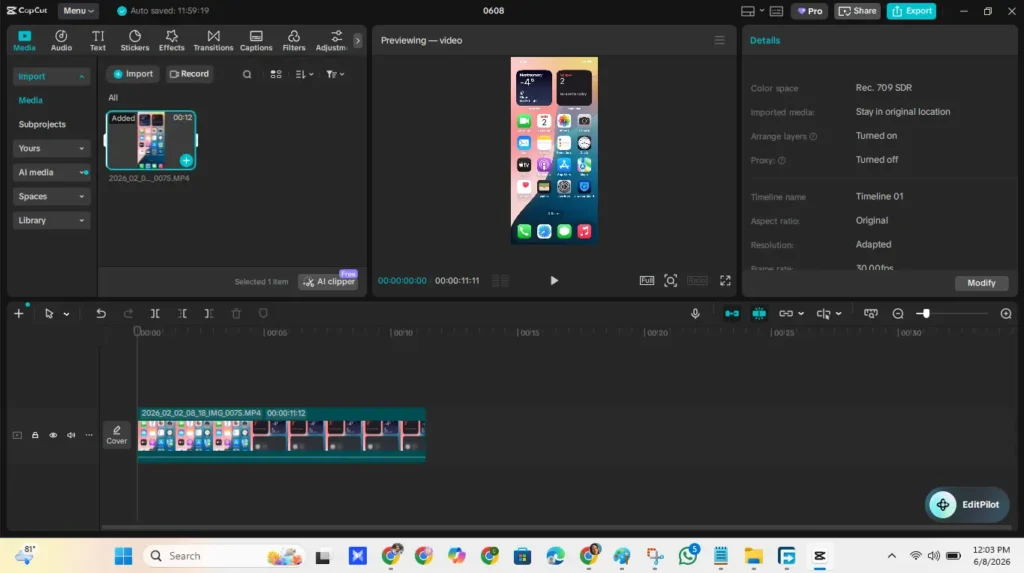
Changing the aspect ratio in CapCut Desktop is simple once your video has been imported into a project.
The desktop version gives you a larger preview area and more precise control when converting videos between horizontal, vertical, square, and other formats.
Follow these steps:
- Open CapCut Desktop on your Windows PC or Mac.
- Create a new project or open an existing one.
- Click Import and select the video you want to edit.
- Once the video appears in the Media panel, click the imported clip to select it.
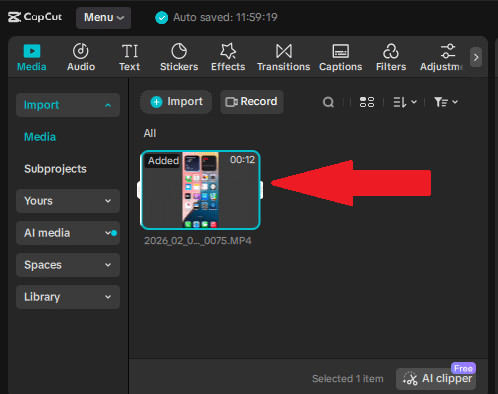
Figure 2: Click the imported video in the Media panel to select it before accessing the Modify settings. - On the right side of the screen, the Details panel will display information about the selected media file.
- Click the Modify button located near the bottom of the Details panel.
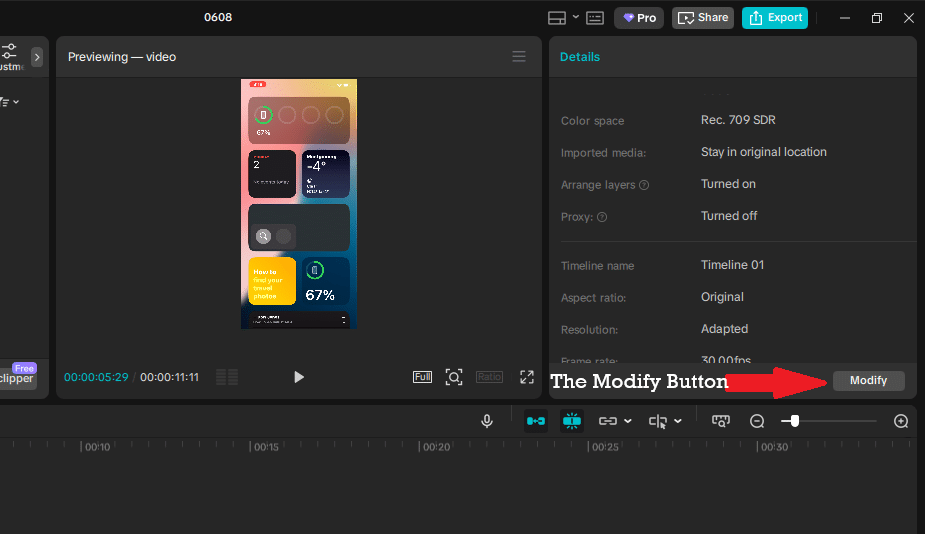
Figure 3: The Modify button is located at the bottom of the Details panel. Click it to open project settings, including the aspect ratio options. - In the settings window that opens, locate the Aspect Ratio option.
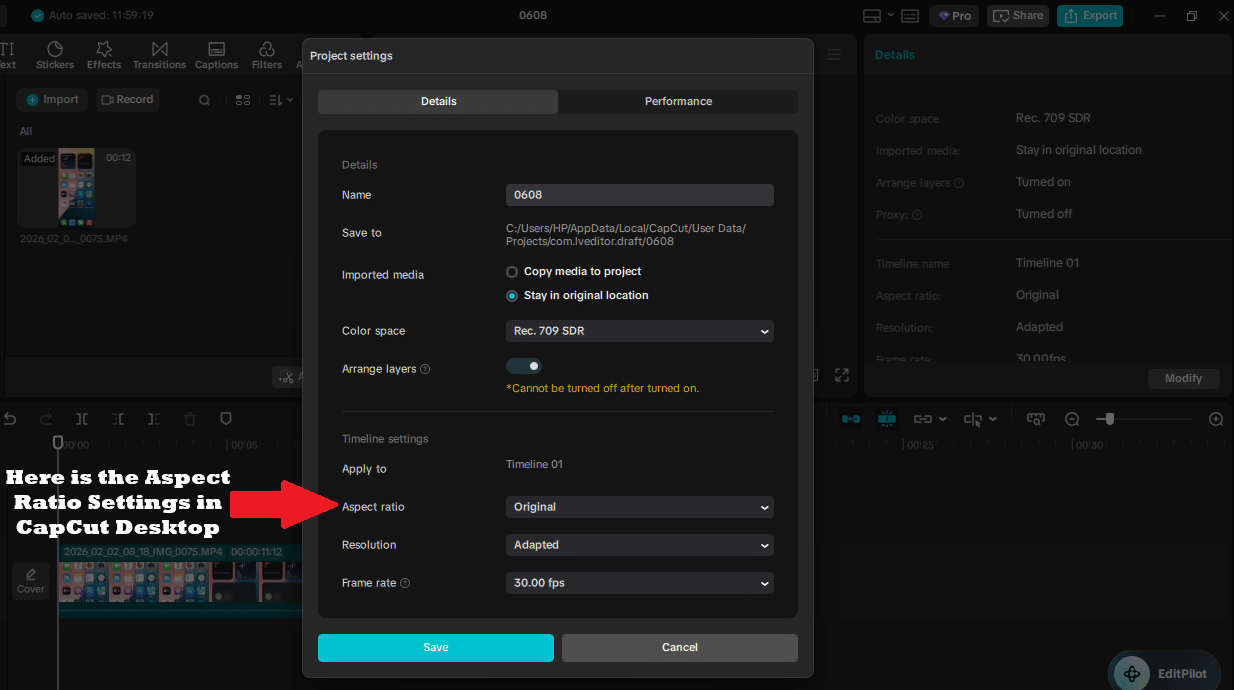
Figure 4: In the Project Settings window, locate the Aspect ratio dropdown menu. This is where you can switch between formats such as 9:16, 16:9, 1:1, and other supported aspect ratios. - Choose the aspect ratio that matches your target platform:
- 9:16 for TikTok, Instagram Reels, and YouTube Shorts
- 16:9 for YouTube and landscape videos
- 1:1 for square social media posts
- 4:5 for Instagram feed posts
- Other available presets depending on your project requirements
- Apply the new aspect ratio and confirm your changes.
- Drag the imported video onto the timeline if you have not already done so.
- Select the clip on the timeline and adjust its position or scale within the preview window to ensure important subjects remain visible inside the new frame.
- Preview the entire video and make any necessary adjustments before exporting.
How to Change Aspect Ratio in CapCut Online
CapCut Online gives you two ways to change aspect ratio.
You can choose the aspect ratio before creating a project, or you can change it later after your clips are already on the timeline.
The first option is usually easier because it helps you build the project around the correct format from the beginning.
Option 1: Choose the Aspect Ratio Before Creating a Project
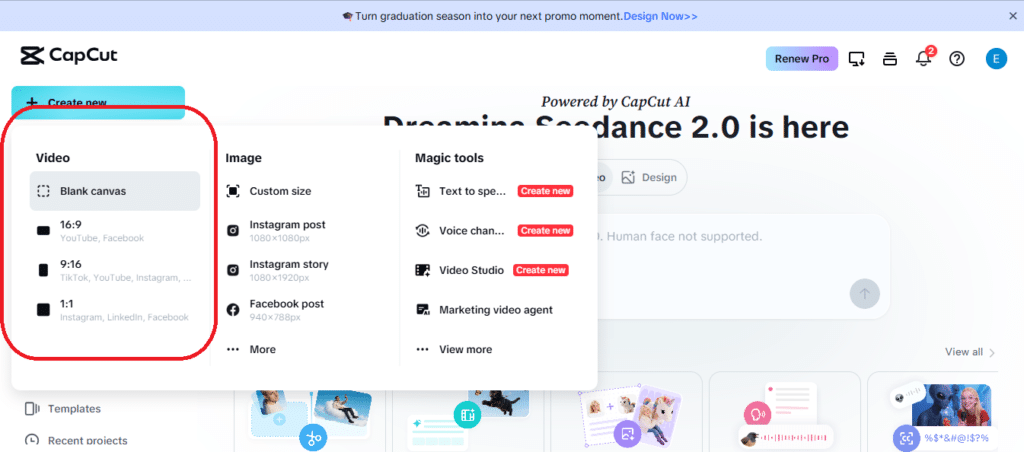
- Open CapCut Online in your browser and sign in.
- Click Create New in the upper-left corner.
- A menu will appear showing preset project sizes.
- Select the aspect ratio that matches your platform:
- 9:16 – TikTok, Instagram Reels, YouTube Shorts, Facebook Reels
- 16:9 – YouTube videos, courses, websites, landscape videos
- 1:1 – Square social media posts
- Custom Size – Create your own dimensions
- CapCut will create a new project using that canvas size.
- Upload your videos, photos, or other media.
- Add them to the timeline.
- Resize or reposition clips if needed.
- Preview the full video before exporting.
Starting with the correct aspect ratio usually saves time because captions, overlays, and effects are less likely to need repositioning later.
Option 2: Change the Aspect Ratio After You Have Already Started Editing
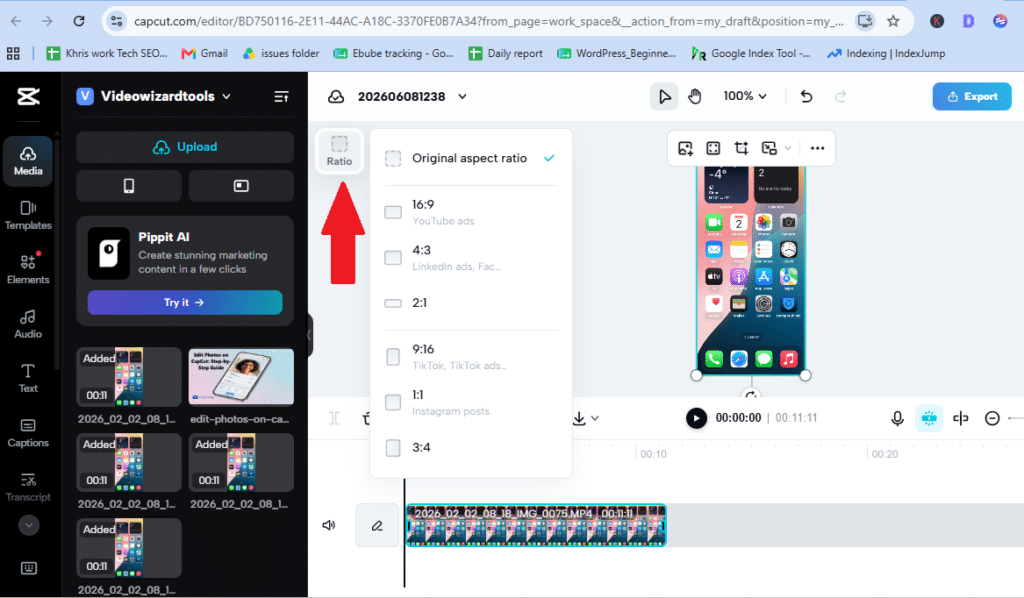
If you already imported clips or started editing, you can still change the aspect ratio without creating a new project.
- Open your project in CapCut Online.
- Click anywhere outside the selected clip if necessary.
- Locate the Ratio button above the preview canvas.
- Click Ratio to open the aspect ratio menu.
- Select the new aspect ratio you want to use.
Common options include:
- 16:9 for YouTube and landscape videos
- 9:16 for TikTok, Reels, and Shorts
- 1:1 for square social posts
- 3:4 for portrait-style content
- 4:3 for certain social and presentation formats
- After changing the ratio, select your video clip.
- Resize, zoom, or reposition the clip inside the canvas.
- Play through the entire video to check that faces, captions, products, and important details remain visible.
- Export when everything looks correct.
Changing the aspect ratio only changes the shape of the project canvas. It does not automatically make your footage fit perfectly inside the new frame.
That means you will usually need to manually reposition the video after switching from one format to another.
For example, when converting a horizontal 16:9 YouTube video into a vertical 9:16 Reel, CapCut may crop the sides of the footage. Adjusting the clip manually helps keep faces, text, and products visible.
Tip: Always preview the entire video after changing aspect ratio. A frame may look fine at the beginning of a clip but become cropped later when the subject moves.
Why Your Video May Look Cropped After Changing Aspect Ratio
Your video may look cropped because the new canvas shape does not match the original clip.
For example, if you put a wide 16:9 video into a tall 9:16 frame, CapCut has to make a choice. It can fit the whole video with empty space, or it can fill the screen by zooming in and cutting off the sides.
That is not CapCut being mean. That is just geometry doing its little villain act.
To fix this, tap the video and resize it manually. You can pinch, drag, zoom, or reposition the clip until the important parts fit better.
The goal is not just to fill the screen. The goal is to fill the screen without cutting off what matters.
If you are not sure which version to use for resizing, this comparison of CapCut Online vs desktop vs mobile can help you pick the right one.
How to Resize the Video After Changing Aspect Ratio
Changing the aspect ratio updates your project’s canvas, but your video clip often needs manual adjustment to look good in the new frame. This is the step many people miss.
After switching ratios (e.g., from 16:9 to 9:16), your video may appear too small, zoomed in too much, off-center, or surrounded by black bars. Here’s how to fix it in CapCut:
On Mobile (iPhone/Android):
- Tap the video clip on the timeline to select it (a white border appears around it in the preview).
- Use two fingers on the preview screen:
- Pinch in/out to zoom the clip (make it bigger or smaller).
- Drag with one finger to reposition it up, down, left, or right.
- For more precise control, tap “Edit” or “Transform” in the bottom menu and adjust the Scale slider.
- Preview the full video by scrubbing through the timeline. Pay special attention to movement — important elements (faces, text, products) should stay visible throughout.
On Desktop:
- Click the video clip on the timeline to select it.
- In the preview window, drag the corners or edges to resize, or use the Scale slider in the Basic tab on the right panel.
- Drag the clip to reposition it.
- You can also toggle Uniform Scale on/off if you need to stretch the video (not recommended for most cases).
- Play through the entire timeline to check framing.
On CapCut Online:
- Click the video clip in the timeline.
- In the preview window, use your mouse to drag the corners for resizing and drag the clip to reposition.
- Use the Scale and Position controls in the right sidebar for precise adjustments.
Key Tips for Great Results:
- Fill vs Fit: Use Fill for full-screen social videos (may crop edges). Use Fit to show the entire clip (may add black bars).
- Add a blurred background (often under Effects or Background) if you want to keep the full clip visible without black bars.
- Always watch the entire video after resizing — motion can push faces or text out of frame.
- Keep important content (faces, captions, products) near the center with some breathing room around the edges.
This manual resizing step is what turns a basic ratio change into a polished, platform-ready video.
Fit vs Fill in CapCut: What’s the Difference?
When resizing videos, you are usually choosing between fitting the video or filling the screen.
Fit means the full video stays visible inside the frame.
This keeps everything in view, but it may create empty space or black bars around the video.
Fill means the video fills the whole frame.
This looks cleaner for social media, but it may crop part of the video.
Here’s the easy way to choose:
- Use fit when you need the whole video visible.
- Use fill when you want a full-screen social video.
- Use background blur when you want the full video visible but hate black bars.
There is no perfect choice for every clip. You are always balancing clean framing with keeping important details visible.
How to Fix Black Bars in CapCut
Black bars appear when your video does not match the project’s aspect ratio.
For example, if you place a horizontal video inside a vertical 9:16 project, CapCut may show black space above and below or around the clip.
You can fix black bars in a few ways:
Zoom in to fill the screen
This removes the bars, but it may crop the sides or top of the video.
Add a blurred background
This keeps the full video visible while filling the empty space with a blurred version of the same clip.
Use a color or image background
This works well for tutorials, quote videos, podcasts, or branded content.
Reframe the video manually
Move the clip around so the most important part stays visible inside the new shape.
For short-form videos, a blurred background often looks better than plain black bars. But if you want a cleaner full-screen look, cropping may be the better choice.
How to Avoid Cropping Faces, Text, and Products
Changing aspect ratio can accidentally cut off the exact thing viewers need to see.
That is why you should always check the full video after resizing.
Pay close attention to:
- Faces near the top of the frame.
- Captions near the bottom.
- Products near the edges.
- Hands, tools, or objects moving in and out of frame.
- Text overlays that may get covered by app buttons after posting.
For TikTok, Reels, and Shorts, avoid putting important text too close to the bottom because platform buttons and captions may cover it.
A good rule is to keep the most important part near the center, with breathing room around it.
Before export, watch the video like a viewer. If your eye keeps fighting the frame, adjust it.
Can You Change Aspect Ratio After Editing?
Yes, you can change aspect ratio after editing in CapCut, but it is better to choose the ratio early.
If you change the ratio after adding captions, stickers, overlays, effects, and keyframes, some things may shift out of place.
For example, captions that looked perfect in 16:9 may sit too low in 9:16. A sticker in the corner may move into a bad spot. A zoom effect may crop someone’s face.
So if you already edited the video, change the ratio carefully and recheck everything.
Watch for:
- Captions that move too close to the edge.
- Text that gets cut off.
- Overlays that no longer line up.
- Faces or products that are cropped badly.
- Backgrounds that no longer fill the frame.
If possible, set your aspect ratio before doing the detailed edit. It saves time and keeps your layout cleaner.
Why Your CapCut Video Looks Blurry After Changing Aspect Ratio
Your video may look blurry after changing aspect ratio if you zoomed in too much, used low-resolution footage, or exported with weak settings.
This happens a lot when turning a horizontal video into a vertical one.
To fill a vertical 9:16 frame, you may need to zoom in heavily. But when you zoom in, CapCut is stretching the visible part of the video. If the original clip is not sharp enough, the result can look soft or blurry.
To reduce blur:
- Start with the highest-quality version of the video.
- Avoid zooming in more than needed.
- Use a blurred background instead of extreme cropping.
- Export at 1080p or higher when possible.
- Use strong export settings for the platform.
If this keeps happening, read this guide on why CapCut videos look blurry after export. It will help you spot whether the issue is your footage, resize choice, or export settings.
Should You Create Separate Aspect Ratios for Each Platform?
Yes, if the video matters.
You can post the same video everywhere, but one size does not always fit every platform well.
A 9:16 video works great for TikTok, Reels, and Shorts. But it may not look right as a normal YouTube video. A 16:9 video works well on YouTube, but it may feel small or awkward inside a vertical Reel.
If the video is important, make platform-specific versions.
For example:
- 9:16 version for TikTok, Reels, and Shorts.
- 16:9 version for YouTube and websites.
- 4:5 version for Instagram feed.
This gives each platform a version that feels natural.
It takes a little more time, but it usually looks much better than forcing one video to work everywhere.
Best Export Settings After Changing Aspect Ratio
After changing aspect ratio, export the video in a size that matches your platform.
For most social videos, 1080p is a safe choice. Use 4K only if your original footage is 4K and you really need that extra detail.
For frame rate, use 30fps for normal videos and 60fps for fast action, gaming, sports, or very smooth footage.
Before exporting, check:
- The aspect ratio is correct.
- The video is not blurry.
- No captions are cut off.
- No faces or products are cropped badly.
- The final video plays smoothly from start to end.
For a cleaner setup, use these best CapCut export settings before posting.
Frequently Asked Questions
Does changing the aspect ratio reduce video quality in CapCut?
Changing the aspect ratio itself does not reduce quality. However, quality can decrease if you have to zoom in heavily to make the video fill a new frame size. The more you crop and enlarge footage, the more likely it is to appear soft or blurry, especially if the original video was recorded at a lower resolution.
Can I create a custom aspect ratio in CapCut?
Yes. Some versions of CapCut allow you to create custom canvas dimensions instead of using preset ratios like 9:16 or 16:9. This is useful for platform-specific requirements, digital ads, website banners, presentations, or unique video layouts.
Will changing the aspect ratio affect captions and text overlays?
It can. When you switch to a different canvas size, captions, stickers, overlays, and text elements may shift position or appear too close to the edges. After changing aspect ratio, review all on-screen text to make sure it remains readable and properly positioned.
Can I use the same CapCut project for multiple platforms?
Yes, but you may need to create separate versions. Many creators duplicate a project and then adjust the aspect ratio, captions, and framing for each platform. This often produces better results than using a single export everywhere.
Which aspect ratio gets the most screen space on mobile devices?
The 9:16 aspect ratio uses the most screen space on modern smartphones because it fills the display vertically. This is why TikTok, Instagram Reels, Facebook Reels, and YouTube Shorts all favor vertical video formats.
Can I convert old landscape videos into vertical videos for Shorts and Reels?
Yes. You can switch the project to a 9:16 aspect ratio and then crop, reposition, or resize the original footage. Some creators also add blurred backgrounds or duplicate footage behind the main video to make landscape content fit vertical platforms more naturally.
Should I choose the aspect ratio before or after editing in CapCut?
Choosing the aspect ratio before editing is usually the better approach. It helps ensure that clips, captions, effects, and overlays are positioned correctly from the start, reducing the amount of adjustment needed later.
Can I change aspect ratio without re-editing my entire project?
Usually yes, but some adjustments are often required. While CapCut can switch the canvas size instantly, you may still need to reposition footage, captions, stickers, and other visual elements to make the final video look polished.
Final Thoughts
Changing aspect ratio in CapCut is easy. Making the video look good after changing it is the real work.
Pick the right ratio for the platform first. Use 9:16 for TikTok, Reels, and Shorts. Use 16:9 for regular YouTube videos. Use 4:5 or 1:1 for Instagram feed.
Then resize the clip carefully. Check faces, captions, products, and movement before exporting.
A good aspect ratio should make the video feel natural, not squeezed into the wrong shape.
