

So you hit export, walk away to grab a drink, come back ten minutes later — and CapCut exporting is still at 12%.
Or the app crawls every time you scrub through your timeline. Or a template that should download in seconds is sitting there spinning.
CapCut slowness shows up in three different places: during export, during editing and rendering, and when downloading assets or templates.
Each one has different causes and different fixes. We will guide on how to easily pinpoint exactly what’s slowing you down and fix it fast.
Quick clarification: we made this post for those who are experiencing CapCut being slow, the progress bar is moving, but it feels like it’s taking forever, so if your CapCut isn’t exporting at all, the button does nothing, the export fails completely, or it crashes mid-export we recommend you follow this guide CapCut not exporting.
Table of Contents
- Why Does CapCut Take So Long to Export?
- Why Does CapCut Take So Long to Reverse a Clip?
- Why Does CapCut Take So Long to Import Videos?
- Why Does CapCut Take So Long to Load Effects?
- Why Does CapCut Take So Long to Render During Editing?
- Why Does CapCut Take So Long to Download Templates and Assets?
- Why Does CapCut Take So Long to Upload to Space?
- How to Make CapCut Faster: Quick Reference
- Frequently Asked Questions
Why Does CapCut Take So Long to Export?
Export is the most processing-intensive thing CapCut does. When you hit that export button, CapCut has to render every clip, effect, transition, caption, and audio layer into a single finished file, all at once, all on your device. The more complex your project, the longer that takes.
But there are also fixable reasons it takes longer than it should. Here are the main ones.
Your Export Settings Are Too High for Your Device
This is the number one cause of slow exports. Exporting at 4K resolution and 60fps on a mid-range phone is like asking a bicycle to keep up with traffic on a motorway. The device’s processor simply isn’t fast enough to encode that much data at that speed.
A 5-minute video exported at 4K/60fps can legitimately take 10–20 minutes even on capable hardware. If you’re on an older or mid-range device, it can take much longer.
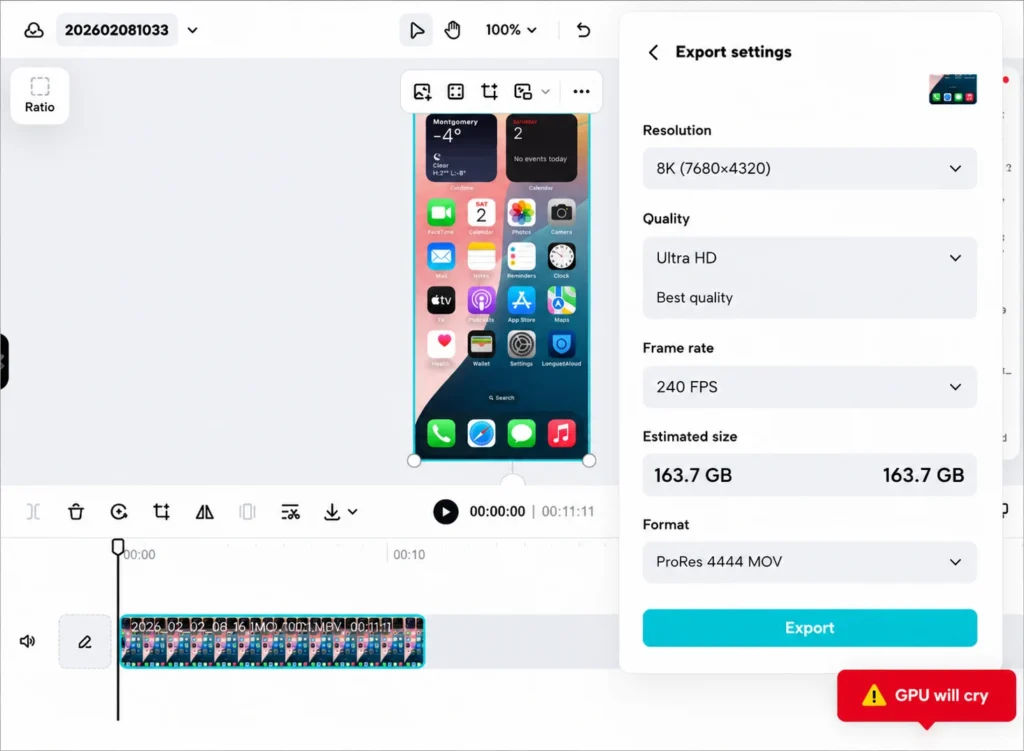
For most social media content like TikTok, Instagram Reels, YouTube Shorts 1080p at 30fps is indistinguishable from 4K after platform compression and produces export times a fraction of the length.
Fix: Before exporting, tap the settings icon on the export screen and drop your resolution to 1080p and frame rate to 30fps if your content doesn’t genuinely need higher. You’ll notice dramatically faster exports with no visible quality loss on most screens.
Too Many Effects, AI Features, or Keyframes in Your Project
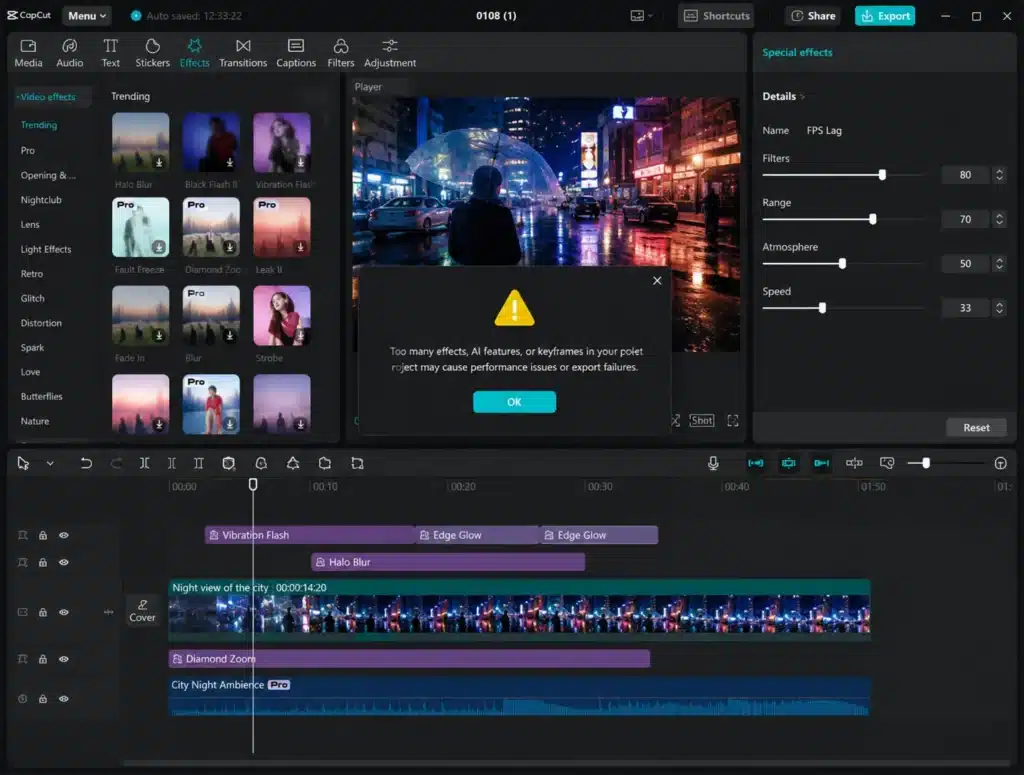
Every effect you stack on a clip adds processing time at export. AI-powered features, noise reduction, video enhancement, stabilization, auto-captions, super resolution are particularly heavy because CapCut processes them frame by frame.
A video with stabilization applied to multiple long clips can add significant time to the export on its own.
Similarly, heavy keyframe animation, compound clips, and multiple video layers all multiply the rendering workload.
Fix: If your export is taking unusually long, go through your timeline and check for stabilization applied to clips where it isn’t essential, this is one of the biggest single time drains.
Also look for AI enhancement effects applied broadly. Removing or reducing these on less important clips can cut export time significantly.
Low Storage Space on Your Device
CapCut needs free storage space not just to save the exported file, but as working space during the export process itself.
When your device storage is nearly full, CapCut’s read and write speeds slow down dramatically, which drags out the entire export.
CapCut’s own official guidance recommends having at least 2–3GB of free space available when exporting. If you’re regularly editing large projects, more headroom than that is better.
Fix: Before exporting, check your available storage. Delete old exports, clear CapCut’s cache, and remove any files you no longer need. See our guide on why CapCut takes so much storage for a full breakdown of what’s eating your space and how to free it safely.
Background Apps Competing for Processing Power
Chrome with multiple tabs open, a streaming app running, cloud backup syncing in the background, all of these compete directly with CapCut for CPU and GPU resources during export.
CapCut’s rendering engine wants as much of your device’s processing power as it can get. Background apps quietly eat into that.
Fix: Before starting a long export, close every app you don’t need. On mobile, clear your recent apps. On desktop, use Task Manager (Windows) or Activity Monitor (Mac) to close anything resource-heavy. It’s a simple step that makes a measurable difference.
Hardware Acceleration Settings Are Misconfigured (Desktop Only)
On CapCut Desktop, hardware acceleration is split into three separate settings under Settings → Performance. By default, all three are enabled and on most modern machines, that’s the right call.
But on older GPUs or machines with outdated drivers, having all three on can actually cause slower exports, stuttering previews, or instability.
Here’s what each setting does:
- Speed up hardware encoding: uses your GPU to encode the final export instead of the CPU. Faster on most machines; occasionally unstable on older GPUs.
- Speed up hardware decoding: uses your GPU to decode footage during timeline playback and editing. Helps with smooth previews on capable hardware.
- Render interface with GPU: uses your GPU to render the CapCut interface itself. Generally safe to leave on.
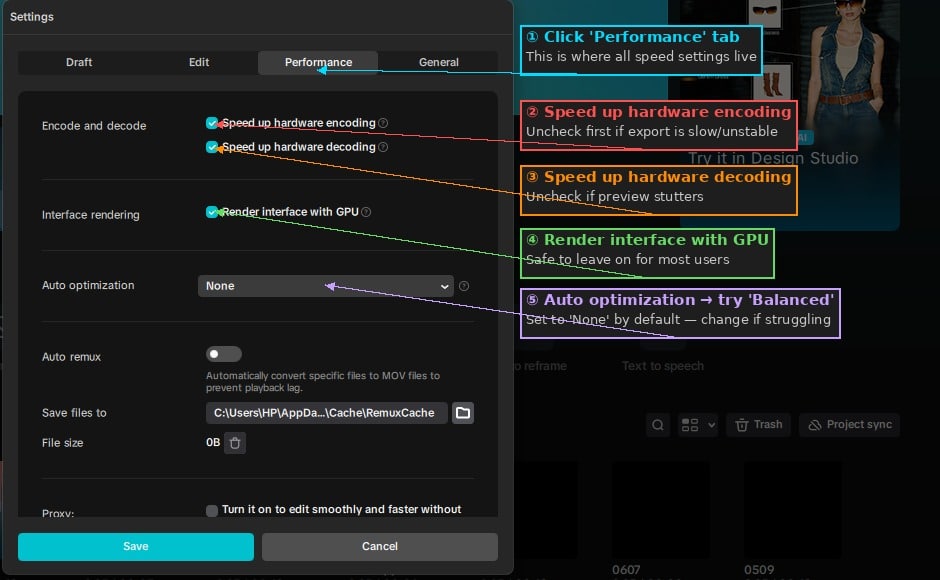
Fix: If your export is slow or unstable, go to Settings → Performance and uncheck Speed up hardware encoding first, this is the setting most likely to cause export slowdowns on problematic hardware.
Test your export speed, then re-enable it if there’s no improvement. If issues persist, uncheck hardware decoding as well. Some machines run measurably faster with these disabled; others are faster with them on — it depends entirely on your GPU and drivers.
Also check the Auto optimization dropdown — if it’s set to “None”, CapCut isn’t automatically adjusting performance settings for your hardware. If your machine is struggling, try switching this to a performance preset and see if it makes a difference.
Corrupted Cache Files
Accumulated or corrupted cache files can interfere with how CapCut processes and writes data during export, slowing things down in ways that aren’t immediately obvious.
Fix on Android: Settings → Apps → CapCut → Storage → Clear Cache.
Fix on iPhone: There’s no direct cache clear button. Offload the app via Settings → General → iPhone Storage → CapCut → Offload App, then reinstall.
Fix on Desktop (Windows): In CapCut settings, go to the Performance tab → Cache size → delete. Alternatively, manually delete the contents of %LocalAppData%CapCut in File Explorer.
Fix on Desktop (Mac): Remove items in ~/Library/Caches/com.lemon.lvoverseas/ then restart CapCut.
Why Does CapCut Take So Long to Reverse a Clip?
Reversing a clip in CapCut is slower than most people expect because it isn’t a simple playback trick, CapCut has to fully re-encode the clip frame by frame in reverse order before it can even show you a preview.
The longer and higher-resolution the clip, the longer this takes. A 60-second 4K clip can take several minutes to reverse on a mid-range phone.
Fix: Trim your clip to only the section you actually need reversed before applying the reverse effect, don’t reverse a 2-minute clip when you only need 10 seconds of it.
Also lower your preview quality in settings while working with reversed clips, since CapCut has to render these in real time during playback.
Why Does CapCut Take So Long to Import Videos?
When you import a video into CapCut, the app doesn’t just copy the file, it generates a preview, creates proxy files for smooth timeline playback, and indexes the clip’s audio waveform.
Large files, high-resolution footage, and videos stored in cloud storage (Google Photos, iCloud) rather than local device storage all make this process significantly slower.
Videos importing from iCloud or Google Photos are particularly slow because CapCut has to download the full file from the cloud before it can process it, even if the photo appears as a thumbnail on your device.
Fix: Before importing, download your clips fully to local device storage rather than importing directly from cloud storage.
On iPhone, go to your Photos app, open the video, and make sure it’s fully downloaded (not showing a cloud icon) before importing into CapCut.
This alone can reduce import time dramatically for users whose photos are set to optimise device storage.
Why Does CapCut Take So Long to Load Effects?
CapCut’s effects, filters, stickers, and transitions are not stored on your device — they live on ByteDance’s servers and are downloaded on demand when you tap them.
Every time you preview an effect you haven’t used recently, CapCut makes a server request, downloads the effect package, and then renders a preview.
On a slow connection or during peak server times, this chain of steps takes noticeably longer.
Fix: Browse and download effects while connected to a fast Wi-Fi connection before your editing session.
Once an effect has been downloaded, CapCut caches it locally and loads it much faster on subsequent uses. You can also pre-download favourite effects from the effects library so they’re ready to use offline.
Why Does CapCut Take So Long to Render During Editing?
Slow rendering during editing — choppy timeline playback, sluggish previews, lag when scrubbing — is a different problem from slow exports. Here the issue is real-time performance, not final encoding.
High-Resolution Footage on a Low-to-Mid Range Device
Editing 4K footage in real time requires your device to decode and display high-resolution frames continuously as you scrub through the timeline.
Mid-range phones and older computers struggle with this — not because anything is wrong, but because it’s genuinely demanding work for the hardware.
Fix: Lower your preview quality in CapCut’s settings. On mobile, look for a resolution or quality toggle in the editor settings. On desktop, go to Settings → Performance → and reduce preview resolution to half or quarter.
You’re not affecting the final export quality — just the preview. This alone can transform a laggy editing experience into a smooth one.
Too Many Layers and Effects on the Timeline
Every additional video layer, sticker, text animation, or effect filter that CapCut has to render simultaneously in the preview adds to the real-time processing load. There’s a ceiling to how much your device can handle at once.
Fix: While editing, temporarily disable or hide effects that aren’t critical for the current edit. Re-enable them before export. This keeps the preview light and responsive without affecting your final video.
Thermal Throttling
When a phone or laptop gets hot during intensive editing sessions, the processor automatically slows itself down to prevent damage — this is called thermal throttling.
It’s a safety mechanism, not a malfunction, but it causes noticeable slowdowns mid-session that often get mistaken for a software bug.
Fix: Take a short break and let the device cool down. Don’t edit with the phone charging and in a case at the same time — this traps heat.
On laptops, make sure the vents aren’t blocked. If overheating is a persistent problem during editing, it’s covered in more detail in our guide on CapCut errors and performance issues.
Why Does CapCut Take So Long to Download Templates and Assets?
CapCut’s template library, effects, stickers, music, and AI features all live on ByteDance’s servers.
When you tap to use a template or download an effect, CapCut makes a server request and downloads the asset in real time. Several things can make this feel painfully slow.
Your Internet Connection
This is the most obvious cause but worth stating clearly: CapCut’s cloud assets require a stable, reasonably fast connection.
It doesn’t need massive bandwidth, but it does need consistent connectivity. Packet loss and a weak signal affect CapCut’s asset downloads more than raw speed does.
Fix: Switch to a stronger Wi-Fi connection or move closer to your router. If you’re on mobile data, check your signal strength. A simple connection switch resolves slow downloads in the majority of cases.
Server Distance (Geographic Latency)
CapCut’s servers are primarily located in Asia. If you’re editing in Africa, South America, or Europe, every server request, every template load, every asset download, every auto-save sync, travels a long round-trip distance.
This adds latency to every interaction that requires a server call, which is more of CapCut’s workflow than most users realise.
This is a structural limitation rather than a fixable bug, but you can work around it by pre-downloading effects and assets while on a fast connection, and doing the actual editing offline where possible. See our guide on editing in CapCut offline for how to set this up.
CapCut Server Load
During peak usage times, CapCut’s servers handle requests from hundreds of millions of users simultaneously. This can cause slower-than-usual template loads and asset downloads that have nothing to do with your device or connection.
If CapCut suddenly feels sluggish across the board — downloads, AI features, template browsing — server load is a likely cause.
Fix: Try again at a different time. Early morning in your time zone is usually quieter. There’s no app-side fix for this one.
Why Does CapCut Take So Long to Upload to Space?
CapCut Space is CapCut’s built-in cloud storage feature, which lets you back up projects and access them across devices.
Uploading to Space is slow for the same reason any cloud upload is slow — your internet connection’s upload speed, which is typically much slower than download speed, is the bottleneck.
A project with multiple long video clips can be several gigabytes in size, and uploading that over a standard home connection takes time.
Geographic distance from CapCut’s servers also plays a role here, just as it does with template downloads — users further from ByteDance’s server infrastructure will experience slower upload speeds to Space.
Fix: Upload to CapCut Space when connected to the fastest Wi-Fi available, and do it when you don’t need the device for active editing — treat it like a background task.
If Space uploads are consistently very slow, consider whether you need to upload full-resolution source files or whether uploading the finished export is sufficient for your backup needs.
How to Make CapCut Faster: Quick Reference
| Where It’s Slow | Most Likely Cause | Fastest Fix |
|---|---|---|
| Export taking too long | Resolution/fps too high | Drop to 1080p / 30fps |
| Export taking too long | Too many AI effects / stabilization | Remove stabilization from non-essential clips |
| Export taking too long | Low storage space | Free up at least 2–3GB before exporting |
| Export taking too long | Background apps | Close all other apps before exporting |
| Laggy timeline/preview | High-res footage on weak hardware | Lower preview quality in settings |
| Laggy timeline/preview | Device overheating | Let device cool, remove case while editing |
| Slow template/asset download | Weak internet connection | Switch to stronger Wi-Fi |
| Slow template/asset download | Server distance or load | Pre-download assets, try at off-peak times |
Frequently Asked Questions
How long should CapCut take to export a video?
A rough benchmark: a 1–2 minute video at 1080p/30fps should export in 1–3 minutes on a modern mid-range phone. A 5-minute video at 4K/60fps can take 10–20 minutes even on capable hardware. If your export is taking significantly longer than these ranges, something is slowing it down — work through the causes above.
Why is CapCut so slow on my phone but fast on my friend’s?
The most likely reason is hardware difference. CapCut’s performance scales heavily with your device’s processor, RAM, and available storage. A flagship phone with 8GB+ RAM and a modern chipset will export the same project several times faster than a budget or mid-range phone. Export settings, background apps, and available storage also play a role.
Does turning on hardware acceleration make CapCut faster?
On desktop, hardware acceleration is designed to use your GPU to speed up exports — and on most modern machines it does. But on some older GPUs or with certain driver configurations, it can actually slow things down or cause instability. Go to Settings → Performance and test with hardware encoding on and off to see which is faster on your specific machine.
Why does CapCut get slower the longer I edit?
Two common reasons: accumulated cache slowing the app down over a long session, and thermal throttling as the device heats up. When your phone gets hot, the processor deliberately slows itself down to prevent damage — which makes CapCut feel increasingly sluggish mid-session. Clearing your cache regularly and taking short breaks during long editing sessions helps maintain consistent performance throughout.
Will lowering export quality make my video look worse?
For most social media use cases — TikTok, Instagram Reels, YouTube Shorts — the answer is no. These platforms compress uploaded videos anyway, which removes most of the visible difference between 4K and 1080p. Dropping from 4K to 1080p at 30fps cuts your export time dramatically with no noticeable quality difference once the video is live on a platform.
Why does CapCut take so long to load templates and effects?
CapCut’s templates and effects aren’t stored on your device — they’re downloaded from ByteDance’s servers on demand every time you tap them. On a slow connection, or if you’re geographically far from CapCut’s servers, each download takes longer. The fix is to browse and download effects while on a fast Wi-Fi connection before your session — once cached locally, they load much faster.
Why does reversing a clip in CapCut take so long?
Reversing isn’t a simple playback trick — CapCut has to fully re-encode the clip frame by frame in reverse before it can show you a preview. The longer and higher-resolution the clip, the longer this takes. Trim your clip to only the section you need reversed before applying the effect to significantly reduce the wait time.
How do I make CapCut export faster?
The most effective steps in order: drop your export resolution to 1080p and frame rate to 30fps, close all background apps before exporting, remove stabilization from clips that don’t need it, clear CapCut’s cache, and make sure you have at least 2–3GB of free storage on your device. On desktop, test whether toggling hardware encoding on or off in Settings → Performance makes a difference on your machine.
If none of these fixes improve performance, it’s worth checking the CapCut Help Center for platform-specific troubleshooting and newly documented issues before reinstalling the app.
