

Have you ever wanted to record your screen for a tutorial, app demo, online class, software walkthrough, or gameplay clip and wondered if CapCut could handle everything in one place?
That’s a fair question.
CapCut is already one of the most popular video editors for TikTok, YouTube, Instagram Reels, and short-form content. So it’s natural to assume it can record your screen too.
And today, the answer is yes.
CapCut Desktop includes a built-in screen recorder that can capture your screen, microphone, webcam, and system audio without needing separate recording software.
So the real answer depends on the device you’re using.
If you’re creating tutorials, software demonstrations, training videos, online lessons, gameplay clips, or walkthroughs, understanding how CapCut handles screen recording can save you a lot of time and frustration.
Table of Contents
- Can CapCut Screen Record?
- What Can CapCut's Screen Recorder Capture?
- How to Screen Record in CapCut Desktop
- Can CapCut Screen Record on iPhone?
- Can CapCut Screen Record on Android?
- Best Practices for Editing Screen Recordings in CapCut
- Common Screen Recording Problems (and How to Fix Them)
- Best Export Settings for Screen Recordings
- Frequently Asked Questions
- Conclusion
Can CapCut Screen Record?
Yes, CapCut can screen record.
The feature is built directly into CapCut Desktop, allowing you to record your screen without installing separate screen recording software.
According to CapCut’s official documentation, the desktop version can record:
- Your entire screen
- A selected window
- A custom screen area
- System audio
- Microphone audio
- Webcam footage
This makes CapCut useful for:
- Software tutorials
- Website walkthroughs
- Online classes
- Training videos
- Product demonstrations
- Presentation recordings
- Gameplay videos
- Educational content
If you’d like to verify the feature yourself, CapCut’s official screen recorder documentation confirms that screen recording is available within CapCut Desktop.
CapCut Official Screen Recorder Guide
For mobile users, the process is slightly different.
Rather than recording directly inside CapCut, you’ll usually record your screen using your phone’s built-in screen recorder and then edit the footage in CapCut afterward.
In practice, that’s the workflow most creators use anyway.
Where Is the CapCut Record Button Located?
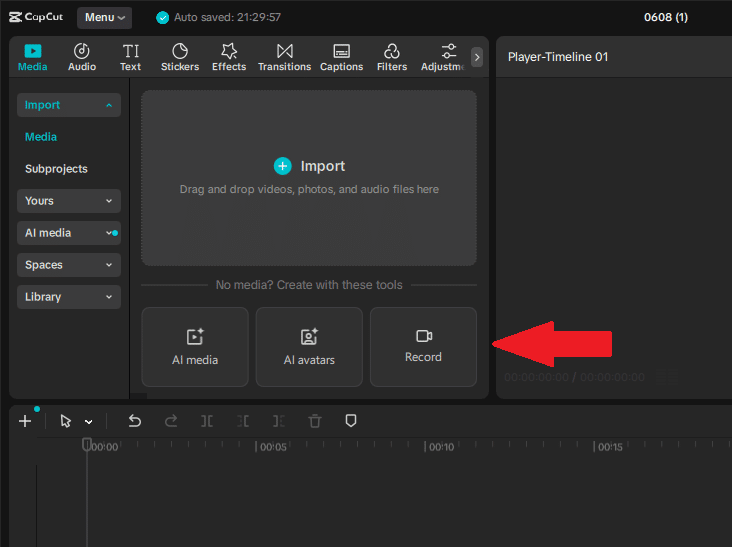
In CapCut Desktop, the Record button is easy to find on the main interface.
After opening CapCut and starting a new project, look in the top left area just below the main media import zone. You’ll see three prominent options: AI media, AI avatars, and Record. The Record button is the one on the far right.
Simply click Record → select Screen Recording, then choose your capture options (full screen, window, area, microphone, system audio, webcam, etc.).
(Tip: The screenshot below shows exactly where the Record button is located.)
This would fit perfectly right under the “Can CapCut Screen Record?” section and pairs nicely with the image you attached. Let me know if you want a slightly longer or shorter version!
What Can CapCut’s Screen Recorder Capture?
CapCut Desktop’s screen recorder is flexible enough for most recording tasks.
Depending on your setup, you can typically record:
- Full-screen activity
- A single application window
- A selected recording area
- Microphone narration
- Computer audio
- Webcam overlays
That flexibility is useful because different projects need different recording setups.
For example:
- A software tutorial may require an entire application window.
- A training course may benefit from webcam footage alongside the screen recording.
- A gameplay video may need both system audio and microphone commentary.
- A presentation recording may focus primarily on narration and slides.
Before recording, it’s worth checking your microphone and audio settings.
Nothing hurts more than finishing a perfect tutorial only to discover the microphone was muted the entire time.
How to Screen Record in CapCut Desktop
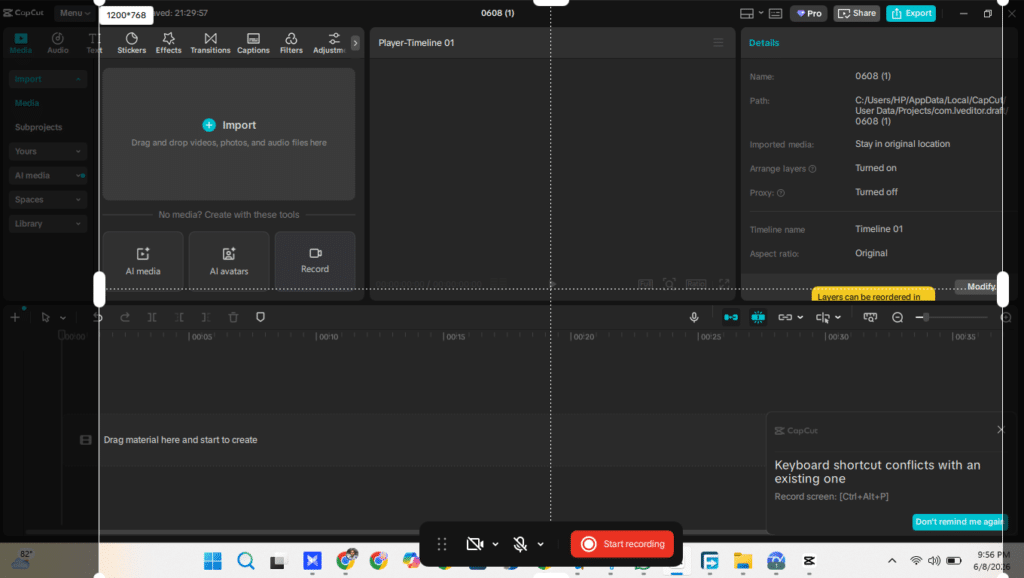
If you’re using Windows or Mac, recording your screen inside CapCut is surprisingly straightforward.
- Open CapCut Desktop.
- Create a new project or open an existing one.
- Locate the Record button (Top Left Area).
- Tap the Record buttom.
- Choose whether to record your full screen, a specific window, or a selected area.
- Enable microphone, system audio, webcam, or any combination you need.
- Click Start Recording.
- Perform the actions you want to capture.
- Stop the recording when finished.
- The recording will automatically be available for editing inside CapCut.
This workflow eliminates the need to record in one application and edit in another.
For tutorial creators, educators, and software reviewers, that’s one of the biggest advantages of using CapCut Desktop.
Can CapCut Screen Record on iPhone?
Not directly.
While CapCut is available on iPhone, it does not currently include a built-in screen recorder like the desktop version.
Instead, the easiest workflow is to use Apple’s built-in Screen Recording feature and then import the recording into CapCut for editing.
This approach is simple, reliable, and works well for tutorials, app demos, online classes, and social media content.
Here are the steps to follow: Take a screen recording on iPhone
Can CapCut Screen Record on Android?
Like iPhone, Android users will usually record their screen using the device’s built-in screen recorder and then edit the video in CapCut.
Most modern Android phones include screen recording in the Quick Settings panel, although the exact location varies depending on the manufacturer.
Here is the step for Android phones: Take a screenshot or record your screen on your Android device
For many creators, this workflow is actually easier because recording and editing remain separate, reducing the chances of technical issues during capture.
Best Practices for Editing Screen Recordings in CapCut
Recording your screen is easy. Turning that raw footage into a clear, professional, and enjoyable tutorial is where the real work happens.
The good news is that CapCut gives you all the tools you need — but applying the right practices makes the biggest difference.
Before You Record
Good editing starts before you even hit the Record button:
- Close unnecessary tabs and applications.
- Disable notifications to prevent interruptions.
- Plan your steps in advance so your tutorial flows naturally.
During Recording
- Narrate as you perform each action instead of explaining afterward. Viewers learn much faster when they can immediately connect what they hear with what they see.
- Speak clearly and stay focused.
After Recording: Editing in CapCut
Most raw screen recordings contain mistakes, pauses, loading screens, or unnecessary parts. Here’s how to polish them effectively:
Trim the Beginning and End
Viewers don’t need to watch you open apps, search for settings, or prepare your desktop. Cut straight to the useful content — a clean start significantly improves viewer retention.
Remove Mistakes and Dead Space
Split the clip and delete wrong clicks, repeated explanations, long pauses, and loading screens. Keep only the parts that help the viewer reach their goal.
Zoom Into Important Areas
Screen recordings often show tiny buttons, menus, and text. Use CapCut’s zoom effects to highlight key areas — this is especially helpful for mobile viewers.
Add Captions and Labels
Short text labels and captions make your tutorial easier to follow. They also improve accessibility for viewers watching without sound.
Blur Sensitive Information
Always review your recording before publishing. Blur or cut out:
- Email addresses
- Usernames
- Payment details
- Personal messages
- Account information
Clean Up the Audio
Reduce background noise, balance voice and system audio levels, and remove awkward pauses. Clear audio is just as important as clear visuals in tutorials.
Common Screen Recording Problems (and How to Fix Them)
Most screen recording problems are surprisingly easy to fix once you know what’s causing them.
Here are the issues creators run into most often when recording and editing screen captures in CapCut.
No Sound in the Recording
If your screen recording has no audio, the recording settings are usually the culprit.
Before recording, check whether your device is set to capture:
- Microphone audio
- System audio
- Both microphone and system audio
Keep in mind that some apps restrict internal audio recording due to privacy or copyright protections.
If your recording is completely silent, try creating a short test recording first before recording a longer tutorial.
The Screen Recording Looks Blurry
Blurry screen recordings usually come from one of three things:
- Low recording quality
- Heavy video compression
- Poor export settings
Start by recording at the highest quality available on your device.
When exporting from CapCut, choose at least 1080p whenever possible.
If your video still looks soft after exporting, our guide on why CapCut videos look blurry after export covers the most common causes and fixes.
Black Bars Around the Video
Black bars appear when the recording dimensions don’t match your project’s aspect ratio.
For example, a widescreen computer recording placed inside a vertical TikTok project will often create empty space above and below the video.
You can fix this by:
- Changing the project aspect ratio
- Resizing the recording
- Cropping strategically
- Using a blurred background
If you’re creating content for TikTok, Reels, or Shorts, our guide on how to change aspect ratio in CapCut explains the process step by step.
The Recording File Is Too Large
Screen recordings can become surprisingly large, especially if they’re long, recorded in high resolution, or captured at higher frame rates.
To reduce file size:
- Trim unnecessary footage
- Export at 1080p instead of 4K when appropriate
- Lower the bitrate slightly
- Compress the final file if necessary
If storage space is becoming a problem, check out our guide on how to reduce video file size in CapCut.
CapCut Feels Slow While Editing
Long screen recordings can be demanding, especially on phones and lower-powered devices.
If CapCut starts lagging:
- Close unused apps
- Free up storage space
- Trim the recording before adding effects
- Move the project to CapCut Desktop if possible
Large recordings can push mobile devices to their limits. If you’re working with lengthy tutorials or high-resolution recordings, our guide on whether CapCut can handle long videos and large files may help.
Best Export Settings for Screen Recordings
Once you’ve finished editing, the next step is exporting the video using settings that match where you’ll publish it.
For most tutorials, software walkthroughs, online classes, and educational content, you don’t need anything overly complicated.
These settings work well in most situations:
- Resolution: 1080p for most videos, 4K only if your original recording is 4K and extra detail matters.
- Frame Rate: 30fps for tutorials and presentations, 60fps for gaming and fast-moving content.
- Aspect Ratio: 16:9 for YouTube and desktop tutorials, 9:16 for TikTok, Reels, and Shorts.
- Format: MP4 for the best compatibility.
- Audio: Prioritize clear voice audio over background music.
If your tutorial contains small text, menus, settings pages, or buttons, avoid low-quality exports. Viewers should be able to read everything without squinting.
For a complete walkthrough, see our guide on the best CapCut export settings.
Frequently Asked Questions
Can CapCut record both screen and webcam at the same time?
Yes. CapCut Desktop allows you to record your screen and webcam simultaneously, making it useful for tutorials, presentations, reaction videos, online courses, and training content where viewers need to see both your screen and your face.
Does CapCut screen recording include system audio?
Yes, CapCut Desktop can record system audio. Depending on your setup, you can choose to capture computer audio, microphone audio, or both during the recording session.
Where are CapCut screen recordings saved?
Screen recordings created with CapCut Desktop are typically saved directly into your project or designated export location, depending on your recording settings. You can then edit the recording immediately inside CapCut without importing it manually.
Can you record gameplay with CapCut?
Yes. CapCut Desktop can be used to record gameplay, including the game window, full screen, microphone commentary, and webcam footage. Performance will depend on your computer’s hardware and the game being recorded.
Is CapCut screen recording free?
CapCut’s screen recording tools are generally available within the desktop application. However, feature availability can change over time, and some advanced tools may require a CapCut account or paid subscription depending on your region and version.
Can I edit a screen recording immediately after recording in CapCut?
Yes. One advantage of using CapCut Desktop’s built-in recorder is that the recording can be sent directly into the editor, allowing you to trim mistakes, add captions, zoom into important areas, enhance audio, and export the final video without switching software.
What is the best screen recording resolution for tutorials?
For most tutorials, 1080p provides the best balance between clarity and file size. If your tutorial contains small text, spreadsheets, code, or detailed interfaces, recording at a higher resolution may improve readability.
Can CapCut screen record a specific application instead of the entire screen?
Yes. CapCut Desktop provides options to record specific windows, applications, or your entire display, allowing you to focus only on the content you want viewers to see.
Conclusion
Yes, CapCut can screen record.
The easiest way to do it today is through CapCut Desktop’s built-in screen recorder, which can capture your screen, microphone, system audio, and webcam without needing separate software.
On iPhone and Android, you’ll usually record your screen using your device’s built-in recorder first and then edit the footage inside CapCut.
Once the recording is captured, CapCut gives you everything you need to turn it into a polished tutorial, walkthrough, training video, or software demo.
Trim the unnecessary parts, zoom into important details, clean up the audio, add captions, and export using settings that fit your platform.
That’s usually the fastest path from raw screen recording to a finished video your audience can actually follow.
