

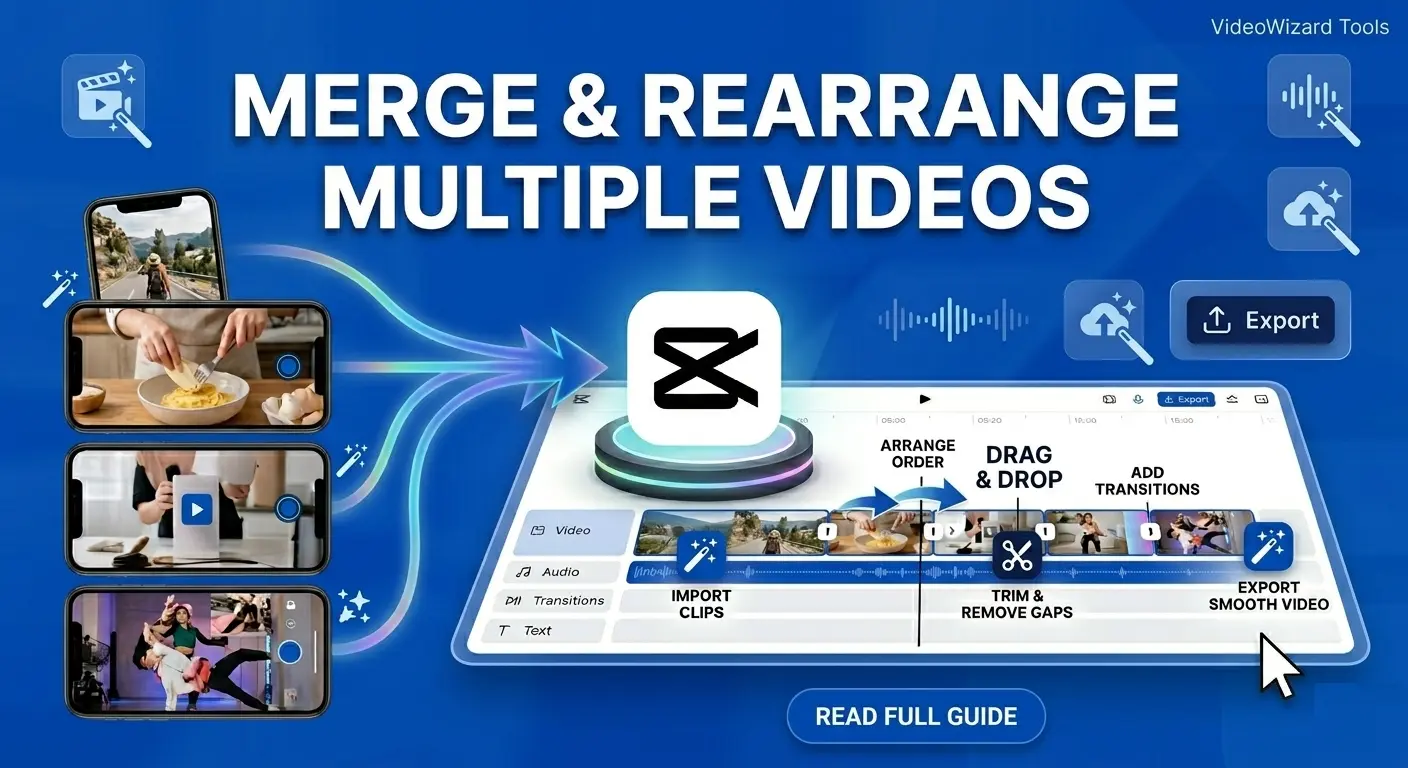
Have you ever recorded several clips and then realized they need to become one finished video?
Maybe you’re creating a TikTok, Instagram Reel, YouTube Short, travel montage, tutorial, or slideshow.
Whatever the project, working with separate clips can quickly become messy if they aren’t organized properly.
The good news is that CapCut makes it easy to combine multiple videos into a single project and export them as one finished file.
The feature works on CapCut Mobile, CapCut Desktop, and CapCut Online, so the process is available regardless of which version you’re using.
But simply putting clips together isn’t always enough. The order of your clips, trimming, audio, transitions, and export settings can all affect how professional the final video looks.
In this guide, you’ll learn how to merge videos in CapCut, arrange clips correctly, fix common issues, and export a smooth final video without losing quality.
Table of Contents
- Quick Steps: Merge Videos in CapCut
- Can You Merge Videos in CapCut?
- What Does "Merging Videos" Mean in CapCut?
- How Many Videos Can You Merge in CapCut?
- How to Merge Videos in CapCut Mobile
- How to Add More Videos to an Existing CapCut Project
- How to Merge Videos and Photos in CapCut
- How to Merge Videos in CapCut Desktop
- How to Merge Videos in CapCut Online
- How to Arrange Clips in the Right Order
- How to Trim Clips Before Merging Them
- How to Remove Gaps Between Merged Clips
- How to Add Transitions Between Videos in CapCut
- How to Merge Videos With Different Sizes or Aspect Ratios
- How to Fix Audio Jumps Between Merged Clips
- How to Merge Videos With Background Music
- How to Export Merged Videos Without Losing Quality
- Why Is My Merged Video File So Large?
- Common Problems When Merging Videos in CapCut
- Frequently Asked Questions
- Final Thoughts
Quick Steps: Merge Videos in CapCut
- Open CapCut.
- Create a new project.
- Select all videos you want to combine.
- Add them to the timeline.
- Arrange the clips in the correct order.
- Trim unwanted sections.
- Add transitions if needed.
- Preview the entire video.
- Export as a single video file.
Can You Merge Videos in CapCut?
Yes, CapCut allows you to merge multiple videos into one project.
You can combine two clips, ten clips, or even dozens of clips depending on your device’s performance and available storage. The feature works on CapCut Mobile, CapCut Desktop, and CapCut Online.
Once you export the project, CapCut creates a single video file that you can upload to TikTok, Instagram Reels, YouTube Shorts, Facebook, or anywhere else.
If you’re editing a large project with lots of clips, effects, and captions, you may also want to read Can CapCut Handle Long Videos and Large Files?.
What Does “Merging Videos” Mean in CapCut?
Some beginners think CapCut has a special merge button that automatically combines files together.
That’s not really how it works.
In CapCut, merging videos simply means placing multiple clips next to each other on the timeline and exporting them as one project.
Think of the timeline like a train.
Each clip is a train car. When you connect the cars together in the right order, they become one complete train. When you export the project, CapCut turns that train into a single video file.
This is why clip order, trimming, and transitions matter. They determine whether the finished video feels smooth or awkward.
How Many Videos Can You Merge in CapCut?
There is no fixed limit on the number of videos you can merge in CapCut.
The real limit depends on:
- Your device’s processing power.
- Available storage space.
- Video resolution.
- Project length.
- The number of effects, captions, and overlays used.
A modern phone or computer can usually handle dozens of short clips without issues. Very large projects with hundreds of clips may start to slow down, especially on older devices.
If CapCut becomes sluggish while editing, freeing storage can help. This guide explains why CapCut uses so much storage.
How to Merge Videos in CapCut Mobile
For most people, CapCut Mobile is the fastest and easiest way to combine videos but i personally prefer using CapCut Desktop.
Whether you’re using an iPhone or Android device, the process is nearly identical.
- Open CapCut.
- Tap New Project.
- Select all videos you want to merge.
- Tap Add.
- Arrange the clips in the desired order.
- Trim unwanted sections.
- Add transitions if needed.
- Preview the entire video.
- Export the finished project.
Before exporting, watch the full video from beginning to end.
Many editing mistakes only become obvious when clips meet each other. This is where you’ll spot awkward pauses, sudden jumps, audio issues, or clips that stay on screen too long.
How to Add More Videos to an Existing CapCut Project
You don’t need to start over if you forgot a clip.
CapCut allows you to add additional videos to an existing project at any time.
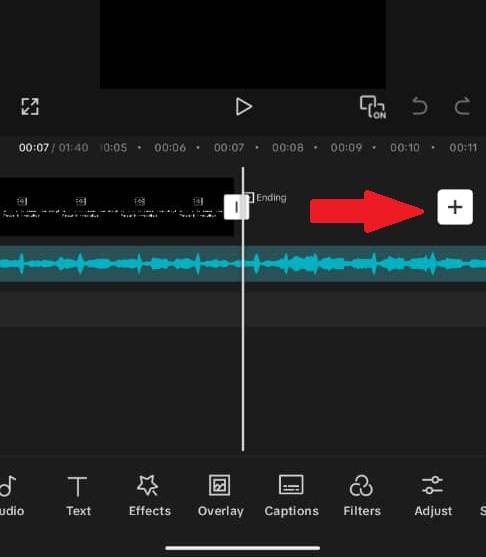
- Open your project.
- Move the playhead to the location where you want the new clip.
- Tap the Add button(The plus sign as shown in the image above).
- Select the new video.
- Insert it into the timeline.
- Drag it into the correct position if necessary.
If you’re working with many clips, selecting them can become difficult. This guide on how to select multiple clips in CapCut can help speed things up.
How to Merge Videos and Photos in CapCut
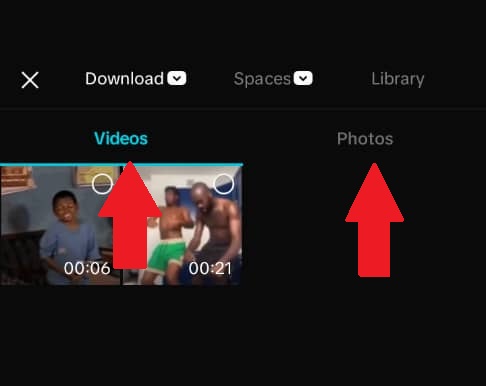
You are not limited to video clips.
CapCut can also combine videos and photos within the same project.
This is useful for:
- Travel slideshows.
- Before-and-after transformations.
- Product showcases.
- Family videos.
- Photo montages.
- Social media storytelling.
The process works exactly the same way.
- Create a new project.
- Select both videos and photos.
- Add them to the timeline.
- Arrange them in order.
- Adjust photo durations.
- Add transitions if desired.
- Export the project.
How to Merge Videos in CapCut Desktop
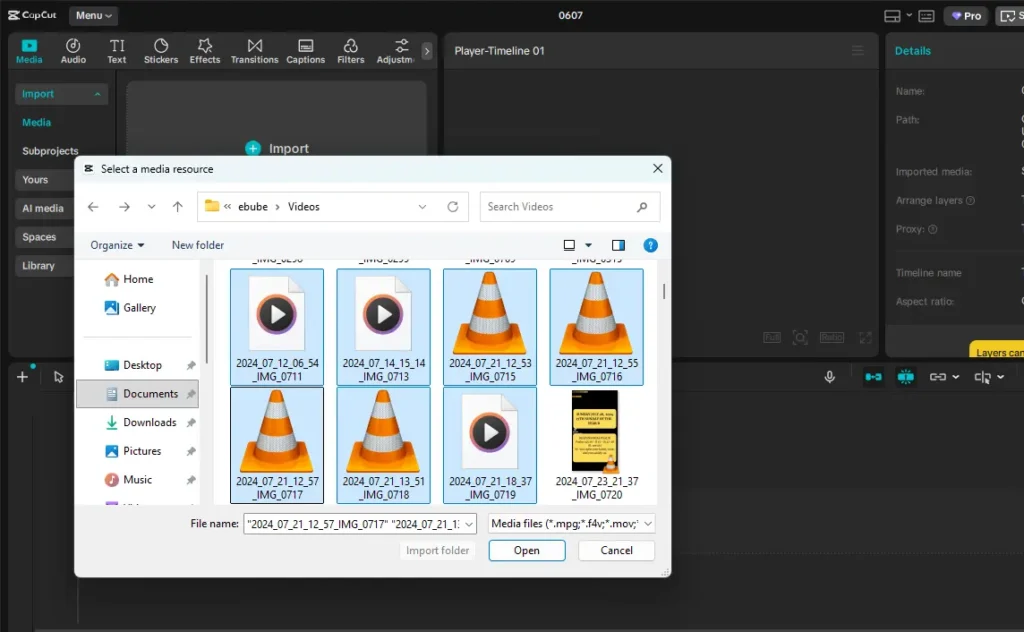
CapCut Desktop offers the same core workflow as the mobile app but gives you a larger timeline and more editing precision.
It’s often the better option for long-form content, YouTube videos, tutorials, and projects containing many clips.
- Open CapCut Desktop.
- Click Create Project.
- Import your video files.
- Drag them onto the timeline.
- Arrange them in the correct order.
- Trim or split clips as needed.
- Add transitions, captions, effects, or music.
- Preview the project.
- Export the final video.
The larger workspace makes it easier to spot gaps, adjust timing, and organize complex edits.
How to Merge Videos in CapCut Online
If you don’t want to install software, CapCut Online offers a browser-based alternative.
The workflow is almost identical to that of CapCut Desktop.
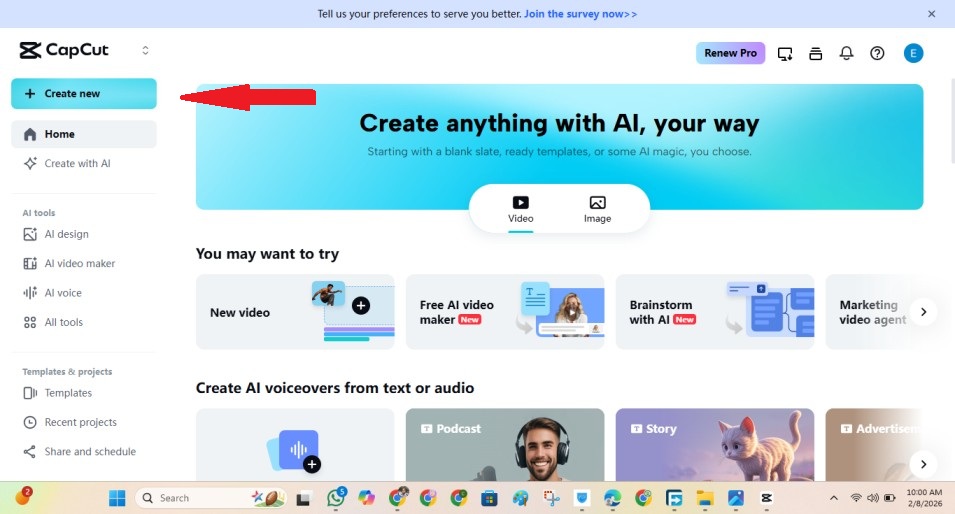
- Open CapCut Online.
- Create a new project.
- Upload your videos.
- Drag them onto the timeline.
- Arrange them in order.
- Trim and edit as needed.
- Preview the project.
- Export the final video.
CapCut Online works well for simple projects and quick edits.
However, larger projects may feel smoother in the desktop version because you’re not relying on browser uploads and internet speed.
If you’re unsure which version of CapCut is best for your workflow, see CapCut Online vs Desktop vs Mobile.
How to Arrange Clips in the Right Order
Before worrying about transitions, effects, or music, get the clip order right.
Good sequencing is what makes a video easy to follow.
In CapCut, simply press and hold a clip, then drag it left or right on the timeline until it sits where you want it.
A simple structure often looks like this:
- Opening hook.
- Main content.
- Supporting footage or details.
- Final result or reveal.
- Closing shot or call to action.
Ask yourself one question:
What should the viewer see first, second, and last?
Answering that usually makes the correct order obvious.
How to Trim Clips Before Merging Them
One of the biggest mistakes beginners make is merging clips without trimming them first.
Most videos contain a few seconds of dead space at the beginning or end. Someone reaches for the camera. The subject starts talking late. The action doesn’t begin until several seconds into the clip.
Those extra moments may seem small, but they add up quickly and can make the final video feel slow.
To trim a clip in CapCut:
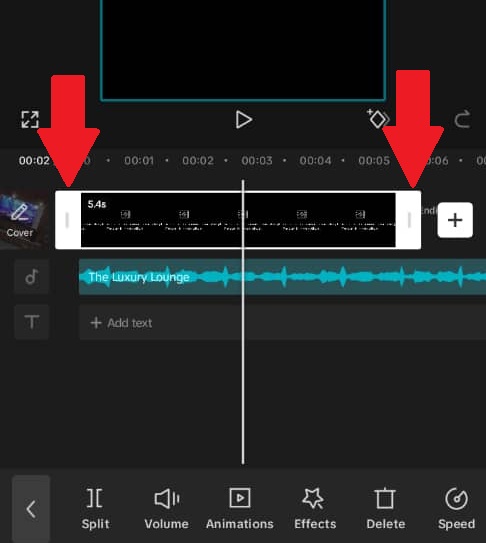
- Select the clip on the timeline.
- Drag the beginning edge inward to remove unwanted footage at the start.
- Drag the ending edge inward to remove unwanted footage at the end.
- Repeat for each clip before exporting.
A good rule is simple: if a section doesn’t add value, cut it.
The tighter your clips are, the smoother the finished video will feel.
How to Remove Gaps Between Merged Clips
If your video suddenly shows a black screen between clips, there is usually an empty gap on the timeline.
This happens when two clips aren’t touching each other.
To fix it:
- Zoom into the timeline.
- Locate the empty space between clips.
- Drag the second clip until it touches the first clip.
- Preview the section again.
Unless you’re intentionally creating a pause, your clips should sit directly next to each other.
Even a tiny gap can make the video feel unfinished.
How to Add Transitions Between Videos in CapCut
Transitions help clips flow together more smoothly.
CapCut includes dozens of transition styles, including fades, slides, zooms, blurs, spins, and flashes.
To add a transition:
- Locate the small transition icon between two clips.
- Tap or click it.
- Select a transition effect.
- Adjust the duration.
- Preview the result.
For most projects, less is more.
A simple fade or clean cut often looks better than stacking flashy effects between every clip.
Travel videos, montages, and social content may benefit from transitions, while tutorials and talking-head videos often look more professional with straightforward cuts.
If you want more creative editing techniques, check out CapCut Transitions for Reels and TikTok.
How to Merge Videos With Different Sizes or Aspect Ratios
Not every clip is recorded the same way.
You might have one vertical video, one horizontal video, and another clip downloaded from a different platform.
CapCut can combine them, but you’ll need to choose the correct canvas size first.
Common aspect ratios include:
- 9:16 — TikTok, Instagram Reels, YouTube Shorts.
- 16:9 — YouTube and landscape videos.
- 1:1 — Square social posts.
- 4:5 — Instagram feed posts.
After selecting the aspect ratio, review each clip individually.
You may need to:
- Resize clips.
- Reposition footage.
- Crop unwanted areas.
- Add a blurred background.
If aspect ratios are confusing, this guide on changing aspect ratios in CapCut explains the process in more detail.
How to Fix Audio Jumps Between Merged Clips
Visuals aren’t the only thing that need attention.
Audio differences between clips can make a video feel rough, even when the cuts look perfect.
One clip may be loud. Another may be quiet. A third may contain background noise or wind.
To smooth out audio:
- Play the video and listen carefully at each clip change.
- Lower overly loud clips.
- Increase quiet clips when necessary.
- Add fade-ins and fade-outs.
- Mute clips with distracting background noise.
Even a short audio fade can make transitions feel much more natural.
Viewers may not consciously notice it, but they’ll notice when it’s missing.
How to Merge Videos With Background Music
Background music can help multiple clips feel like one complete story.
Without music, merged videos can sometimes feel disconnected. With the right soundtrack, separate clips often feel more unified.
A simple workflow looks like this:
- Merge and arrange your clips.
- Trim unwanted sections.
- Add your music track.
- Lower the music volume if people are speaking.
- Align important cuts with the beat where possible.
- Fade the music at the end.
For tutorials and educational content, keep music subtle.
For TikToks, Reels, and montage videos, music often plays a larger role in pacing and engagement.
How to Export Merged Videos Without Losing Quality
Once your edits are finished, export settings become important.
Poor export settings can make a good edit look blurry, pixelated, or compressed.
For most creators, these settings work well:
- Resolution: 1080p.
- Frame Rate: 30fps or 60fps.
- Format: MP4.
- Bitrate: High quality when available.
If your original footage was recorded in 4K and your device can handle it, exporting in 4K may provide better results.
For a complete breakdown, see this Best CapCut Export Settings guide.
Why Is My Merged Video File So Large?
Many people are surprised when a merged project becomes much larger than expected.
That’s normal.
You’re combining multiple video files into a single export, often with music, captions, effects, transitions, and overlays included.
If the file becomes too large, try:
- Removing unused clips.
- Exporting in 1080p instead of 4K.
- Reducing bitrate slightly.
- Trimming unnecessary footage.
- Compressing the final video after export.
If storage or upload size is becoming a problem, this guide on reducing video file size in CapCut can help.
Common Problems When Merging Videos in CapCut
There Is a Black Gap Between Clips
This usually means there is empty space on the timeline. Drag the clips together until they touch.
The Clips Are in the Wrong Order
Press and hold the clip, then drag it left or right until it reaches the correct position.
One Video Looks Zoomed In
The clips likely use different aspect ratios. Resize or reposition the clip after selecting the correct canvas size.
The Audio Sounds Uneven
Adjust clip volumes individually and add short fades where necessary.
CapCut Won’t Import a Video
The file may be unsupported, damaged, stored in cloud-only storage, or too large for the device.
If import issues continue, check what file formats CapCut supports.
CapCut Becomes Slow During Editing
Large projects can strain device resources.
Try closing other apps, freeing storage space, lowering preview quality, or editing on desktop instead.
Frequently Asked Questions
How many videos can you merge in CapCut?
CapCut does not have a fixed limit on the number of videos you can merge. The practical limit depends on your device’s performance, available storage, project length, and the number of effects or overlays used.
Does merging videos in CapCut reduce quality?
Merging clips does not automatically reduce quality. However, exporting with low resolution or bitrate settings can make the final video appear blurry or compressed.
Why is there a black screen between my clips in CapCut?
A black screen usually means there is an empty gap between clips on the timeline. Drag the clips together so they touch, then preview the video again.
Can I merge vertical and horizontal videos in CapCut?
Yes. CapCut allows you to combine videos with different aspect ratios, but you may need to crop, resize, reposition, or add a blurred background for a consistent look.
Why is my merged video file so large?
Large file sizes are common when combining multiple clips, especially when exporting in high resolution. Reducing bitrate, trimming unnecessary footage, or exporting at 1080p instead of 4K can help.
Can I merge videos and keep the original audio?
Yes. CapCut keeps the original audio from each clip by default. You can also adjust volume levels, mute clips, or add background music after merging.
Why won’t CapCut import one of my videos?
This can happen if the file format is unsupported, the video is corrupted, stored only in cloud storage, or too large for your device to process properly.
Is CapCut Mobile or Desktop better for merging videos?
Both versions can merge videos effectively. Mobile is faster for quick edits, while Desktop provides more timeline space and control for larger projects.
Final Thoughts
Merging videos in CapCut is one of the easiest editing skills to learn, but a polished result comes from more than simply placing clips next to each other.
The real difference comes from the small details: trimming unnecessary footage, organizing clips in the right order, fixing audio inconsistencies, removing gaps, and choosing the correct export settings.
Whether you’re combining two short clips for TikTok or building a longer project for YouTube, the workflow is largely the same. Import your footage, arrange it on the timeline, clean up the transitions between clips, and export everything as a single video.
Take a few extra minutes to preview the finished project before exporting. Catching a bad cut, missing clip, audio jump, or aspect-ratio issue now is much easier than discovering it after you’ve already uploaded the video.
Once you understand how the timeline works, merging videos in CapCut becomes a quick and repeatable process you’ll use in almost every project.
